6. Cloud Disk
6.1 Overview of Cloud Disk
Cloud Disk is a block device that provides persistent storage space for virtual machines and database services based on a distributed storage system. It has an independent lifecycle, supports binding/unbinding to multiple virtual machines as needed, and can be expanded when storage space is insufficient. It is based on distributed network access and provides high-security, high-reliability, high-performance, and scalable data disks for cloud hosts.
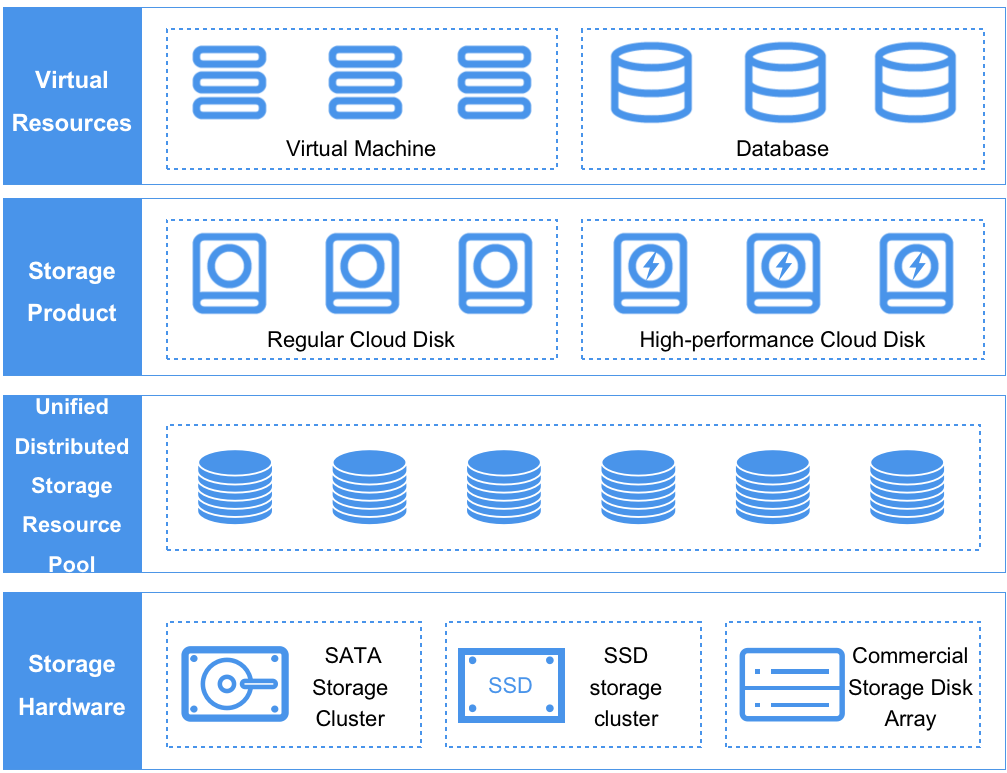
The storage system is compatible with and supports various underlying storage hardware such as general servers (compute-storage convergence or independent general storage servers) and commercial storage. The underlying storage hardware is abstracted into different types of storage resource pools for different types of clusters by the distributed storage system, which is uniformly scheduled and managed. In practical application scenarios, ordinary mechanical disks with SATA interfaces can be uniformly abstracted into [SATA storage clusters], and SSD full flash disks can be uniformly abstracted into [SSD storage clusters], which are encapsulated by unified storage and provided to platform users.
As shown in the diagram, the resources of the SATA storage cluster are packaged into ordinary cloud disks, and the resources of the SSD full flash storage cluster are packaged into high-performance cloud disks. Virtual machines and database services on the platform can mount disks of different storage cluster types according to their needs, and support mounting multiple types of cluster disks simultaneously. Cloud platform administrators can customize the alias of storage cluster types through the administrator console to identify storage clusters of different disk media, brands, performance or underlying hardware, such as EMC storage clusters, SSD storage clusters, etc.
Typically, the performance and capacity of SSD disk media cloud disks are linearly related, and the higher the capacity, the higher the IO performance provided. If there is a strong demand for IO performance, consider expanding the SSD disk media cloud disk.
The underlying data of distributed storage is stored by striping and PG mapping, and data security is ensured by storing multiple copies of the data, i.e., the data blocks written to the cloud platform storage cluster are simultaneously saved in multiple disks of different server nodes. The data stored by multi-copy storage provides consistency guarantee, but may cause inaccurate data due to misoperations or original data exceptions. To ensure data accuracy, the cloud platform provides disk snapshot capabilities to backup the data files and status of cloud disks at a certain point in time. In case of data loss or damage, data can be quickly restored through snapshots, including database data, application data, file directory data, etc., achieving recovery within minutes.
Cloud Disk is allocated from the storage cluster capacity by unified storage, providing block storage devices for platform virtual resources and sharing the capacity and performance of the entire distributed storage cluster. It also provides users with cloud disk resources and full lifecycle management through the block storage system, including creation, binding, unbinding, expansion, cloning, snapshot, and deletion of Cloud Disks.
- Supports cloud disk creation in seconds, with a minimum capacity of 10G and a step size of 1GB. The maximum capacity of a single cloud disk can be customized and supports up to 32000GB.
- Has an independent lifecycle and can be bound to any virtual machine freely. After unbinding, it can be remounted to other virtual machines.
- X86 architecture virtual machines support up to 25 cloud disks, while ARM architecture virtual machines support up to 3 cloud disks.
- Supports online and offline disk capacity expansion. After the disk storage capacity is expanded, the file system and partition in the virtual machine operating system need to be expanded.
- To ensure data security and accuracy, cloud disks only support disk expansion, not disk contraction.
- Supports cloud disk cloning, i.e., copying data in a cloud disk into a new cloud disk.
- Supports snapshot backup of cloud disks, including system disk snapshots of virtual machines and snapshots of elastic cloud disks, and can roll back data from snapshots to cloud disks for data recovery and restoration scenarios.
- Supports creating a cloud disk from a snapshot. The size of the created disk is equal to the original disk size of the snapshot. A cloud disk created from a snapshot can only belong to the same storage cluster as the original cloud disk corresponding to the snapshot and can create a virtual machine with a system disk snapshot.
- Supports configuring QoS for global and each cloud disk, and adjusts the disk performance according to different business models to balance the overall platform performance.
- Supports setting storage cluster type permissions, i.e., part of the storage resources can be set for tenant-exclusive use to meet the needs of scenarios requiring exclusive access to underlying storage resources.
Supports automatic thin provisioning. When creating a cloud disk, only the allocated logical virtual capacity is presented. When a user writes data to the logical storage capacity, actual capacity is allocated from physical space according to the storage capacity allocation strategy. For example, if a user creates a cloud disk with a capacity of 1TB, the storage system will allocate and present a logical volume of 1TB to the user. Actual physical disk capacity is only allocated when the user writes data to the cloud disk.
6.2 Creating a Cloud Disk
On the platform console, users can quickly create a cloud disk by specifying its type, capacity, and name as a data disk for a virtual machine. Before creating a cloud disk, make sure that the account balance and disk quota are sufficient.
1、Enter the disk resource console through the console, click on the “Create Disk” button to enter the cloud disk creation wizard page, as shown below, select and configure disk types, disk capacity, disk names, disk keys and other parameters according to your needs.
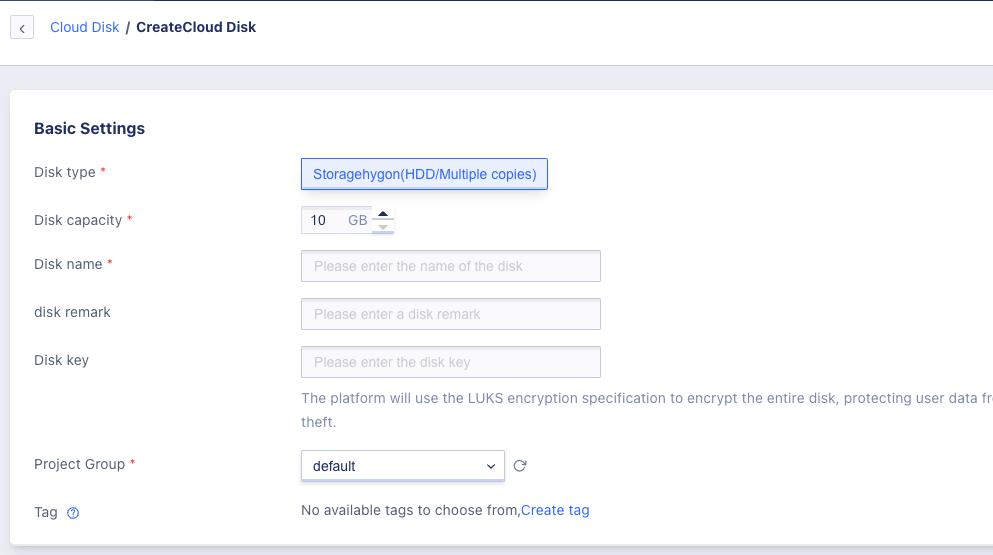
- Disk Type: the type of the cloud disk, which refers to the storage cluster type defined by the platform administrator, such as HDD cloud disk or SSD high-performance cloud disk.
- Disk Capacity: the logical capacity assigned to the cloud disk, with a default minimum of 10GB, a step size of 1GB, and a maximum support of 32000 GB. The cloud platform administrator can customize the capacity specifications in the console.
- Cloud Disk Name: the name of the cloud disk to be created.
- Disk Key: if a key is entered, the disk will be encrypted.
2、Select the purchase quantity and payment method, confirm the order as shown below, and click “Buy Now” to purchase and create the cloud disk:
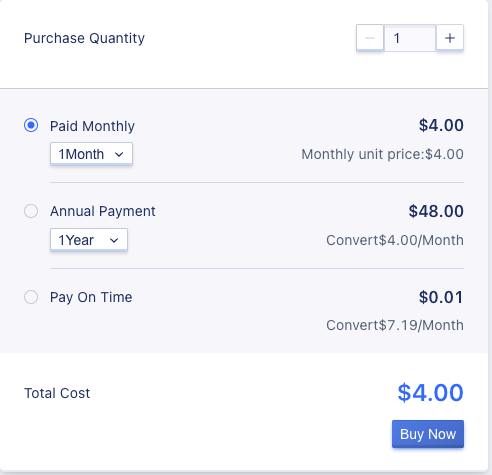
- Purchase Quantity: select the number of cloud disks to be created, and up to 10 cloud disks of the same specification can be created in batches at a time.
- Payment Method: choose the billing method for the virtual machine, supporting three methods: hourly, yearly, and monthly. Choose the appropriate payment method according to your needs.
- Total Cost: shows the cost of creating cloud disk resources according to the payment method selected by the user.
- Buy Now: After clicking “Buy Now”, the cloud disk resource list page will be displayed, where users can view the creation process of the cloud disk. After the creation is successful, the status of the cloud disk will be displayed as “Unbound”.
6.3 Viewing Cloud Disks
By accessing the virtual machine control panel through the navigation bar and switching to the disk management page, you can view a list of cloud disk resources and their detailed information for the current account, including name, resource ID, status, cluster type, disk capacity, bound resources, billing method, creation time, expiration time, project group, and operation options, as shown in the following figure:
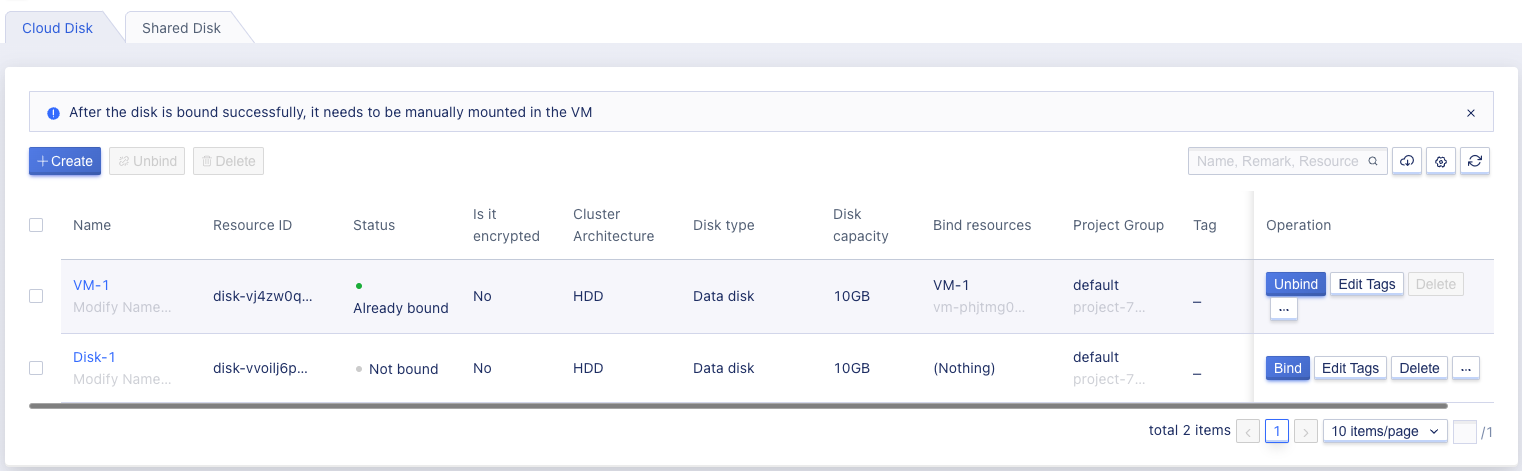
- Name/ID: The name and globally unique identifier of the cloud disk.
- Status: The current status of the cloud disk, including creating, unbound, binding, bound, unbinding, cloning, and deleting, where “cloning” means that the disk is currently being cloned, and “snapshotting” means that the disk is currently being backed up by snapshot.
- Encryption: The encryption status of the disk.
- Cluster Type: The type of cloud disk, which represents the storage cluster type and is defined by the platform administrator, such as HDD or SSD.
- Disk Capacity: The capacity of the cloud disk, in GB.
- Bound Resources: The name and ID of the virtual machine to which the cloud disk is bound, or empty if not specified.
- Billing Method: The billing method specified when creating the cloud disk, such as monthly, yearly, or hourly.
- Creation Time/Expiration Time: The creation time and expiration time of the cloud disk’s billing cycle.
- Project Group: Information about the current project group of the cloud disk.
The operations listed in the operation column are for individual disks, including binding, unbinding, expanding, cloning, snapshotting, and deleting. You can search and filter the disk list using the search box, which supports fuzzy searching.
To facilitate tenants in managing and tracking their disk resources, the platform supports downloading a list of all disk resources owned by the current user in Excel format. It also supports batch unbinding and deleting of disks.
6.4 Binding Cloud Disks
Binding refers to mounting a cloud disk to a virtual machine to add a data disk for data storage.
- Only disks in the “unbound” state can be bound. To ensure data security, each cloud disk can only be bound to one virtual machine at a time.
- Cloud disks have regional (data center) properties and can only be bound to virtual machines in the same data center that are either shut down or running.
- X86 architecture virtual machines can bind up to 25 disks, while ARM architecture virtual machines can bind up to 3 disks.
You can perform disk binding operations by selecting the “Binding” function in the disk management resource list operation items, as shown below:
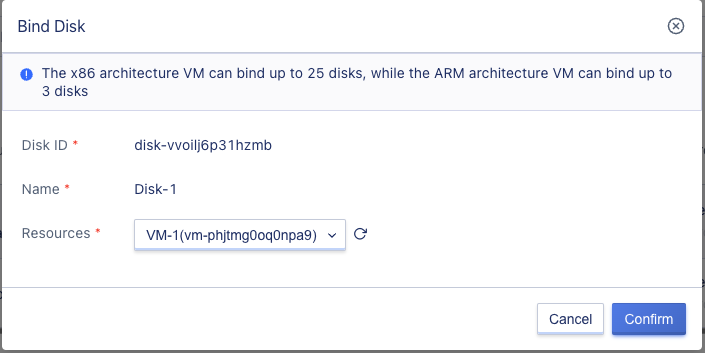
When binding, you need to select the virtual machine to which the disk will be bound. During the binding process, the status of the disk is “binding.” When the status changes to “bound,” it means that the binding was successful. Users can view the cloud disk resources and information that have been bound, including capacity and mount points, through the virtual machine’s disk information. Users can also log in to the virtual machine’s operating system to verify if the new disk device has been recognized. For example, Linux users can enter fdisk -l to view information about the new block device.
By default, cloud disks are not formatted (if required) or mounted after binding. Users need to log in to the virtual machine’s operating system that has been mounted to format and mount (mount) the cloud disk according to their needs. For information about formatting and mounting data disks within the operating system, see Formatting and Mounting Data Disks.
6.5 Unbinding Cloud Disks
Unbinding cloud disks involves separating the cloud disk from the virtual machine. Unbound cloud disks can be rebound to other virtual machines, and data on unbound cloud disks will not be lost. After remounting to a new virtual machine, you can directly use the data on the cloud disk.
Only bound disk resources can be unbound. Users can perform the unbinding operation through the disk list or the hard disk page of the bound virtual machine’s details, as shown below:
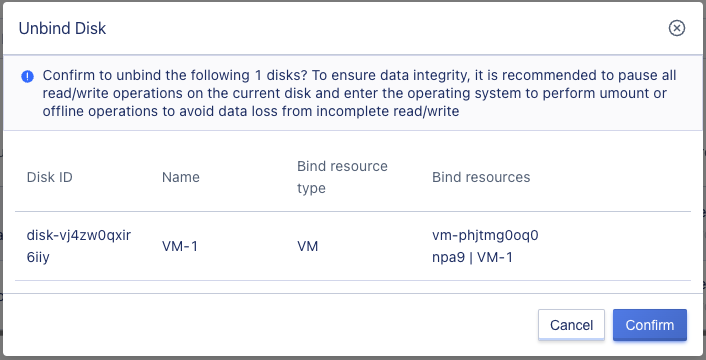
The virtual machine must be in a shutdown or running state during the unbinding process. During the unbinding process, the status of the cloud disk changes to “unbinding.” When the status changes to “unbound,” it means that the unbinding was successful, and the disk can be rebound to another virtual machine.
To ensure data integrity before the unbinding operation, it is recommended to pause all read-write operations to the file system for the current disk and enter the operating system to perform the
umountor offline operation (Linux systems need to confirm that the file system corresponding to the disk has beenumount; Windows systems need to confirm the disk is taken offline in Disk Management), to avoid file system damage or loss caused by forced unbinding of the cloud disk.
6.6 Formatting and Mounting Data Disks
After successfully mounting a cloud disk to a virtual machine, it needs to be formatted before data can be read and written. This section mainly describes how to create a single partition data disk using a new cloud disk. The way Linux virtual machines and Windows virtual machines use cloud disks after formatting is different. After formatting, the Linux virtual machine needs to be mounted into a directory of the file system for use, while the Windows virtual machine needs to initialize the disk, partition, and format it before normal use.
Formatting and partitioning disks have certain risks, and the data in the cloud disk will be cleared after formatting. Please proceed with caution.
6.6.1 Linux Virtual Machine
The cloud disk device name mounted on the Linux virtual machine is assigned by the system by default, starting from /dev/vdb and incrementally increasing up to /dev/vdz. In this example, a cloud disk of 100GB is mounted to the Linux virtual machine with the device name /dev/vdb. The specific operation steps are as follows:
- Create a cloud disk and mount it to a Linux virtual machine, then connect to and log in to the virtual machine via SSH.
- Use the
fdisk -lcommand to check the cloud disk on the virtual machine, and verify whether it has been mounted successfully. In the following image, the mounted data disk is a 100GB/dev/vdbdevice.

- Create a file system using the
mkfs.ext4 /dev/vdbcommand to format and create a new file system for the partition. Partition formatting can be of various file systems such asext3,ext4, and so on. This example uses theext4format.
[root@localhost ~]# mkfs.ext4 /dev/vdb
mke2fs 1.42.9 (28-Dec-2013)
Filesystem label=
OS type: Linux
Block size=4096 (log=2)
Fragment size=4096 (log=2)
Stride=0 blocks, Stripe width=0 blocks
655360 inodes, 2621440 blocks
131072 blocks (5.00%) reserved for the super user
First data block=0
Maximum filesystem blocks=2151677952
80 block groups
32768 blocks per group, 32768 fragments per group
8192 inodes per group
Superblock backups stored on blocks:
	32768, 98304, 163840, 229376, 294912, 819200, 884736, 1605632

Allocating group tables: done
Writing inode tables: done
Creating journal (32768 blocks): done
Writing superblocks and filesystem accounting information: done
- Mount the data disk, create a mount point directory
/data, then use themount /dev/vdb /datacommand to mount the new partition. Usedf -hto verify if the cloud disk has been mounted successfully.
[root@localhost ~]# mkdir /data
[root@localhost ~]# mount /dev/vdb /data
[root@localhost ~]# df -h
Filesystem      Size  Used Avail Use% Mounted on
/dev/vda1        20G  874M   18G   5% /
tmpfs           1.9G     0  1.9G   0% /dev/shm
/dev/vdb         99G  188M   94G   1% /data
- Configure automatic mounting during startup by adding the mount information of the cloud disk to
/etc/fstab, as follows:
echo '/dev/vdb /data ext4 defaults 0 0' >> /etc/fstab
- The disk is now mounted successfully, and can be used normally. If the cloud disk is unbound in the console and rebound to the virtual machine, the command
mount /dev/vdb /dataneeds to be executed again, or the virtual machine needs to be restarted for automatic mounting. - If the cloud disk is unbound in the console and bound to another Linux virtual machine, perform the mounting operation according to steps 4-5.
6.6.2 Windows Virtual Machine
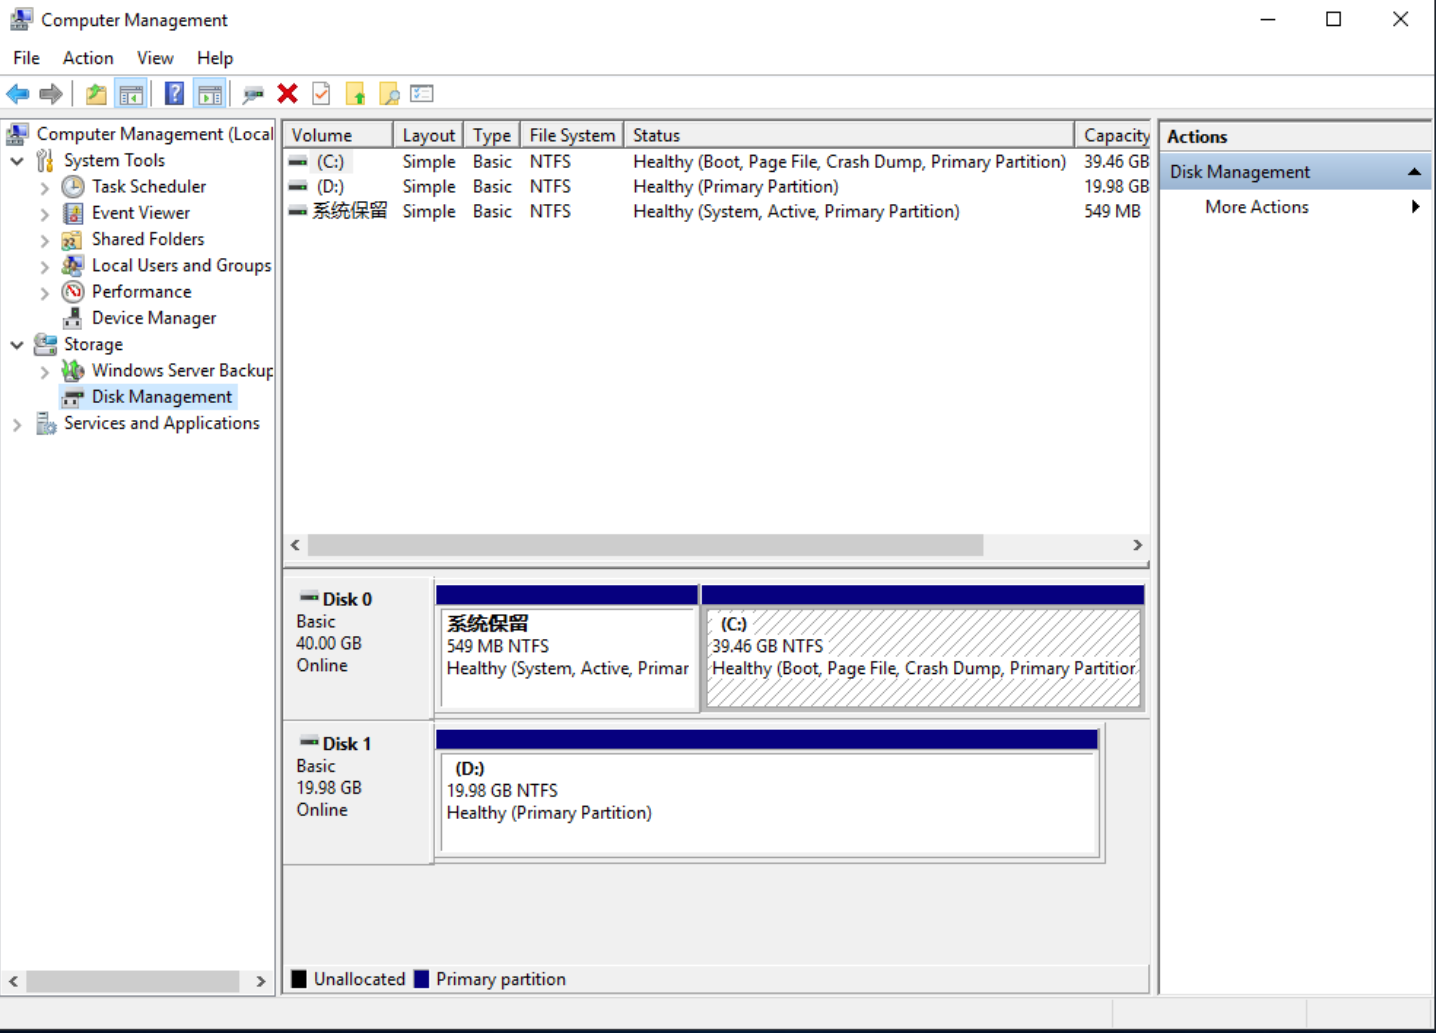
After mounting a cloud disk to a Windows virtual machine, initialization and formatting partition operations need to be performed before it can be used normally. The Windows operating system can enter the “Disk Management” interface to perform partitioning and formatting operations. This chapter takes Windows 2012 R2 as an example for formatting and partitioning operations as follows:
- Create a cloud disk and mount it to a Windows virtual machine. Connect to the virtual machine via VNC or Remote Desktop and log in.
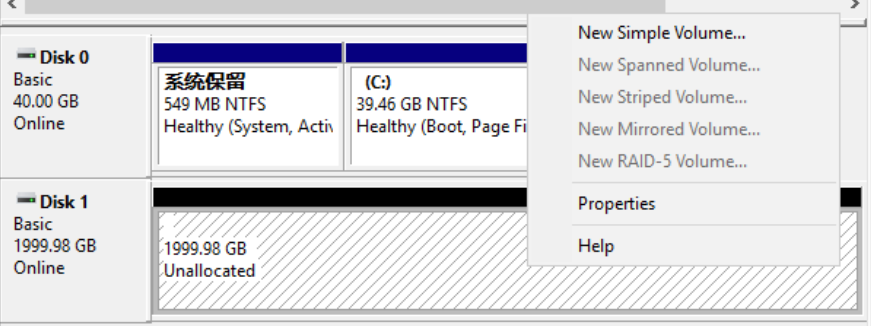
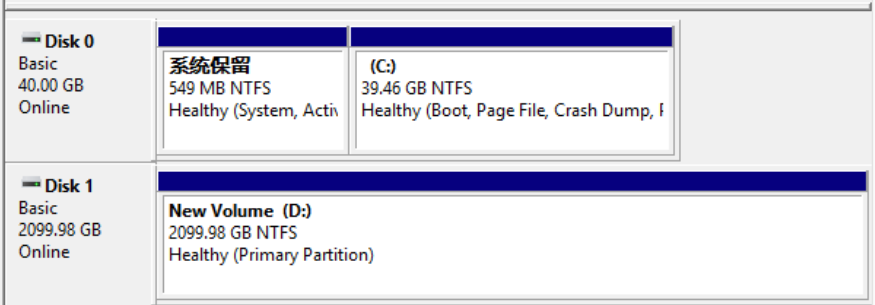
- Click 【Start】-【Administrative Tools】-【Computer Management】-【Disk Management】to open the “Disk Management” interface and view the mounted cloud disk, such as Disk 1 shown in the following figure:
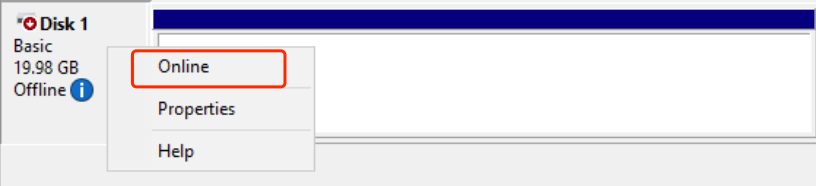
- Right-click on Disk 1 and select 【Online】, as shown below:
- Right-click on Disk 1 and select 【Initialize Disk】to enter the disk initialization wizard interface, as shown below:
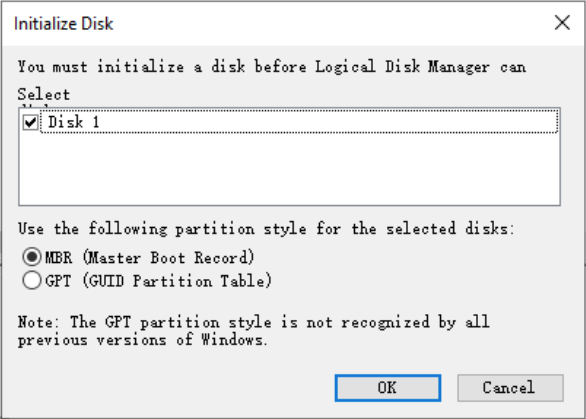
- Depending on the different partition types, select 【GPT】or【MBR】and click the 【OK】button;
- MBR is currently the most commonly used partition type, supporting data disks not larger than 2 TB, and only supporting up to 4 primary partitions. If you want to divide the disk into more partitions, you need to use one of the primary partitions as an extended partition and create logical partitions within it.
- GPT is a new partition type. Early versions of Windows could not recognize this partition type. The data disk capacity that GPT can handle depends on the operating system and file system. In Windows operating systems, GPT can support up to 128 primary partitions.
- To partition the disk, right-click on the unallocated area to the right of Disk 1 and select 【New Simple Volume】to enter the new simple volume wizard interface, as shown below:
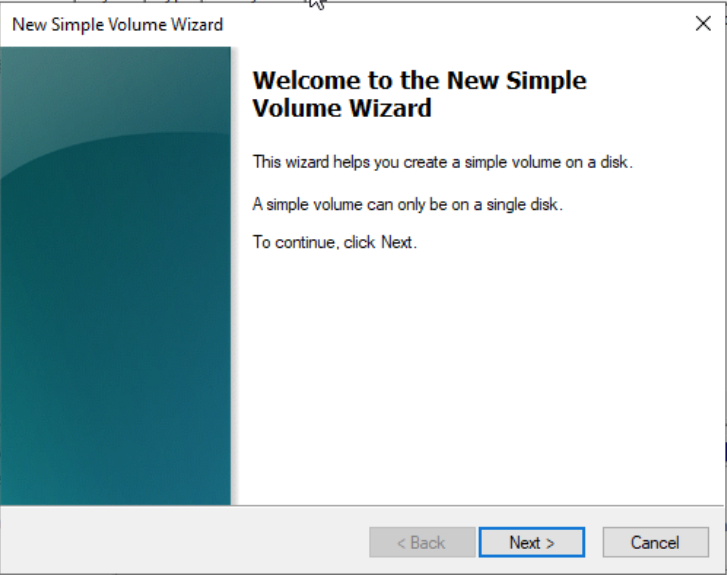
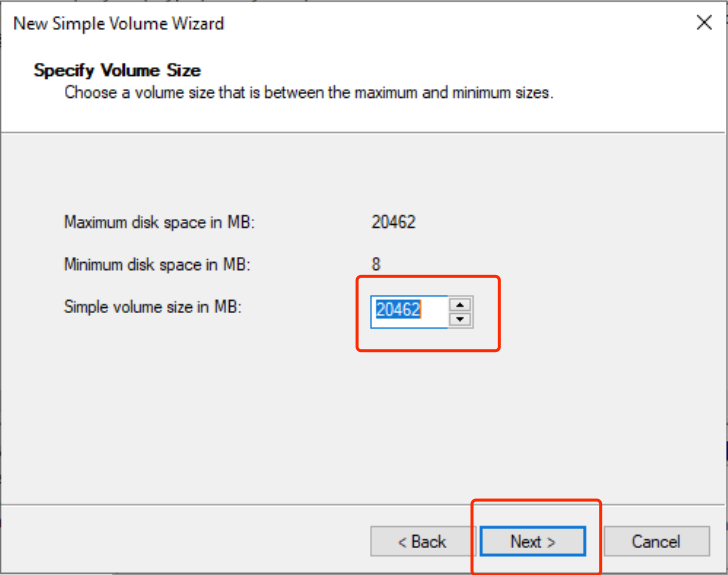
- Click Next, enter the required size for the partition. If only one partition is needed, use the default value and click Next.
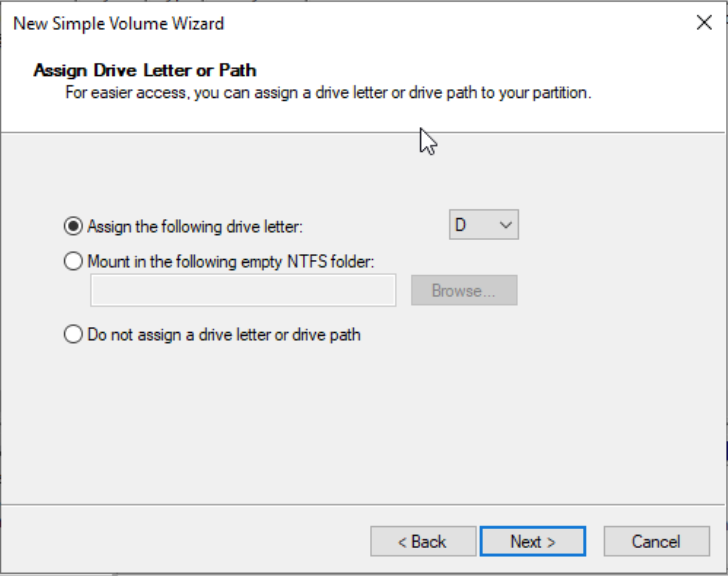
- Assign a drive letter and path, select a drive letter (i.e., disk letter), such as D in this example, and click Next.
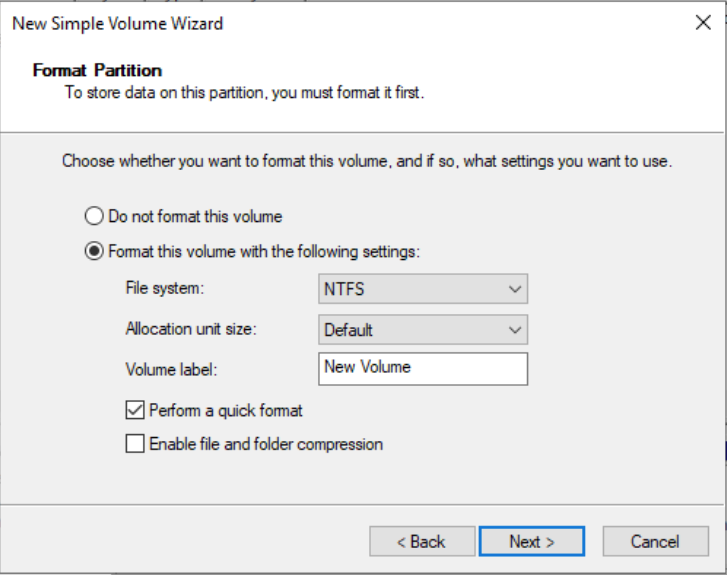
- Format the partition, select the format settings, including file system, allocation unit size, and volume label. Confirm whether to perform quick format and enable file and folder compression. Use the default settings here and click Next.
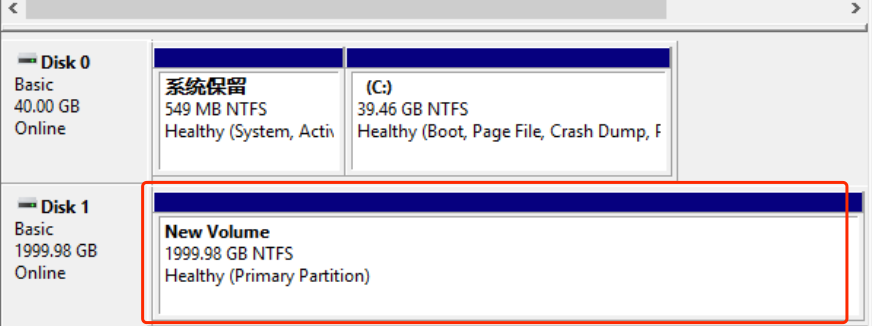
- Click Finish to begin creating a new simple volume. Return to the Disk Management tool, where

6.7 Expand Cloud Disk
6.7.1 Expand Disk Capacity
The platform supports expanding the capacity of cloud disks for users to adapt to scenarios where disk capacity needs to be increased due to changes in business requirements. The platform only supports expanding disk capacity, not reducing it. There are two ways to expand disks: online and offline:
- Online means expanding the capacity of a cloud disk bound to a running virtual machine;
- Offline means expanding the capacity of a cloud disk bound to a virtual machine that is either not bound or in a shut-down state.
The range of disk capacity expansion is the specification of the current disk type, defaulting to 10GB~32000GB. Platform administrators can configure disk specifications in the global configuration of the platform management background.
Expanding disk capacity will affect the cost of the virtual machine. For disks charged by the hour, the expanded capacity will be charged according to the new configuration in the next billing cycle; for disks charged annually or monthly, the expanded capacity will take effect immediately, and the difference will be automatically compensated proportionally. Users can click “Expand” in the cloud disk control panel operation to expand the disk capacity, as shown below:
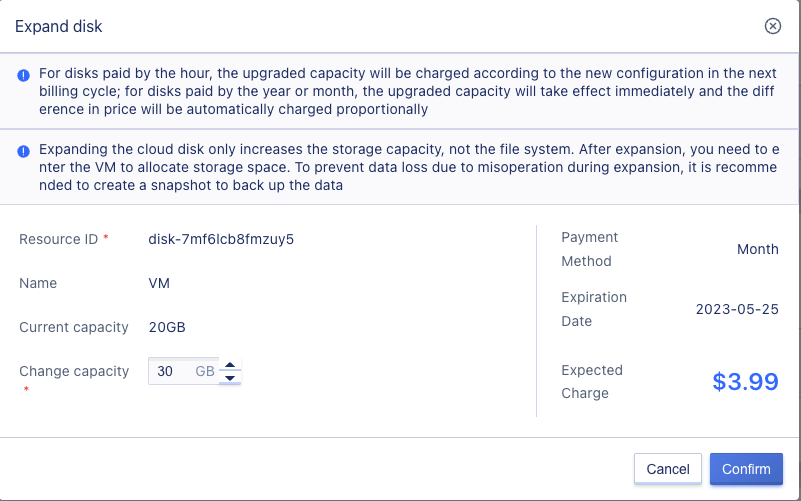
As shown in the figure, expanding the disk requires specifying the size of the changed capacity, which is the capacity that the disk needs to be expanded. The current size of the disk is already displayed on the platform, and since it does not support reduction, the changed capacity must be greater than the current capacity.
Users can view the new capacity of the disk through the disk list or virtual machine disk information; if the disk is bound to a virtual machine, users can also log in to the operating system of the virtual machine to view the capacity of the bound disk device. For example, Linux OS users can enter fdisk -l to view the information of the newly added block device.
Since MBR format partitions do not support disk capacities larger than 2TB, if the disk to be expanded uses MBR partition format and needs to be expanded to a capacity of 2TB or more when expanding the cloud disk, it is recommended to create and mount a new disk, use the GPT partition method, and copy the data to the new disk.
The expansion operation only increases the block device capacity of the disk, and does not expand the file system and partition in the operating system. After successful capacity expansion, you need to enter the virtual machine operating system that is mounted to carry out partition expansion or new partition operations, as detailed in [6.7.2 Disk Partition Expansion].
6.7.2 Disk Partition Expansion
After expanding the disk capacity, you need to enter the operating system to expand the disk partition, that is, to expand the file system to enable the operating system to use the expanded disk capacity normally. Different operating systems have different methods for partition expansion. For example, Linux typically uses the fdisk or parted tool, while Windows typically uses its built-in disk management tool. Depending on the different disk expansion scenarios, partition expansion can generally be divided into the following scenarios:
- Bare disk expansion (Linux)
- Single partition disk expansion (Linux)
- Single partition disk expansion (Windows)
- Multi-partition disk expansion (Linux)
- Multi-partition disk expansion (Windows)
- 2TB hard disk partition expansion (Linux)
- 2TB hard disk partition expansion (Windows)
6.7.2.1 Expanding a Raw Disk (Linux)
A raw disk refers to a cloud disk that has not been partitioned. After the cloud disk is mounted to the host, it can be directly formatted for use. Users can expand the capacity of the raw disk by entering the operating system and performing the expansion operation.
A raw disk only supports formatting and use in Linux systems. Windows must be formatted and partitioned before it can be mounted.
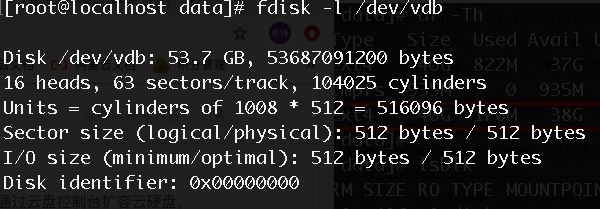
This example uses CentOS 6.5 operating system (kernel version 2.6.32-431.el6.x86_64) as the example environment version. The cloud disk size is 40GB and is expanded to 50GB. The mount point is /dev/vdb. Actual operations may vary based on the actual situation.
-
View current disk information, including mount points, file system types, and partition information.
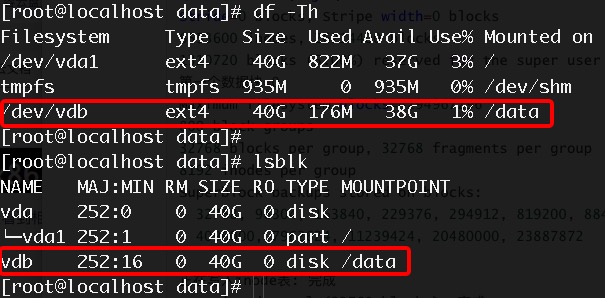
Note: The result shows that the vdb disk is an ext4 partition with no sub-partitions, which is a raw disk that can be expanded according to the method described in this document. If there are sub-partitions under vdb, please refer to the Single Partition Expansion or Multi-Partition Expansion section.
-
Expand the capacity of the hard disk through the console or API, and check the capacity of the disk in the operating system, as shown in the figure below, expanded to 50GB;
-
Unmount the disk and perform a file system expansion operation. Different file systems have different commands for expanding. This document provides examples of how to expand ext4 and xfs file systems respectively.
-
To expand the ext4 file system, execute
resize2fs /dev/vdbto expand the system disk, then remount the disk.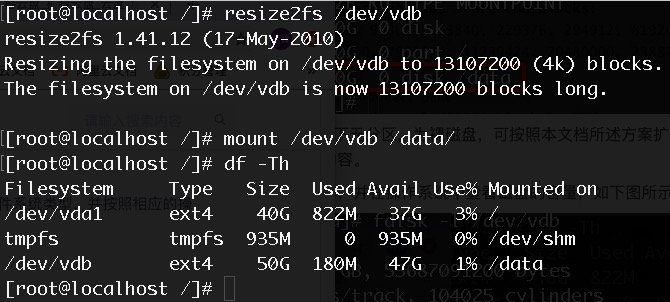
As shown in the figure above, after expanding and mounting the disk, the capacity displayed in the /data directory is the expanded 50GB.
-
If the disk has an xfs file system, execute the
xfs_growfs /data/command to expand the disk partition.
Note: Expanding the xfs file system requires mounting the disk in the operating system before operation.
6.7.2.2 Expanding a Single Partition (Linux)
A single partition disk refers to a cloud disk that has been mounted to a virtual machine before expansion and only has one partition. After expanding the capacity of the hard disk, users can enter the operating system to expand the partition capacity of the single partition disk. The operations for single partition expansion on Linux and Windows operating systems are different. This section is a guide to expanding a single partition disk on Linux.
This example uses CentOS 6.5 operating system (kernel version 2.6.32-431.el6.x86_64) as the example environment version. The cloud disk size is a 10G single partition, expanded to 20GB, and the mount point is /dev/vdb1. Actual operations may vary based on the actual situation. If there are multiple partitions on the disk, please refer to the Multi-Partition Expansion section.
This operation example assumes that the disk capacity is less than 2TB. If the disk capacity is greater than 2TB, please refer to the 2TB Disk Partition Expansion (Linux).
-
Use
lsblkto check the current disk information, including mount points, file system types, and partition information.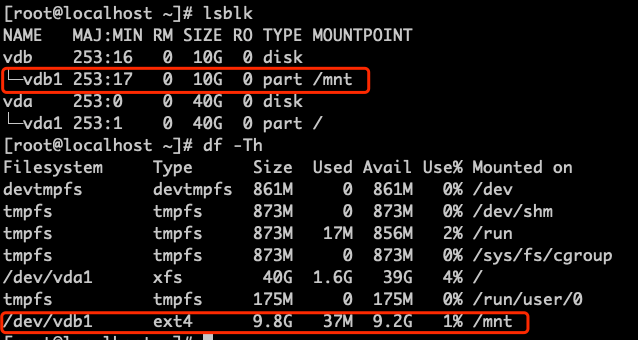
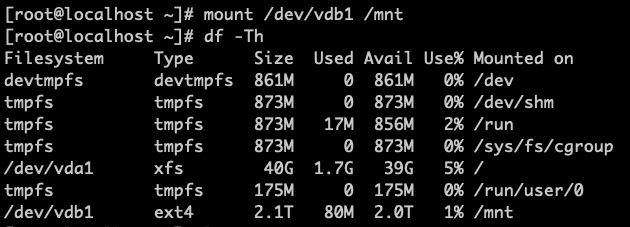
Note: The result shows that there is only one 10GB partition under vdb, the partition format is ext4, and it is mounted to the
/mntdirectory. -
Expand the capacity of the hard disk through the console or API, and check the expanded disk capacity in the operating system through fdisk or lsblk.
-
Unmount the disk in the operating system and use the
fdisk /dev/vdbcommand to delete the original partition and create a new partition.
Note: Deleting partitions will not cause data loss in the disk.
-
Check the file system and perform a file system expansion operation. Different file system expansion commands have different operations. In this article, ext4 and xfs file systems are used as examples for expansion operations.
-
For ext4 file system expansion, execute
e2fsck -f /dev/vdb1andresize2fs /dev/vdb1to check and expand the file system.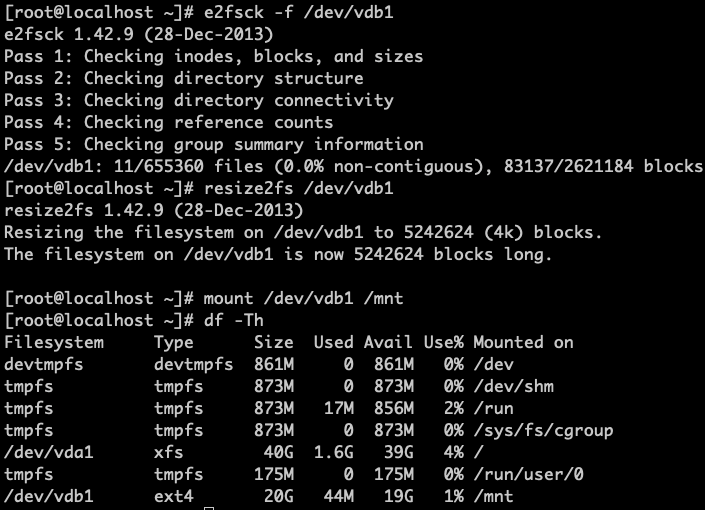
The following image shows the successful expansion of the partition. After expanding the partition, remount the partition and check its size and related information.
-
If the disk uses the xfs file system, first execute
xfs_repair /dev/vdb1to check the file system, as shown in the following image: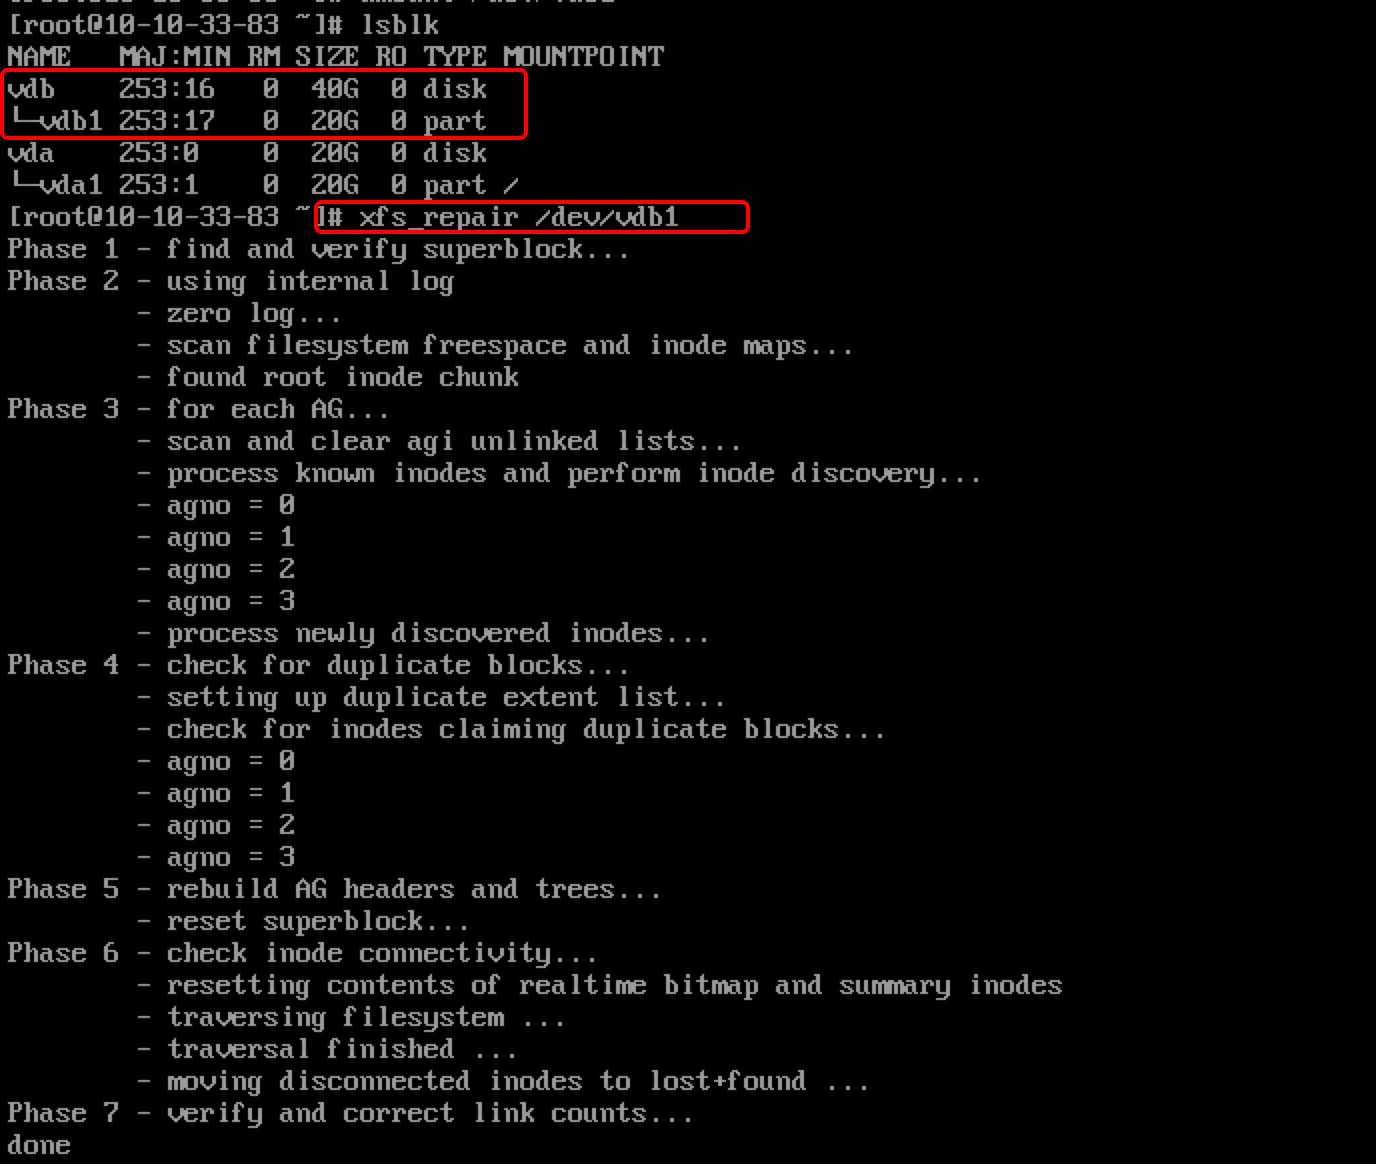
Finally, remount the disk using mount and execute
xfs_growfs /mntto expand the disk partition.
6.7.2.3 Single Partition Expansion (Windows)
A single partition disk refers to a cloud disk that has been mounted to a virtual machine before expansion and has only one partition. After expanding the capacity of the hard disk, users can enter the operating system to expand the partition. The operations for single partition expansion are different between Linux and Windows operating systems. This chapter is a guide for single partition expansion on Windows.
This example uses Windows Server 2012R2 as the example environment version, with a cloud disk size of 10GB, expanded to 20GB, and mounted on Disk1. In actual environments, operations should be performed according to actual situations. The specific operations are as follows:
This operation example assumes that the disk capacity is less than 2TB. If the disk capacity is greater than 2TB, please refer to 2TB Disk Partition Expansion (Windows).
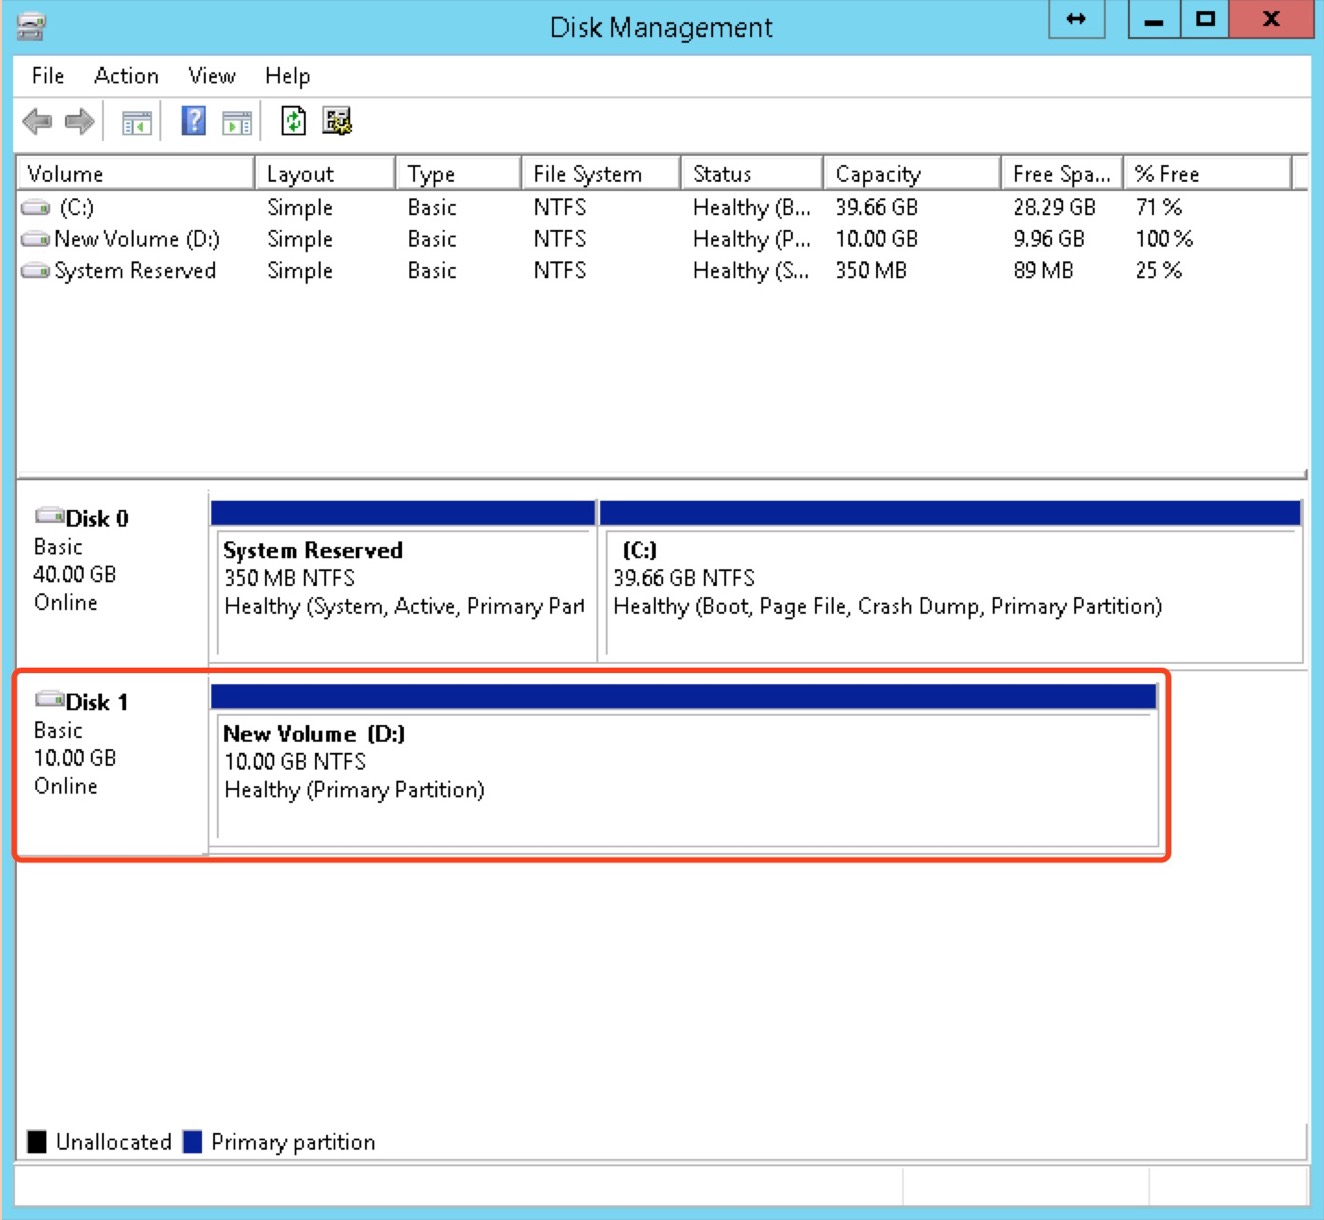
-
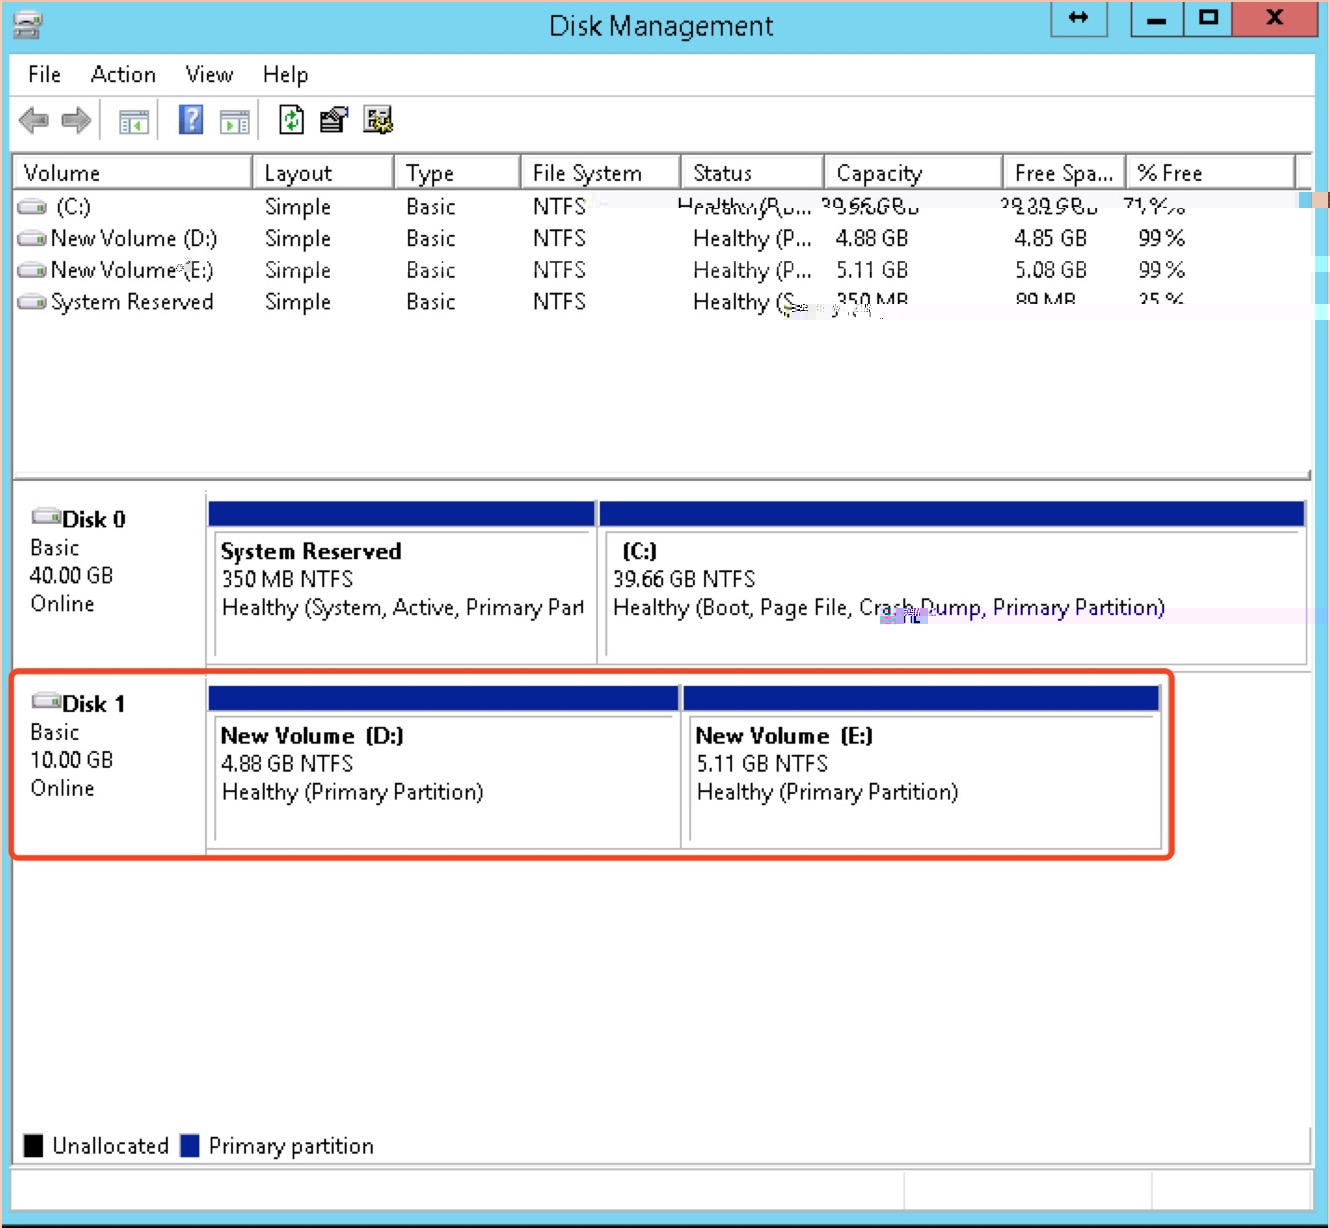
Check the current disk’s partition and mounting information to confirm that the disk is the one that needs to be expanded, as shown in the following figure:
-
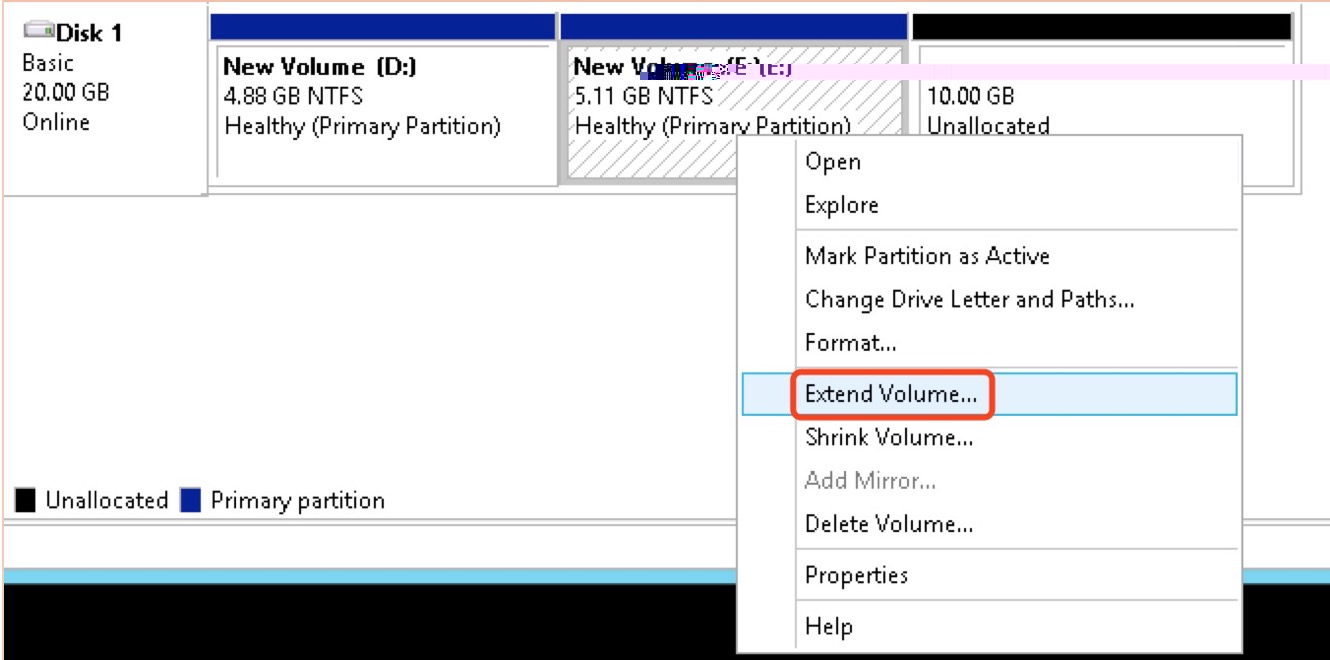
Offline the disk in the operating system, expand the capacity of the current disk through the console and API, and check the size of the expanded disk through the operating system disk management tool, as shown in the following figure:

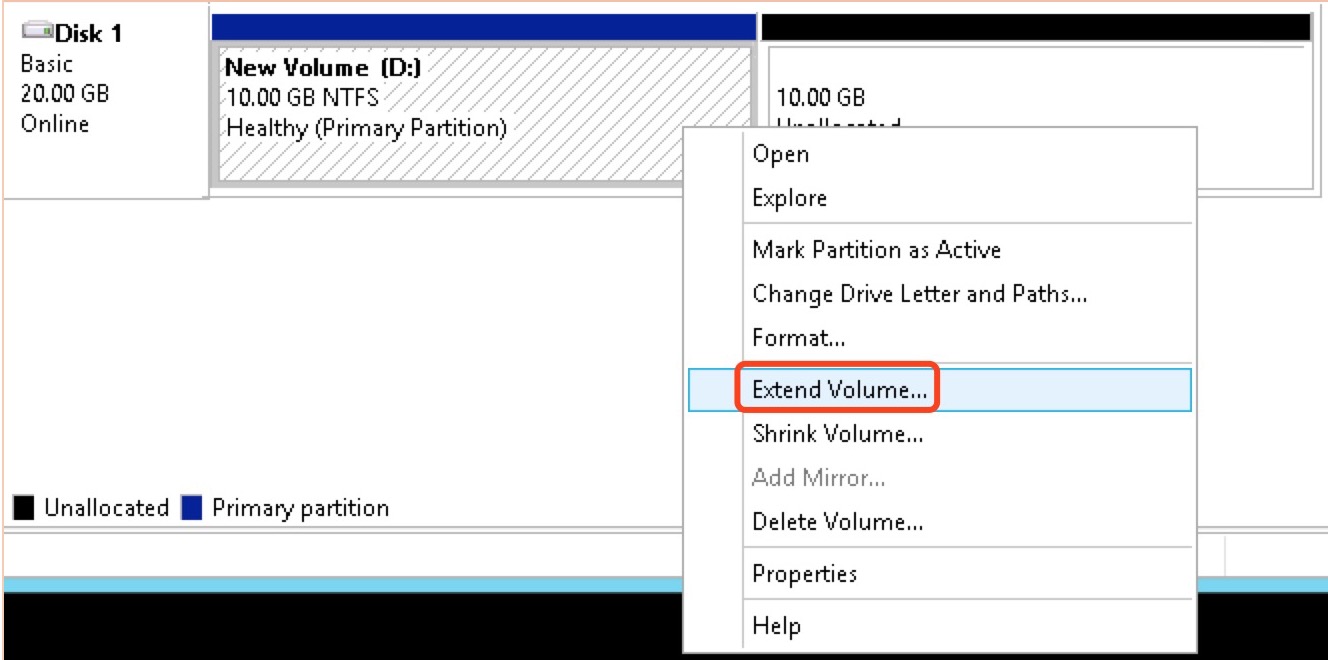
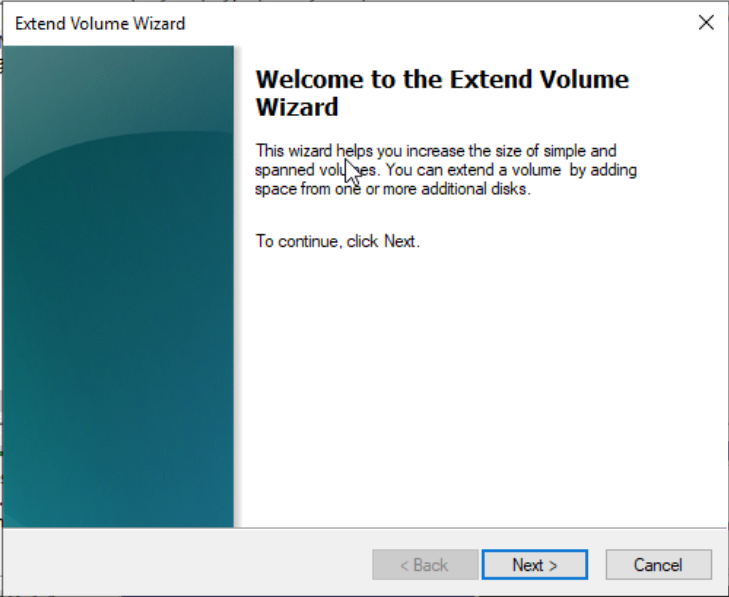
-
Right-click on the blank space of the new partition D, select “Extend Volume”, and in the pop-up dialog box, expand the disk partition, as shown in the following figures:
-
After the partition expansion is successful, check the information of the expanded partition, as shown in the following figure:

6.7.2.4 Multi-Partition Expansion (Linux)
A multi-partition disk refers to a cloud disk that has been mounted to a virtual machine and divided into multiple partitions before being expanded. Users can expand the partition of the multi-partition disk in the operating system after expanding the disk capacity. Since the newly expanded space is attached to the end of the virtual cloud disk, only the last partition can be expanded for the multi-partition scenario.
The operations for multi-partition expansion are different for Linux and Windows operating systems. This section provides a guide for multi-partition expansion on Linux. In this example, CentOS 6.5 is used as the example environment version, the cloud disk size is 20G, and two partitions are divided into 10GB each, mounted at /dev/vdb1 and /dev/vdb2 respectively, and expanded to 30GB, which means that the last partition will be expanded to 20GB. The actual operation needs to be performed according to the actual situation.
This operation example assumes that the disk capacity is less than 2TB. If the disk capacity is greater than 2TB, please refer to the 2TB Disk Partition Expansion (Linux) section.
-
Use
lsblkanddfto view the information of the current disk, including the mount point, file system type, and partition situation;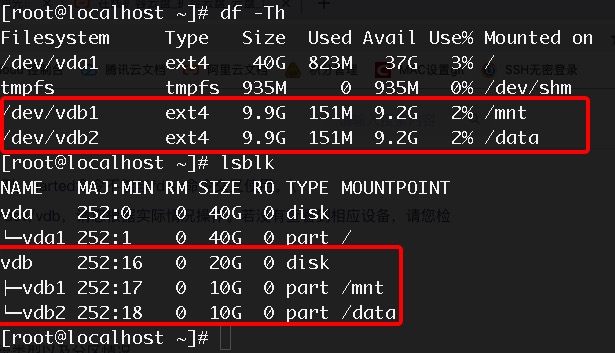
The result shows that there are two 10GB partitions (vdb1 and vdb2) under vdb, and they are mounted to the /mnt and /data directories respectively. The expansion operation can only be performed on the vdb2 partition, which will be expanded to 20GB.
-
Expand the disk capacity through the console or API, and check the disk capacity after expansion in the operating system through fdisk or lsblk;
-
Unmount the disk in the operating system, use the
fdisk /dev/vdbcommand to delete the last partition (vdb2) and create a new partition;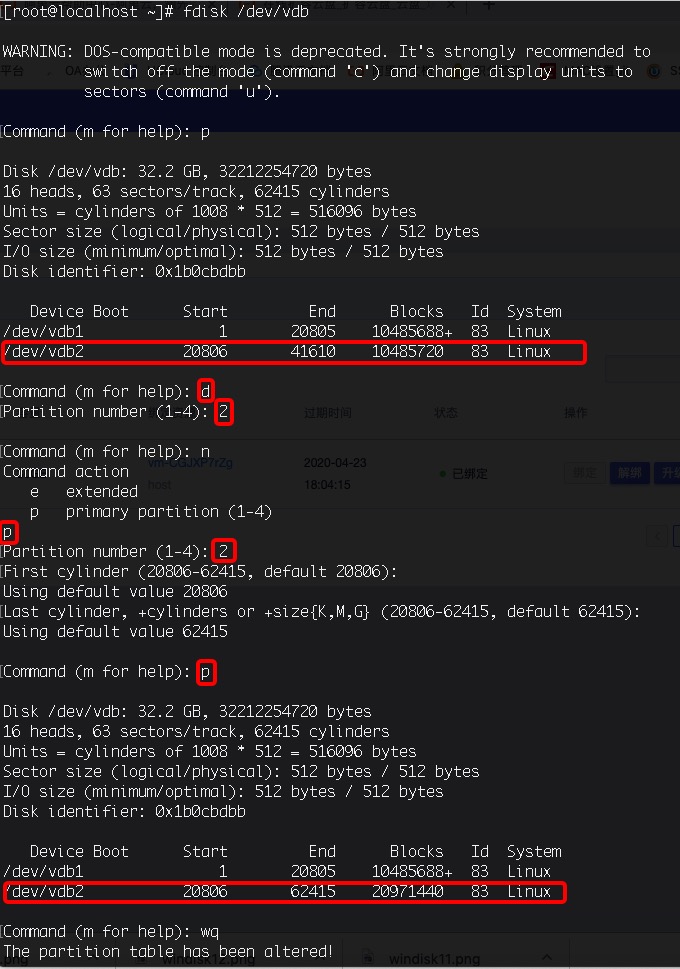
Note: Deleting a partition will not cause data loss inside the disk. The above example is deleting vdb2, which is the last partition of the disk.
-
Check the file system and perform the file system expansion operation. Different file systems have different commands for expansion operations. This article uses ext4 and xfs file systems as examples for expansion operations;
-
For the ext4 file system expansion, execute
e2fsck -f /dev/vdb2andresize2fs /dev/vdb2to check and expand the partition. After the expansion is successful, remount the partition and check the partition size and related information; -
If the disk is an xfs file system, first execute
xfs_repair /dev/vdb2to check the file system. Use mount to remount the disk to the/datadirectory, and finally use the commandxfs_growfs /datato expand the vdb2 disk partition.
6.7.2.5 Multi-Partition Expansion (Windows)
A multi-partition disk refers to a cloud disk that has already been mounted to a virtual machine and divided into multiple partitions before being expanded. After expanding the disk capacity, users can enter the operating system to expand the partitions of the multi-partition disk. Since the newly expanded space is attached to the end of the virtual cloud disk, for multi-partition scenarios, only the last partition can be expanded.
The operations for multi-partition expansion on Linux and Windows operating systems are different. This section is a guide for multi-partition expansion on Windows. This example uses Windows Server 2012R2 as the example environment version, with a cloud hard disk size of 10G, two partitions of 5GB each, and a mount point of Disk1. It will be expanded to 20GB, and the last partition will be expanded to 15GB. In actual environments, operations should be performed according to actual conditions.
This operation example assumes that the disk capacity is less than 2TB. If the disk capacity is greater than 2TB, please refer to the “2TB Disk Partition Expansion (Windows)” section.
-
View the current disk partition and mounting information to confirm that the disk is the one that needs to be expanded, as shown in the following figure:
-
Offline the disk in the operating system, and perform a capacity expansion operation on the current disk through the console and API. Use the operating system disk management tool to view the expanded disk size, as shown in the following figure:

-
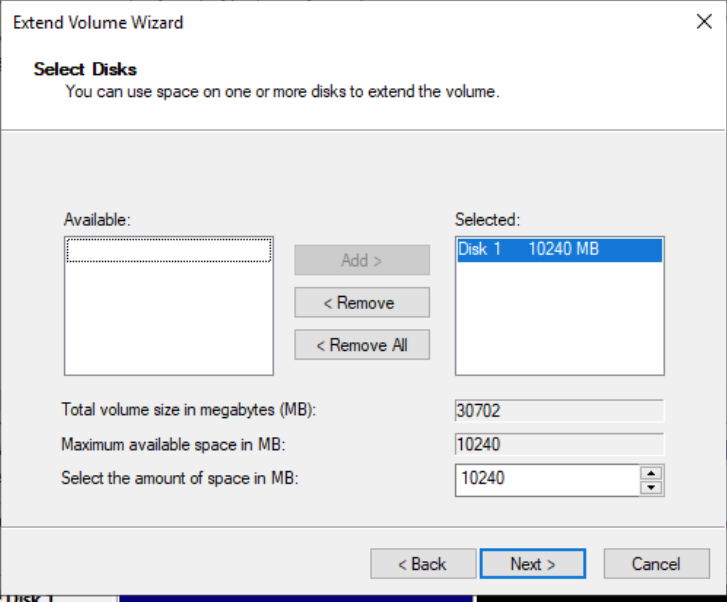
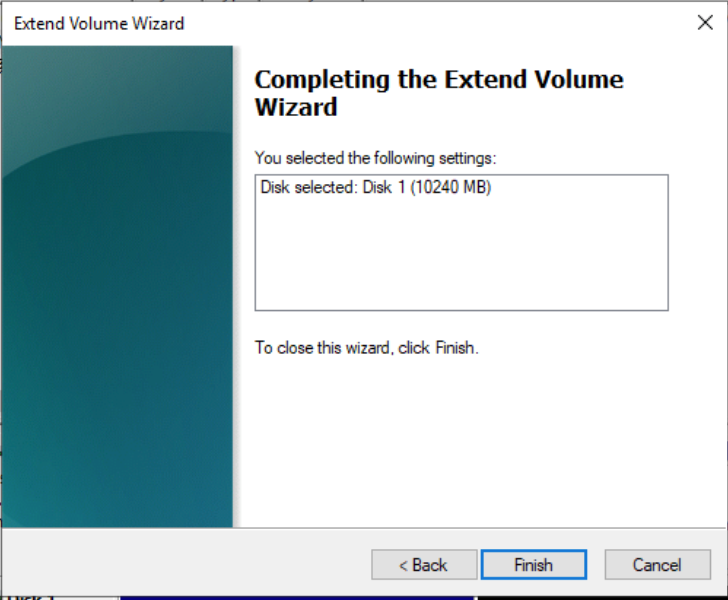
Right-click on the blank space of the new partition E (the last partition) and select Extend Volume to expand the partition;
Complete the volume expansion of the new partition by clicking Next and configuring related settings;
-
After the expansion is complete, view the partition status, as shown in the following figure:

As the result shows, drive E has been expanded to 15GB, which is an increase of 10GB from its original capacity.
6.7.2.6 2TB Disk Partition Expansion (Linux)
When the capacity of a disk is greater than 2TB, partitioning cannot be performed using the fdisk command in Linux. Instead, the parted command should be used for partitioning and expansion. The operations for disks larger than 2TB are different in Linux and Windows operating systems. This section provides a guide for expanding disks larger than 2TB in Linux.
This example uses CentOS 6.5 as the example environment version, with a cloud disk size of 2TB and mount point at /dev/vdb. We will expand the disk to 2.1TB by expanding the cloud disk and partition to 100GB. Please adjust the commands based on your actual environment. The specific steps are as follows:
(1)If the disk is newly created, use the parted tool to partition it first. The specific steps are shown below:
-
Enter
parted /dev/vdbto partition the disk.mklabel gptsets the disk partition format to GPT.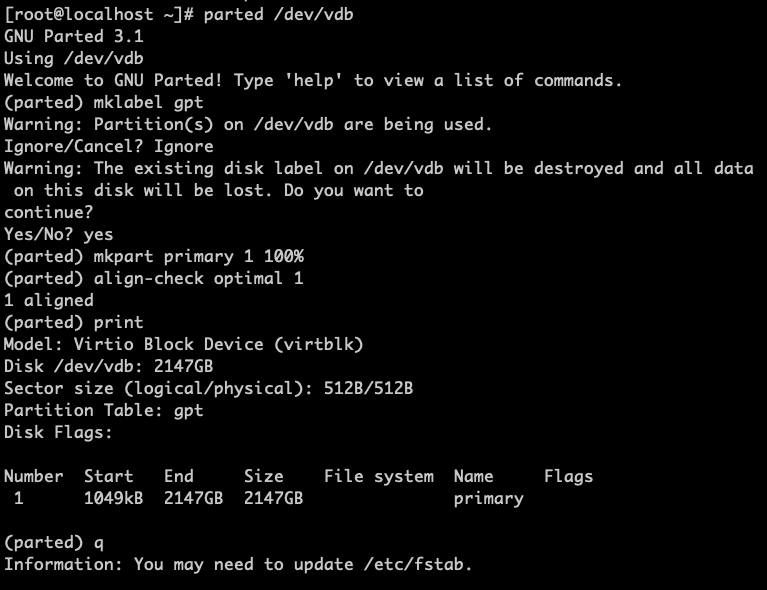
-
After partitioning, use lsblk to check if the disk partition was successful. You can format the partition using mkfs.ext4 /dev/vdb1 and mount it before it can be used normally, as shown below:
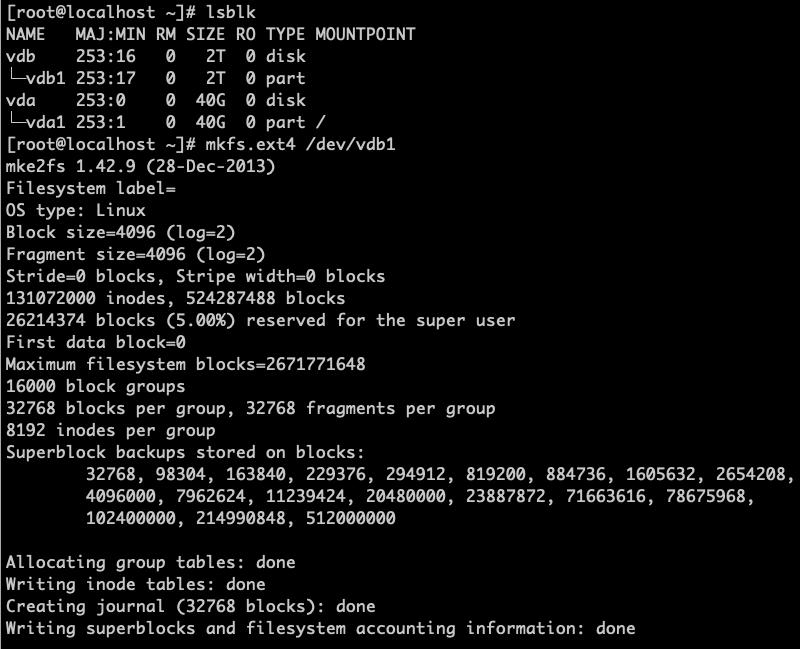
-
After successful formatting, mount the disk and check its information. In the figure below,
/dev/vdb1is mounted to/mntwith a capacity of 2TB.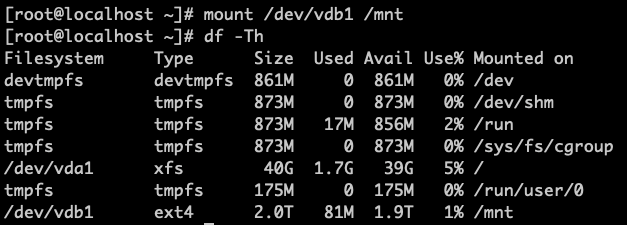
(2)The specific steps for expanding a disk larger than 2TB are as follows:
-
Use
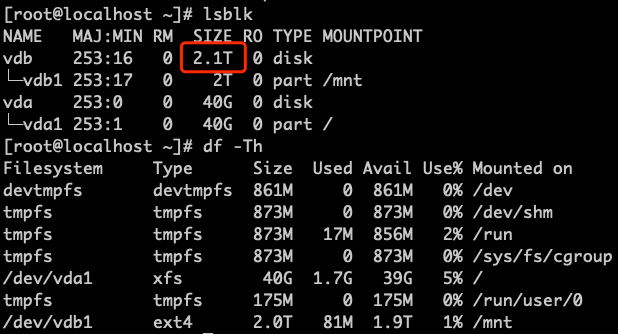
lsblkanddfcommands to check the current disk information, including mount points, file system types, and partition details. -
Expand the disk capacity through the console or API and check the disk capacity using fdisk or lsblk in the operating system. In this example, we will expand the disk to 2.1TB, which is 2100GB, as shown below:
-
To unmount a disk in the operating system, use the umount command. Then, use the
parted /dev/vdbcommand to delete the original partition and create a new partition. Use thelsblkcommand to view information about the vdb1 partition. If there are multiple partitions, delete the last partition and create a new one.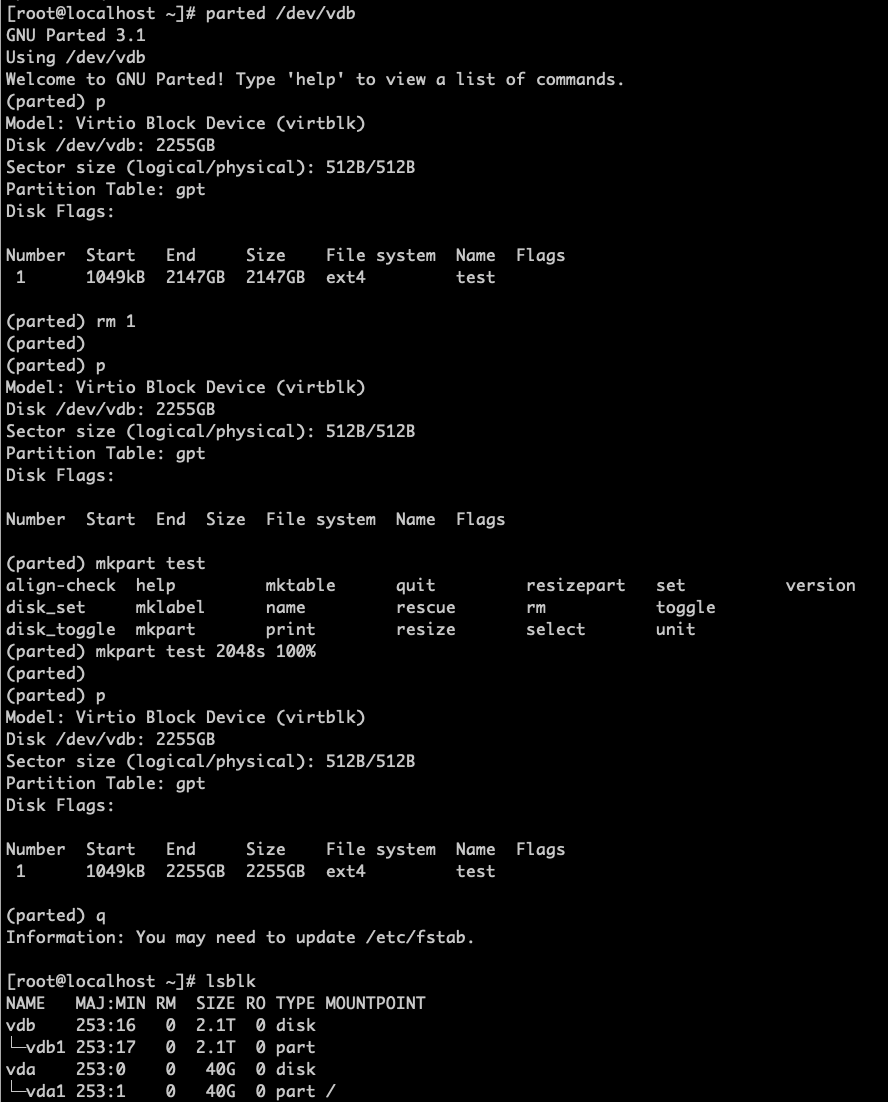
As shown in the figure,
unit schanges the display and operation unit to sector;rm 1deletes the current partition; andmkpart test 2048s 100%creates a new partition named “test” with a starting sector of 2048s and uses all remaining disk space. Note: deleting the current partition will not cause data loss on the disk. -
Use the
e2fsck -f /dev/vdb1command to check the file system and useresize2fs /dev/vdb1to resize the partition.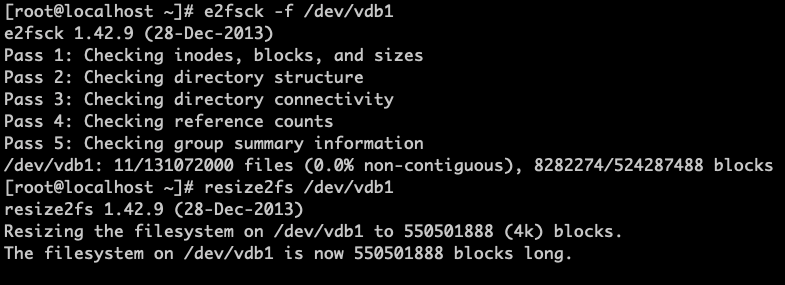
-
Remount the disk and check the disk status to verify if the expansion was successful.
6.7.2.7 2TB Disk Partition Expansion (Windows)
When a disk’s capacity exceeds 2TB, MBR partition format cannot be used in Windows. Instead, GPT partition table format is required for disk initialization, and partitioning and expansion operations are performed through the Disk Management tool. The operations for disks exceeding 2TB in size differ between Linux and Windows operating systems. This section provides a guide for expanding disks larger than 2TB on Windows.
This example uses the Windows Server 2012R2 operating system as the example environment version, with a cloud disk size of 2TB and a mounting point of Disk1 (disk 1). The disk will be expanded to 2.1TB, and the cloud disk and partition will be expanded by 100GB. Actual operations should be performed based on the specific situation. The specific operations are as follows:
(1)If the disk is newly created, it needs to be connected and initialized using the Disk Management tool. The specific steps are as follows:
-
When a 2TB hard disk is mounted to a Windows VM that has been created from the console, a disk similar to “Disk1” or “disk1” will appear in the Disk Management tool, and the disk status will be offline;
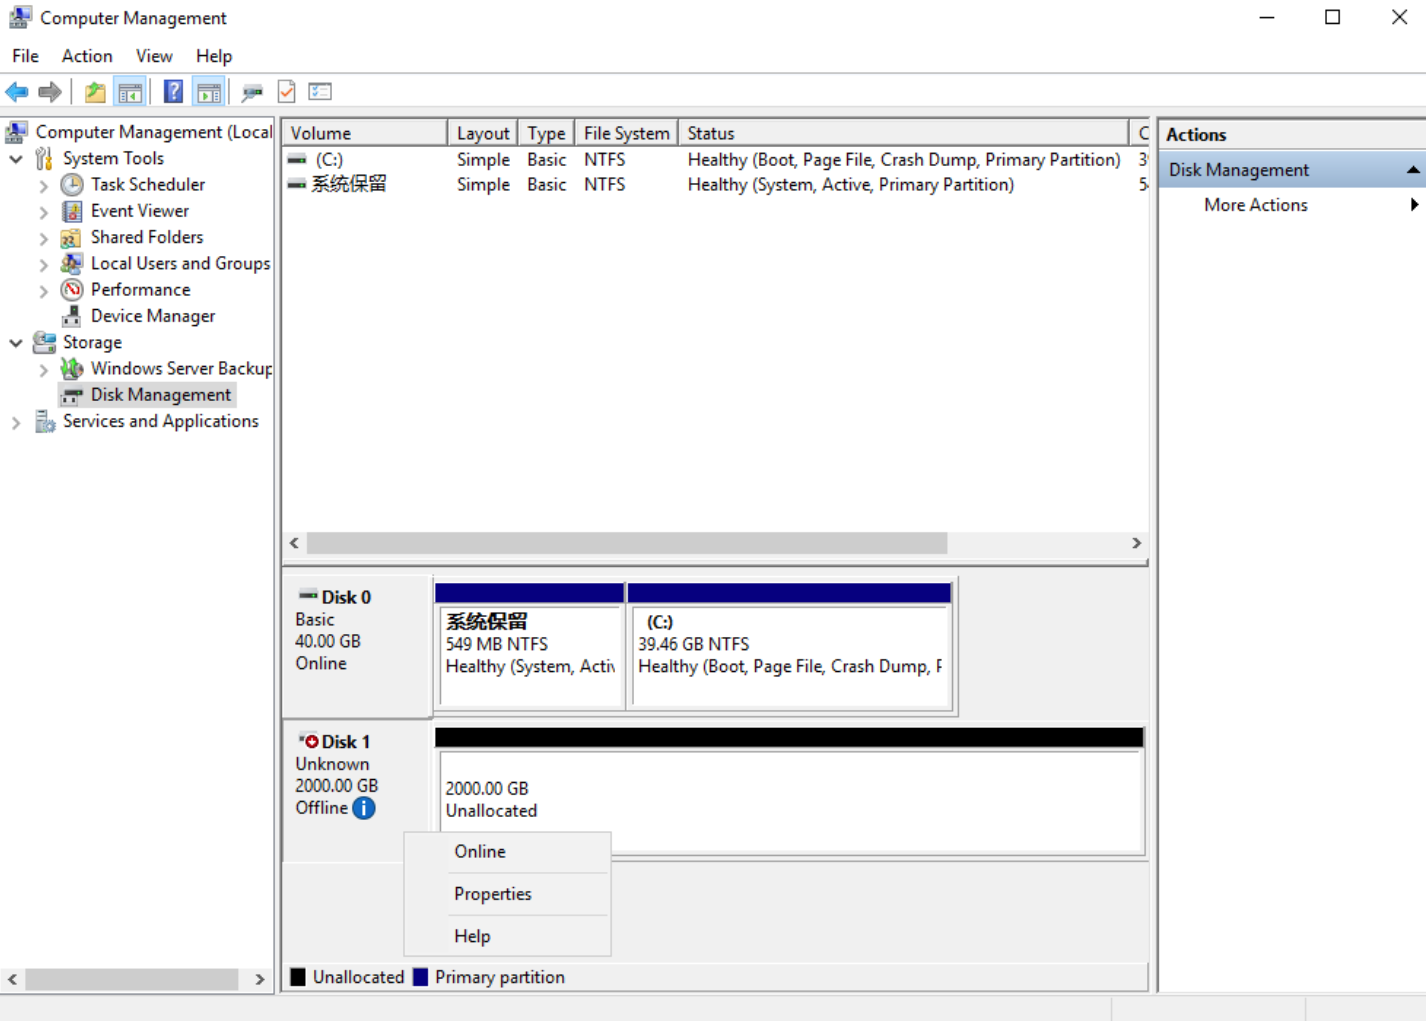
-
As shown in the above figure, right-click the blank space next to Disk1 and click “Online” to bring the disk online;
-
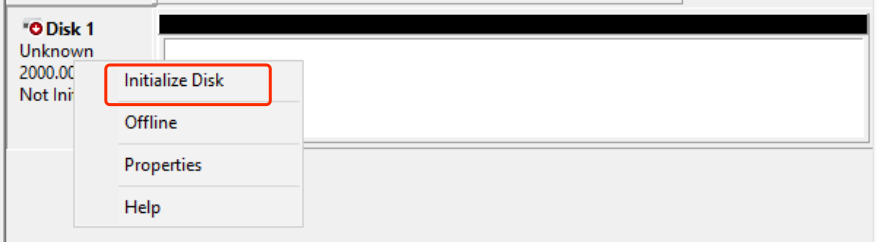
After the disk is online, its status is “Not Initialized.” Click on the blank space of the disk and click “Initialize Disk.”;
-
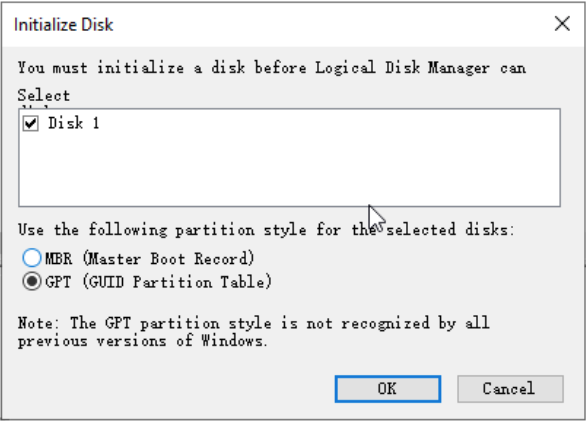
In the Initialize Disk screen, select the “GPT (GUID Partition Table)” option to initialize the disk;
-
After the disk is initialized successfully, right-click the unallocated area of Disk1 and click “New Simple Volume” to create a partition and format it;
-
In the New Simple Volume Wizard, select the volume size, drive letter, and formatting options to create a new partition. The result is shown below:
(1)To expand a 2TB disk on Windows, follow these steps:
-
Expand Disk 1 through the console or API. After expansion, use the Disk Management tool in the Windows operating system to “Rescan Disks” and view the information of the newly expanded disk. For example, as shown in the figure below, Disk1 has an additional 100GB of unallocated space;
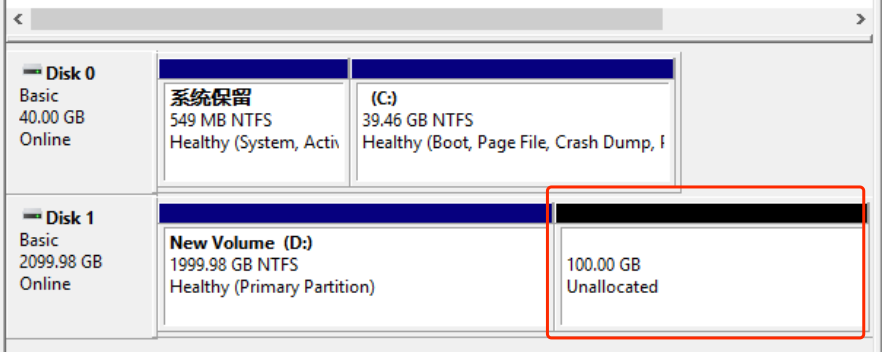 ]
] -
To expand the partition on Windows, you can either create a new partition with the extra 100GB or add the 100GB to an existing partition. This example demonstrates expanding the 100GB unallocated space to the existing D drive partition;
-
Right-click the blank space of the existing partition (in this example, the D drive) and click “Extend Volume.” Use the Extend Volume Wizard to add the unallocated capacity to the D drive;

-
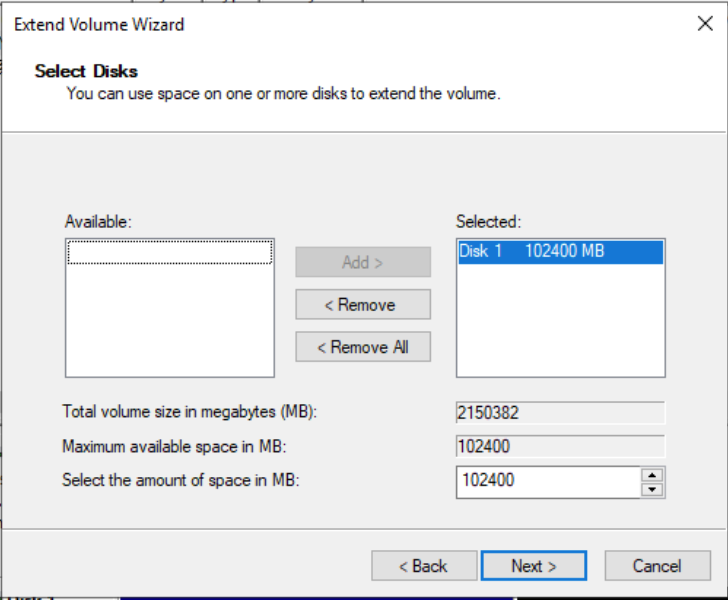
In the Extend Volume Wizard, select Disk1, enter the amount of capacity to be extended, which is typically all available unallocated capacity, and confirm the volume extension operation.
-
After the expansion is complete, the unallocated capacity has been successfully added to the existing D drive partition. As shown in the figure above, the disk’s total capacity is now 2.1TB.
6.8 Hard Disk Cloning
Hard disk cloning refers to copying data from a cloud disk to a new one with the same size and type as the original disk. Only disks in an unbound state can be cloned, and during the cloning process, the source disk cannot be bound, cloned, or expanded.
Users can use the “Clone” function on the cloud disk resource list to perform a cloud disk cloning operation, as shown in the following figure:
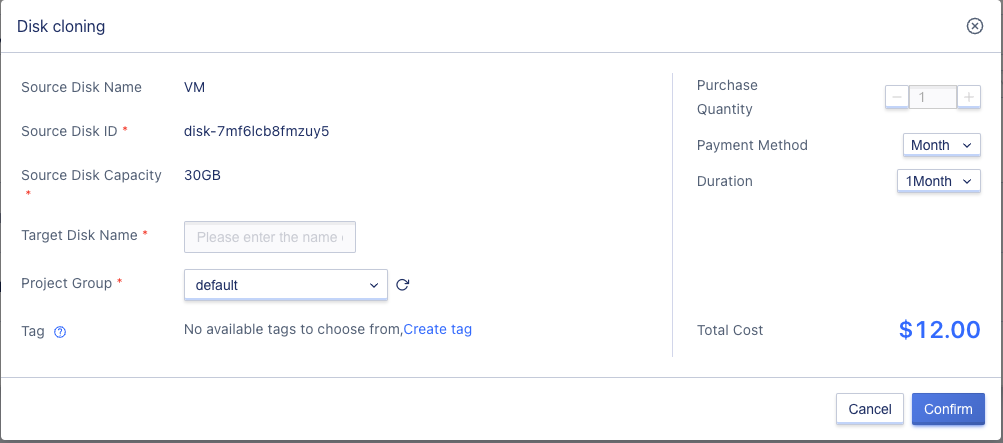
- Source disk name/ID: The name and ID of the disk that needs to be cloned;
- Source disk capacity: The capacity of the disk that needs to be cloned, i.e., the source disk capacity;
- Target disk name: The name of the newly cloned disk.
Cloning will create a new disk based on the source disk, and users need to select the relevant billing configuration for the new disk, including the purchase quantity, payment method, and total cost:
- Purchase quantity: Create multiple cloud disks in batches according to the selected configuration and parameters. Currently, only one disk can be cloned at a time.
- Payment method: Select the billing method of the disk, which supports three methods: hourly, yearly, and monthly. Users can choose the appropriate payment method according to their needs.
- Total cost: Displays the cost of creating a cloud disk resource according to the payment method selected by the user.
- Confirm: After clicking the confirmation purchase button, the cloud disk resource list page will be returned, where the status of the cloned disk can be viewed. After successful cloning, the status of the cloud disk will be displayed as “Unbound”.
Hard disk cloning can be used for backup and snapshot of hard disk data. The cloned disk is completely identical to the source disk data, and the cloned cloud disk inherits the encryption attribute.
6.9 Deleting a Cloud Disk
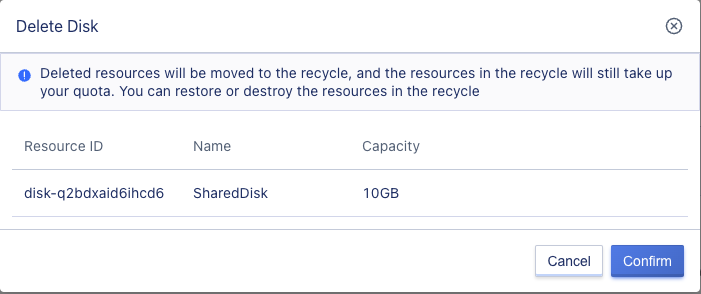
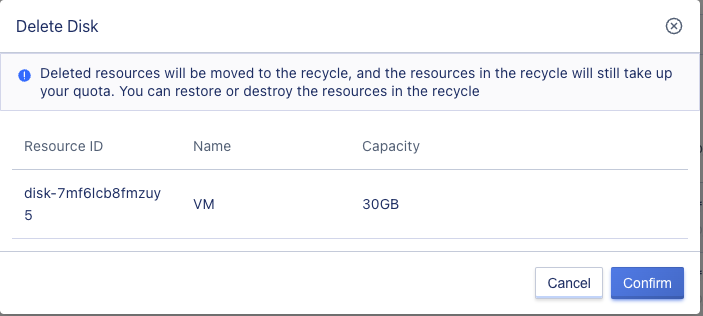
Users can delete cloud disk resources in the “Unbound” state. The deleted cloud disk will automatically enter the “Recycle Bin” and can be restored or destroyed. After deleting a cloud disk, snapshot resources created from the current cloud disk will also be destroyed.
Users can use the “Delete” function on the cloud disk management console to delete a cloud disk, and the deleted cloud disk resources can be viewed in the recycle bin. As shown in the following figure:
6.10 Modifying Name and Remarks
The name and remarks of a disk can be modified in any state. Users can click the “Edit” button next to each disk name on the disk list page to modify them.
6.11 Renew Cloud Disk
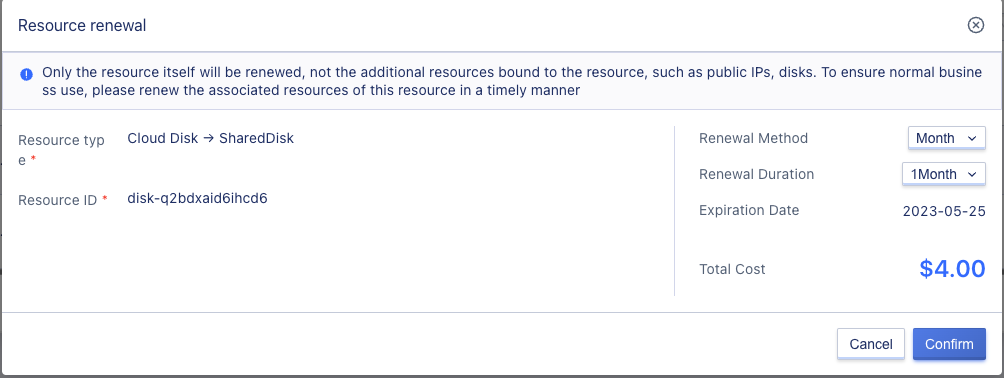
Users can manually renew their cloud disks. The renewal only applies to the resource itself and not to any virtual machine resources associated with the resource. Associated resources will be automatically unbound after expiration, and to ensure normal operations, timely renewal of related resources is required.
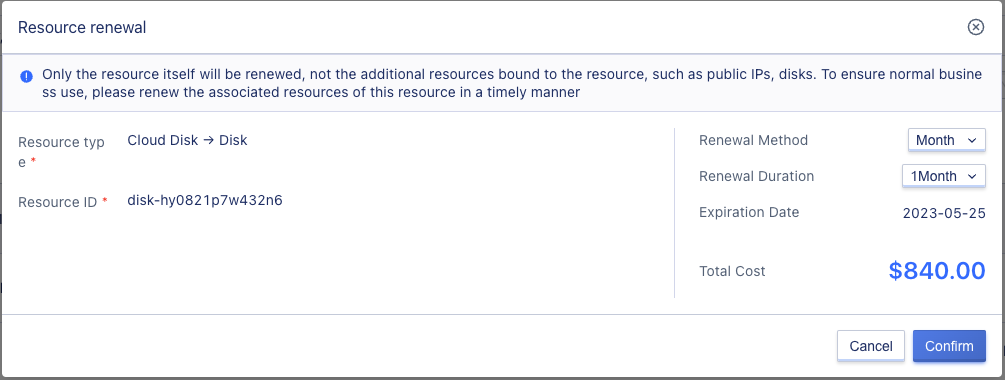
When renewing a cloud disk, users can change the renewal method from short-term to long-term, such as changing from monthly to yearly.
Fees for renewals are charged according to the duration of the renewal, which matches the billing method of the resource. If the cloud disk is billed hourly, then the renewal duration is specified as one hour; if billed monthly, then the renewal duration can be chosen from 1 to 11 months; if billed yearly, then the renewal duration can be chosen from 1 to 5 years.
6.12 Snapshot Management
The distributed storage system on the cloud platform supports disk snapshots to reduce the risk of data loss due to mistakes or upgrades and is an important measure to guarantee data security on the platform.
6.12.1 Snapshot Overview
A snapshot is a file containing the data status of a cloud disk at a specific point in time. It can be understood as a backup of the cloud disk’s data at a certain moment, and writing or modifying data on the cloud disk will not affect the created snapshot.
Scheduled snapshot policies are supported, which is an automatically executed periodic strategy for creating snapshots. Snapshot policies are separate from snapshots and have an independent lifecycle. In practice, disk snapshots can reduce the risk of data loss due to mistakes or upgrades and can be roughly applied to the following business scenarios:
- Disaster recovery backup: Scheduled snapshots of cloud disks can be used to quickly roll back in case of system problems, avoiding data loss.
- Version rollback: Preparing snapshots before performing major upgrades can help restore to historical versions if the upgraded version encounters unrecoverable problems.
The platform supports snapshot operations on system disks and data disks that are already bound to virtual machines, as well as snapshot rollback operations, i.e., rolling back the snapshot data to the associated cloud disk to meet data recovery needs.
6.12.2 Creating Snapshots
Users can create snapshots for a cloud disk on the cloud disk list page. If the disk is already mounted to a virtual machine, users can also perform snapshot operations on the disk through the disk information list in the virtual machine details page. Snapshot backups of system disks of virtual machines are also supported. To ensure data and disk security:
- Only unbound and bound disks can be used for snapshot operations. If the disk is being expanded or snapshotted, snapshot backup cannot be performed;
- When creating a snapshot, disk mounting/unmounting and modification of virtual machine state (such as turning on/off) are not allowed, or it may cause abnormal snapshot creation;
- Snapshots only capture data that has been written to the disk and do not include data cached in memory by applications or operating systems. It is recommended to pause I/O operations on the disk before taking a snapshot, such as shutting down or unmounting the disk.
In actual operation, users can create a snapshot for a cloud disk through the “Snapshot” option on the cloud disk list page or the disk list operation item in the virtual machine details page. As shown in the snapshot creation wizard page, users can verify the required disk information, enter the snapshot name, and perform snapshot creation operation.
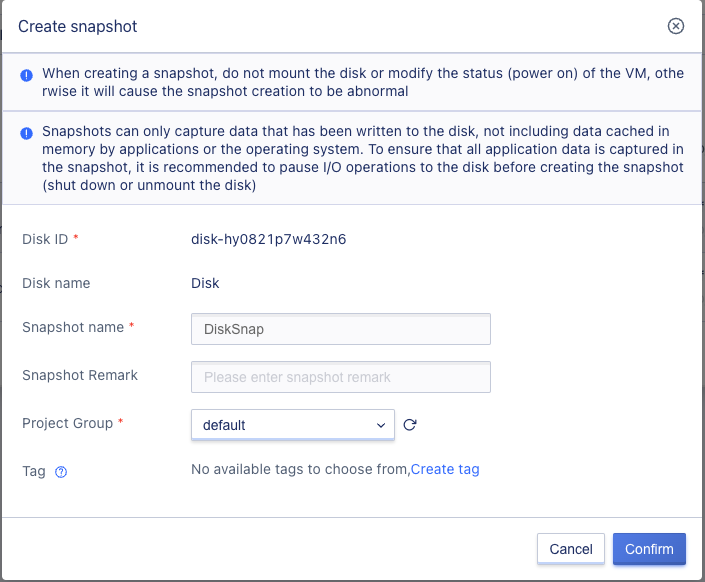
Only one snapshot can be created for a disk at a time. The snapshot status during the snapshot creation process is “creating”. When the status changes to “normal”, it means that the snapshot has been successfully created. Users can view the status and related information of the created snapshot on the snapshot list page.
6.12.3 Viewing Snapshot Information
After the snapshot is successfully created, users can switch to the snapshot page on the virtual machine console to view the snapshot resource list information and related information, including name, resource ID, disk, disk type, status, encryption status, creation time and operation items, as shown below:
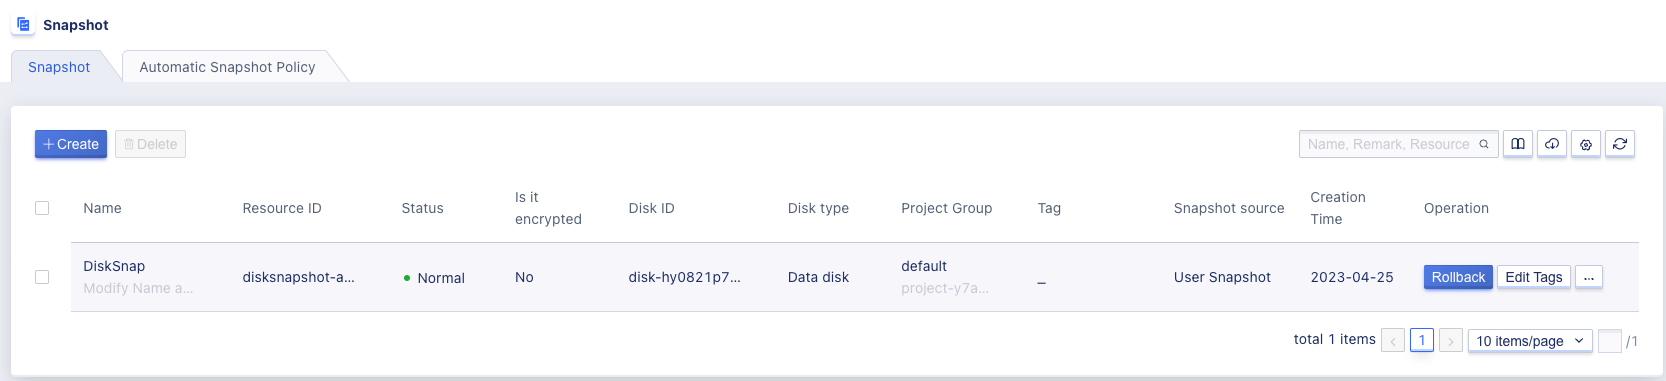
- Resource Name/ID: Represents the name and globally unique identifier of the current snapshot;
- Disk: Represents the disk corresponding to the current snapshot, that is, the snapshot is created from this disk;
- Disk Type: Represents the attributes of the disk to which the current snapshot belongs, such as data disk or system disk;
- Status: Represents the running status of the current snapshot, including creating, normal, recovering, deleting. “Recovering” means that the snapshot is currently being rolled back;
- Creation Time: The creation time of the current snapshot.
The operation items on the list refer to operations on individual snapshots, including rollback and deletion. To facilitate tenants to count and maintain snapshot resources, the platform supports downloading all snapshot resource list information owned by the current user as an Excel table and also supports batch deletion of snapshots.
6.12.4 Snapshot Rollback
Snapshot rollback is a scenario where snapshot data at a certain point in time is rolled back to the associated cloud disk for data recovery.
- When rolling back, the cloud disk must be in an unbound state or the associated virtual machine must be in a shutdown state.
- Only snapshots in normal state can be rolled back.
Users can perform a snapshot rollback operation on a snapshot through the “Rollback” option in the snapshot resource list operation item, which only supports rolling back the snapshot to the corresponding disk, as shown in the following figure:
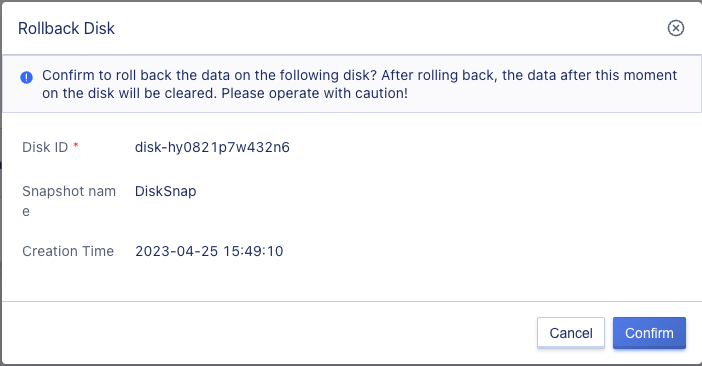
After clicking confirm, the page will return to the snapshot list page, and both the snapshot and the associated disk will be converted to the “recovering” state. After the rollback is successful, the disk will be converted to the “unbound” state and the snapshot will be converted to the “normal” state. After the snapshot rollback is successful, the data on the parent disk before the rollback operation will be cleared and overwritten by the data in the snapshot, i.e., the data on the parent disk will be consistent with the data captured in the current snapshot.
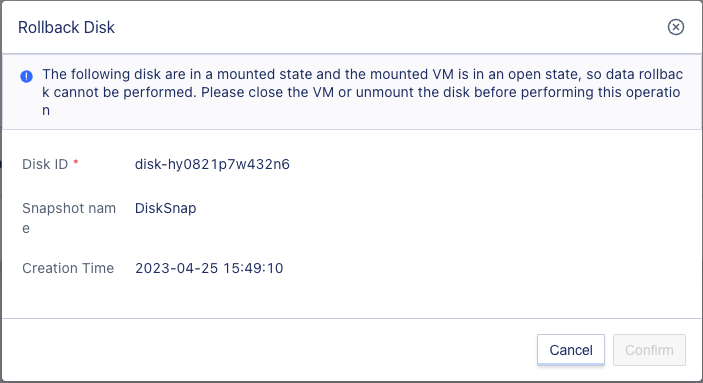
If the cloud disk associated with the snapshot is in a mounted state and the virtual machine it is mounted to is in a powered-on state, data rollback cannot be performed, as shown in the following figure, and the virtual machine must be powered off or the disk must be unmounted first.
6.12.5 Delete Snapshot
Platform snapshots are incremental snapshots, and subsequent snapshots only retain the changed data of the previous snapshot. When a user deletes an intermediate snapshot, only the blocks that are not referenced by subsequent snapshots in that snapshot will be deleted, and the referenced blocks will be recorded in subsequent snapshots.
Users can delete any snapshot of a disk. For example, if a user takes 10 snapshots of a disk and deletes any one of them, the rollback data will not be affected.
- If the user deletes the first snapshot, the system will merge the data in the first snapshot into the second snapshot to ensure the accuracy of the data rolled back through the second snapshot.
- If the user only deletes the second snapshot, the system will only delete the data blocks in snapshot 2 that are not referenced by snapshot 3, and the data blocks referenced by snapshot 3 will be automatically recorded in snapshot 3 to ensure the accuracy of the data rolled back through snapshot 3.
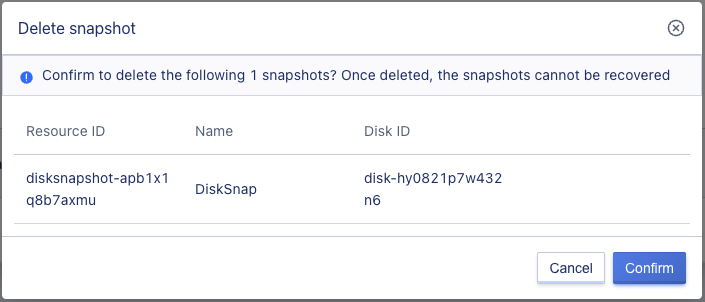
Only snapshots in normal state can be deleted. As shown in the figure, users can delete a snapshot through the console snapshot list page. Once a snapshot is deleted, it will be permanently destroyed.
6.12.6 Modify Snapshot Name
The name and description of a snapshot can be modified regardless of its status. To do this, click on the “Edit” button next to the snapshot name on the snapshot resource list page.
6.12.7 Create Cloud Disk
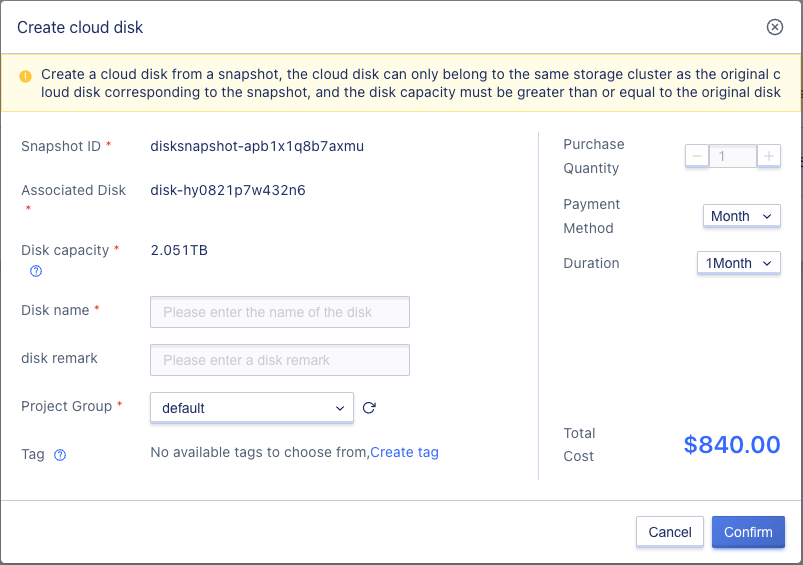
Cloud disks can be created from snapshots. The size of the disk created will be equal to the original disk size of the snapshot, and the encryption property will also be inherited. Cloud disks created from snapshots can only belong to the same storage cluster as the original cloud disk corresponding to the snapshot. Virtual machines can be created using cloud disks created from system disk snapshots.
In practice, cloud disks can be created from snapshots by clicking on the “Create Disk from Snapshot” button in either the snapshot list page or the cloud disk details snapshot list operation item. As shown on the create disk from snapshot wizard page, users can verify the required associated disk information, snapshot information, and enter a cloud disk name to create a cloud disk.
6.13 Shared Disk
A shared cloud disk is a data block-level storage device that supports concurrent read and write access by multiple cloud servers. It has the characteristics of multiple mount points, high concurrency, high performance, and high reliability. It is mainly used in critical enterprise application scenarios that require cluster and HA (High Available) capabilities, where multiple cloud servers can simultaneously access a shared cloud disk.
6.13.1 Create a Shared Disk
On the platform console, users can quickly create a cloud disk as a virtual machine’s shared data disk by specifying the type, capacity, and name of the shared disk. Before creating a shared disk, please make sure that your account balance and disk quota are sufficient.
To create a shared disk, open the cloud disk shared disk page and click on the “Create” button to open the creation page as shown below:”
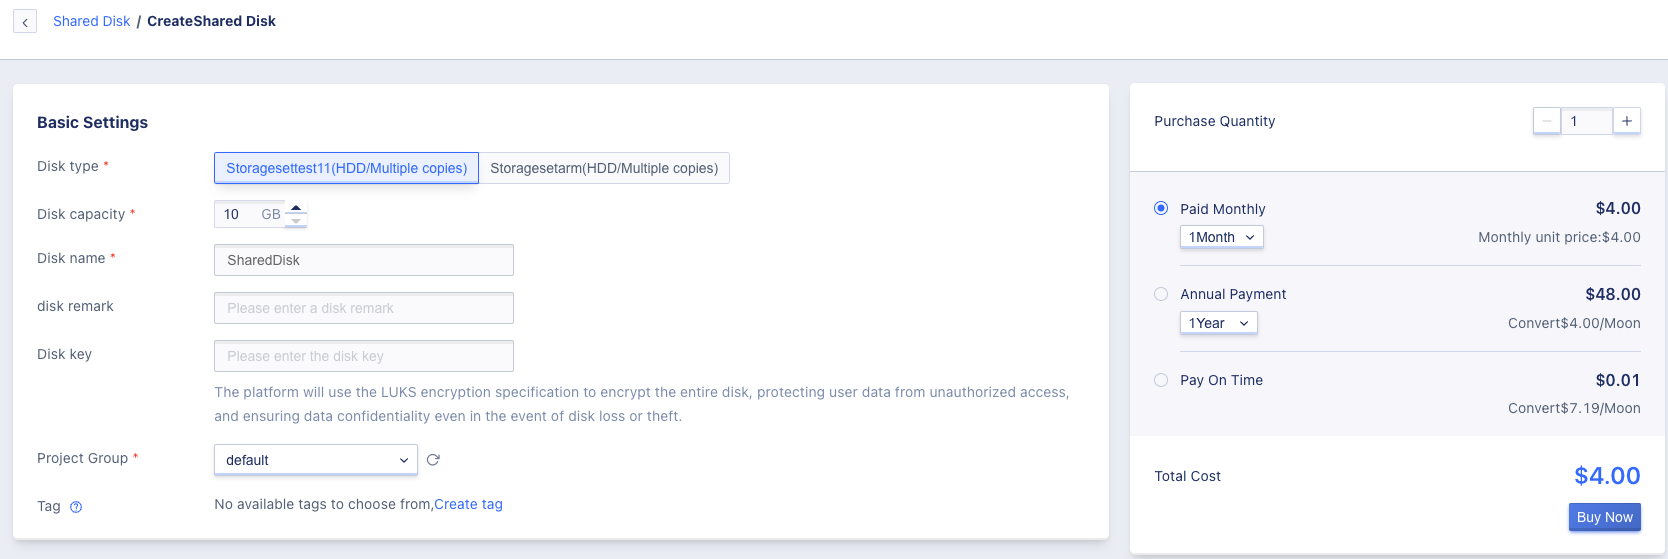
- Disk type: This refers to the shared disk type, i.e. the storage cluster type, which is customized by the platform administrator, such as HDD cloud disk or SSD high-performance cloud disk;
- Disk capacity: This refers to the logical capacity of the shared disk allocated, with a default minimum of 10GB and a step size of 1GB. The maximum supported capacity is 32000GB, which can be customized by the cloud platform administrator in the console;
- Disk name: This refers to the name of the shared disk that needs to be created;
- Disk notes: This refers to any necessary explanatory information that needs to be added;
- Disk encryption key: If a key is entered, the disk will be encrypted;
- Project group: This refers to the project group that is bound when creating the disk;
- Tags: This refers to the tags that are bound for resource management;
After setting the information above, click the “Confirm” button to successfully create a shared disk.
6.13.2 Viewing the Shared Disk List
Open the Cloud Disk page and go to the Shared Disk section to view the list of shared disks, which will be displayed as follows:
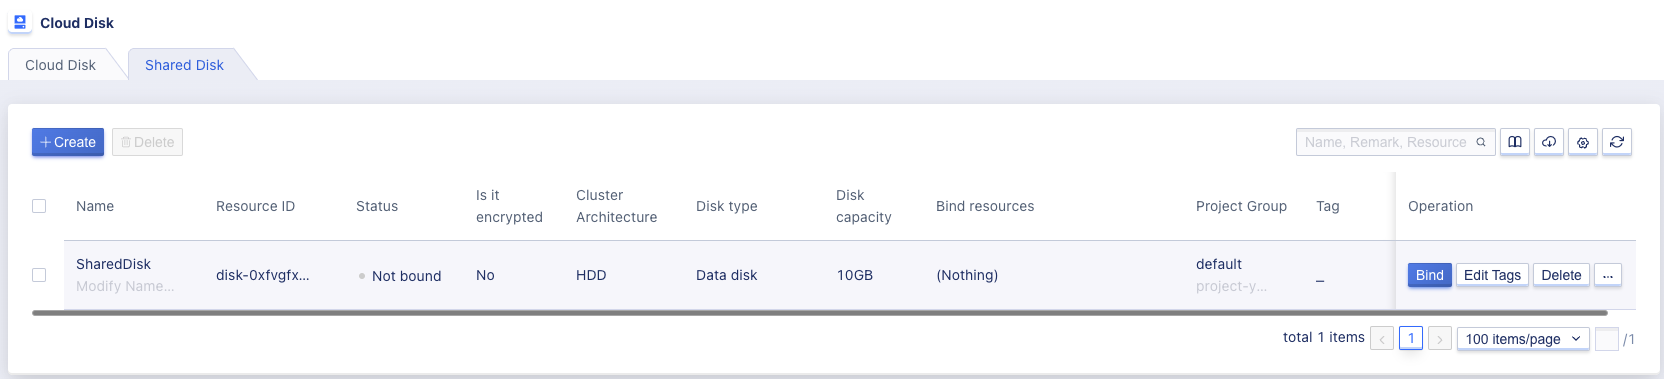
- Name/ID: This refers to the name and globally unique identifier of the shared disk;
- Status: This refers to the current status of the shared disk, including creating, unbound, sharing, shared, unbinding, being cloned, and deleting, among others. “Being cloned” indicates that the disk is currently being cloned.
- Encryption: This refers to whether the disk is encrypted;
- Cluster architecture: This refers to the shared disk type, i.e. the storage cluster type, which is customized by the platform administrator, such as HDD cloud disk or SSD high-performance cloud disk;
- Disk type: This refers to the shared disk type, which is always a data disk;
- Disk capacity: This refers to the capacity of the shared disk, measured in GB;
- Bound resources: This refers to the names and IDs of the virtual machines that the shared disk has been bound to. If no virtual machine has been specified, this field will be empty;
- Billing method: This refers to the billing method specified when creating the shared disk, such as monthly, yearly, or hourly;
- Creation time/expiration time: This refers to the creation time of the cloud disk and the expiration time of the billing cycle;
- Project group: This refers to the project group information of the current shared disk;
- Tags: This refers to the tags of the current shared disk.
6.13.3 Binding shared disk
Click the bind button to open the bind shared disk page, select the virtual machine, and click confirm.

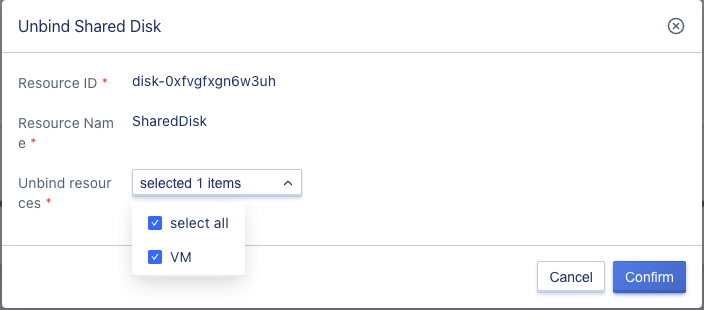
6.13.4 Unbinding shared disk
Click the unbind button to open the unbind shared disk page, select the virtual machine, and click confirm.
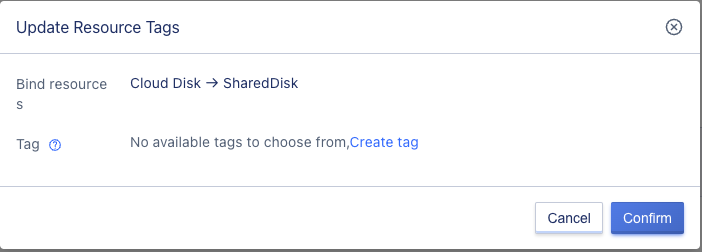
6.13.5 Modifying shared disk tags
Click the modify tag button to open the modify tag page, select the tag, and click confirm.
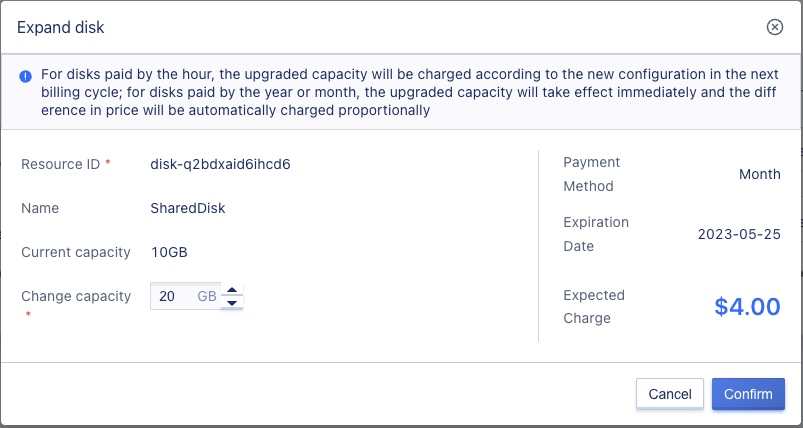
6.13.6 Expanding shared disk
Click the expand button to open the expand disk page, modify the capacity, and click confirm.
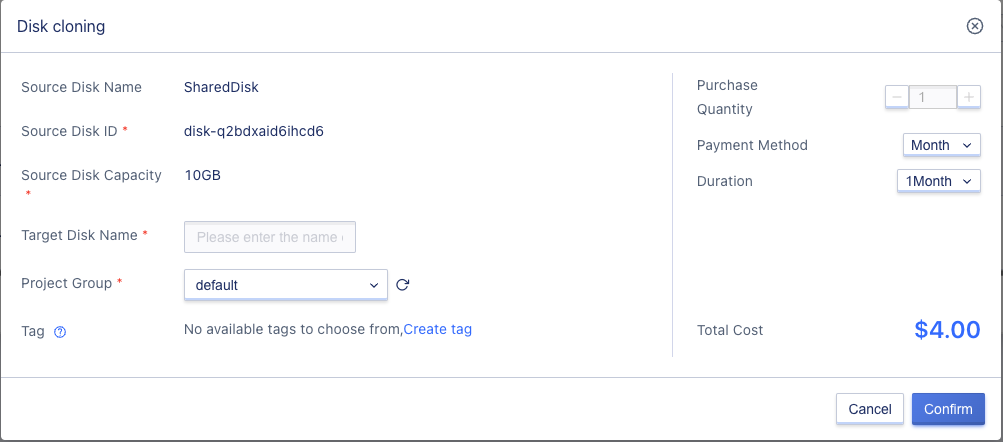
6.13.7 Cloning shared disk
Click the clone button to open the clone shared disk page, set the target disk name, project group, tag, and other information, and click confirm.
6.13.8 Renewing shared disk
Click the renew button to open the renew page, select the renewal method and duration, and click confirm.
6.13.9 Deleting shared disk
Click the delete button, and after confirming, delete the shared disk.