3. Virtual Machines
3.1 Overview
Virtual machines are the core service of cloud platforms, providing scalable computing power services, including the most basic computing components such as CPU, memory, operating system, etc., and combining with network, disk, etc. to provide a complete computing environment.
- The cloud platform virtualizes physical server computing resources through KVM (Kernel-based Virtual Machine), providing computing resources for virtual machines.
- The computing resources of a virtual machine can only be located on one physical server. When the physical server is heavily loaded or fails, it will automatically migrate to other healthy physical servers.
- The computing power of virtual machines is represented by virtual CPU (vCPU) and virtual memory, and the storage capacity is reflected by cloud storage capacity and performance.
- The virtual machine management program controls the QoS of vCPU, memory and disk to support virtual machine resource isolation and ensure that multiple virtual machines on the same physical server do not interfere with each other.
Virtual machines are the basic environment for cloud platform users to deploy and run application services, which are used in the same way as physical computers, providing full life cycle functions such as creation, shutdown, power off, boot, reset password, reinstall system, upgrade and downgrade; supporting different operating systems such as Linux and Windows, and can be accessed and managed through VNC, SSH, etc., with full control rights of virtual machines. The resources and associated relationships involved in the operation of virtual machines are as follows:
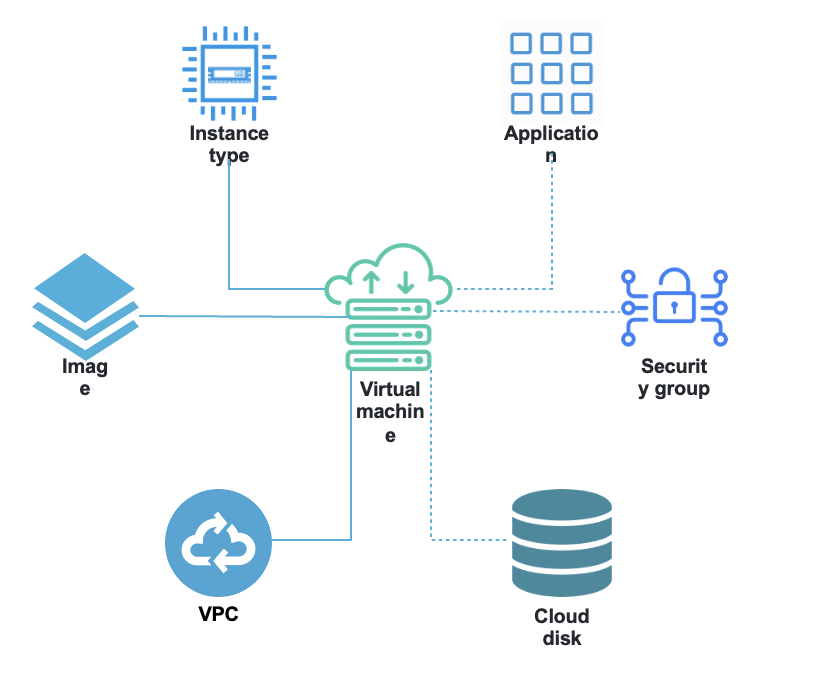
As shown in the figure, instance specifications, images, and VPC networks are the basic resources that must be specified to run a virtual machine, that is, to specify the CPU memory, operating system, virtual network card, and IP information of the virtual machine. On the basis of the virtual machine, cloud disks, elastic IPs, and security groups can be bound to provide data disks, public IPs, and network firewalls for the virtual machine to ensure the data storage and network security of the virtual machine application.
In terms of virtualization computing capabilities, the platform provides GPU device pass-through capabilities, supporting users to create and run GPU virtual machines on the platform, so that the virtual machine has high-performance computing and graphics processing capabilities. Supported pass-through devices include NVIDIA’s K80, P40, V100, 2080, 2080Ti, T4 and Huawei Atlas300, etc.
3.2 Create virtual machines
Cloud platform users can quickly create multiple virtual machines with specified models, specifications, images, cloud disks, VPC networks, public IPs, security groups, USBs, DNSs, and other related basic information of virtual machines, for deploying their own applications and services.
3.2.1 Prerequisites
- Before creating a virtual machine, you must have an account that can log in to the cloud platform and have already recharged the account.
- Before creating a virtual machine, you need to select the data center where the virtual machine needs to be created and run through the “Region” in the upper left corner of the console.
- Confirm that the quota of the specified region and account is sufficient; if the quota is insufficient, resources quota needs to be applied to the cloud platform management.
- Confirm that the required VPC, subnet, security group, and security group rules have been created to meet the network partitioning and security rule requirements in the target region.
3.2.2 Create Operation
-
After selecting the region (data center) where the virtual resources need to be run, select Virtual Machine in the left navigation bar, enter the virtual machine console, click “Create Virtual Machine”, and the virtual machine creation wizard will pop up.
-
Choose the type of virtual machine and determine the operating system image for the virtual machine.
- The machine type is the cluster type of nodes running virtual machines, representing different architectures and different models of CPUs or hardware features, which can be customized by administrators, such as x86 machine type, GPU machine type, ARM machine type, etc. The instance created by ARM machine type is an ARM version virtual machine instance, which has been adapted to domestic chips, servers and operating systems, and can run domestic operating systems, such as UOS or Galaxy Kirin.
- A mirror is a template of the virtual machine instance running environment, and you can choose from basic mirror, self-made mirror, and ISO mirror.
- The basic image is provided by the platform official by default, including multiple distributions of Centos, Ubuntu, Debian and Windows native operating systems, and the default time zone of the basic image is Shanghai.
- Self-made images are user-exported or self-customized images through virtual machines, which can be used to create virtual machines and can only be viewed and managed by the account itself.
- ISO images are not currently provided by default on the platform, and users need to upload and use them locally or through a URL.
-
View Image Features
- The mirroring features include hot upgrades, cloud-init, qemu-ga, and whether encryption is enabled.
-
Choose the specifications of the virtual machine, i.e. define the CPU memory and GPU configuration that provides computing power, and the specifications can be customized by the platform administrator.
- The default virtual machine specifications for the CPU model are 1 core 2G, 2 cores 4G, 4 cores 8G, 8 cores 16G, 16 cores 32G, etc.
- The platform provides GPU device pass-through capability. If the model is a GPU model, you can create and run virtual machines with GPU capabilities.
- For GPU models, the platform supports up to 4 GPU chips, and supports selection of GPU types. To maximize the performance of the GPU virtual machine, the platform limits the minimum CPU memory specification to be more than 4 times the number of GPU chips. For example, 1 GPU chip requires a minimum of 4 cores and 8G specification, 2 GPU chips require a minimum of 8 cores and 16G specification, and 4 GPU chips require a minimum of 16 cores and 32G specification.
-
Select and configure the system disk and data disk of the virtual machine, configure the capacity of the system disk and cloud disk separately, and select whether to encrypt the disk.
- System disk: The system disk for running the virtual machine image, when creating a virtual machine, you must select the system disk type and system disk capacity.
- Choose the disk type of the system disk, such as SSD disk or HDD disk, the disk type can be customized by the administrator.
- Configure the system disk capacity, the default system disk for both Linux and Windows images is 40GB, when creating an encrypted system disk, an additional 1G space is added by default, the system disk supports up to 2T, and the system disk capacity can be expanded to 2T, with a step of 1GB, that is, the capacity should be a multiple of 1GB.
Expanding the system disk increases the capacity of the block device, but does not expand the file system within the system. Therefore, after the system disk is expanded, you need to enter the virtual machine to perform the file system expansion (resize) operation. For specific operation steps, please refer to System Disk Expansion.
- Data disk: an elastic block device that provides persistent storage space for virtual machines based on distributed storage systems. When creating virtual machines, a cloud disk can be created and automatically bound to the virtual machine at the same time, and the hard disk will be automatically formatted and mounted.
- The data disk mount path can be selected by default as
/data(except for Windows systems), and users can also choose to add a cloud disk after the virtual machine is created. - Choose and configure the type and capacity of the data disk, and the specifications of the capacity range can be customized by the administrator.
- The platform’s default specifications support a minimum of 10GB capacity and a maximum of 32000GB, with a step size of 1GB, meaning the capacity should be a multiple of 1GB.
- The data disk mount path can be selected by default as
- Disk encryption: System disk, data disk password input, after setting the password, the corresponding hard disk will be encrypted.
- Currently, modifying the key of any resource is not supported.
- Once a disk is encrypted, the encryption cannot be removed unless it is formatted.
- The user-made encrypted data disk and created virtual machines cannot use the platform’s encryption mechanism, because it cannot sense whether the data disk is encrypted.
Encryption attribute inheritance, new resources generated from encrypted resources are automatically encrypted, such as snapshots, custom images, and cloned disks, which will inherit the encryption attributes.
- Configure network-related settings, including the VPC network, subnet, private IP address, private security group, public IP, and public security group that the virtual machine needs to join:
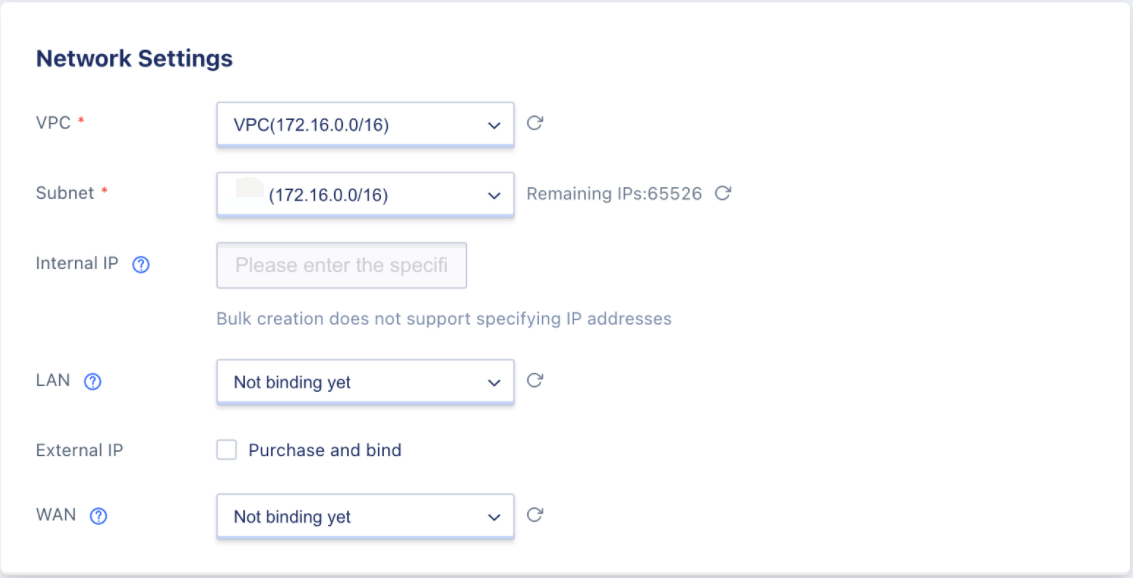
- A VPC network is a logically isolated two-layer network broadcast domain environment that belongs to the user. Within a VPC network, the user can construct and manage multiple three-layer networks, i.e. subnets. The VPC private network is the container of the subnets, and the networks between different VPCs are absolutely isolated.
- When creating a virtual machine, you must select a VPC network and the subnet it belongs to, that is, select the network and IP segment that the virtual machine will join.
- The console has calculated the number of available IPs for the selected subnet for the user, when creating, specify a subnet with enough available IPs.
- The platform will automatically assign an IP address to the virtual machine from the subnet it belongs to by default, and you can manually specify the IP address of the virtual machine through the “Internal IP” option.
- Security groups are virtual firewalls provided by the platform, providing bidirectional traffic access control rules that define which networks or protocols can access resources.
- External security groups are used to control traffic between virtual machines and external IPs, while internal security groups are used to control secure access between virtual machines.
- The external and internal security groups are not bound by default, and can be bound after the virtual machine is created.
- The system provides a default security group. If it cannot meet the requirements, you can create a security group and bind it to the virtual machine.
- The external network IP provides elastic external network exit services for virtual machines, supporting the application and binding of an external network IP to the virtual machine when creating the virtual machine. The platform supports IPv4/IPv6 dual-stack network, and can bind multiple external network IP addresses to the virtual machine after the virtual machine is successfully created, supporting up to 50 IPv4 and 10 IPv6 external network IP addresses, and supporting manual setting of the virtual machine’s default exit. It also supports filtering external network line resources through tags.
- When the mirroring feature does not support qemu-ga, creating a virtual machine cannot apply for a direct EIP, but you can bind a NAT EIP after the virtual machine is created, and you need to open the VPC gateway to bind the NAT EIP.
The platform supports viewing the bound external IP address and network routing in the virtual machine, and the traffic of the virtual machine accessing the external network is directly transmitted to the physical network card and the external network through the virtual network card, which improves the performance of network transmission.
- Select and configure the virtual machine basic management configuration, including virtual machine name, login method, login password (optional random generation), project group and tags, etc.
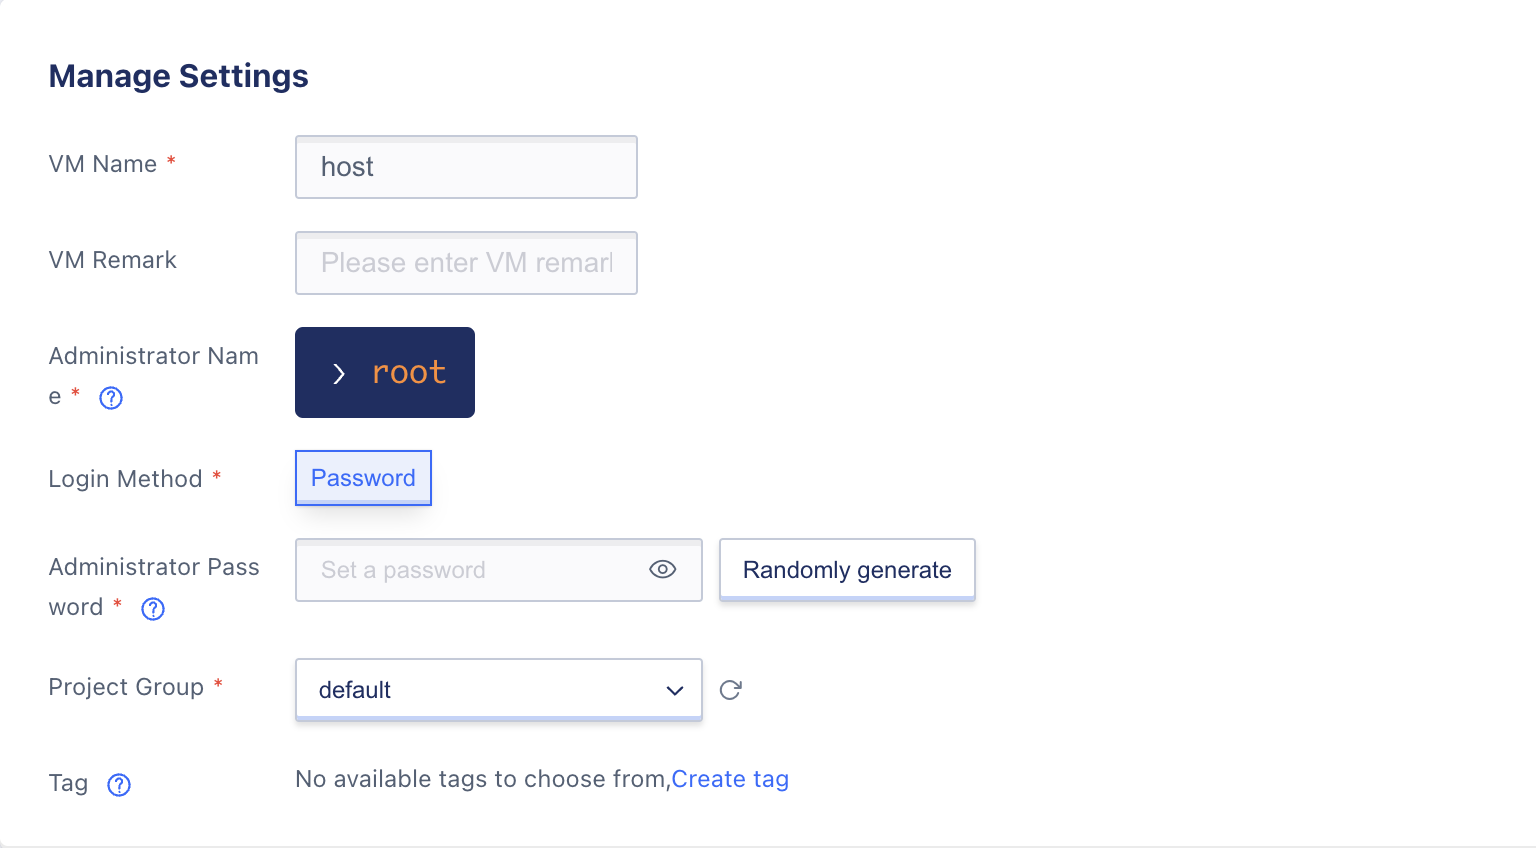
- Virtual machine name: The default configuration name of the platform is
host, and the user can customize the virtual machine name, which can be searched and filtered by name. - Login method: Set login credentials for the virtual machine, i.e. the password for logging into the virtual machine, with the option to generate randomly.
- The administrator for CentOS is
root, the administrator for Ubuntu isubuntu, the administrator for Debian isroot, and the administrator for Windows systems isadministrator.
- The administrator for CentOS is
- Label: Select an existing tag key-value pair to bind to the virtual machine resource.
When the image selected for creating the virtual machine has neither cloud-init feature nor qemu-ga feature, the administrator name, login method, and administrator password are not displayed.
-
Configure advanced settings, including hostname, USB, DNS, CPU boot mode, high availability mode, isolation group, and custom data.
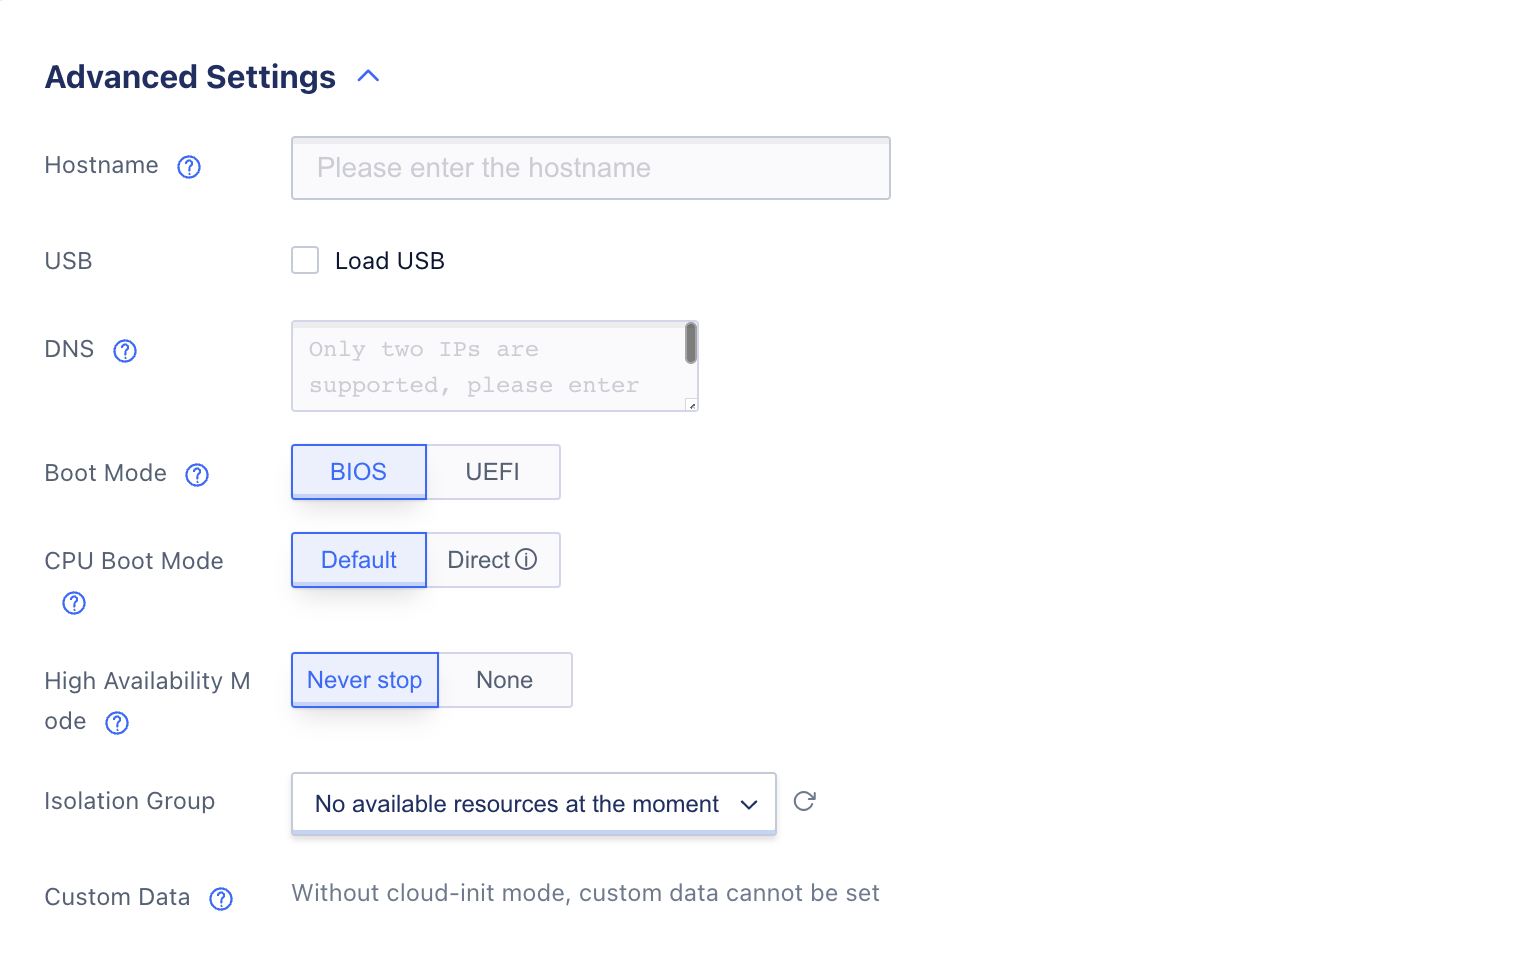 * Hostname: Represents the computer name inside the operating system, when creating in batches, the current hostname will be added with an orderly suffix, and the new hostname will take effect after the instance is restarted.
For Windows systems, the length is between 2 to 15 characters. For Linux systems, the length is between 2 to 63 characters. When creating in batches, Windows supports up to 12 characters, and Linux supports up to 60 characters.
- USB: Supports USB pass-through function, physical machine USB devices can be directly passed through to the cloud host running on the physical machine, USB devices include the following two modes:
- Direct connection: Load the USB device onto the cloud host on this physical machine, and when migrating the cloud host, the USB device needs to be unloaded.
- Forward: Load the USB device onto the cloud host within the computing cluster where this physical machine is located, and no need to unload the USB device when migrating the cloud host.
- DNS: Support custom DNS, up to two IPs, multiple IPs please enter on separate lines.
- CPU Boot Mode: The mode used by the CPU when the virtual machine starts, divided into default and direct, where the direct mode requires the CPU models of two physical machines to be exactly the same for online migration.
- High availability mode: This policy can trigger automatic restart of cloud hosts to improve their availability. High availability keeps virtual machines alive forever and does not keep them alive if they are not present.
- Isolation Group: An Isolation Group is a simple scheduling policy for virtual machine resources, which supports the dispersion of instances within or between groups to different physical machines, in order to ensure high availability of the business.
- Custom data: that is, custom initialization scripts, encoded in base64, up to 1M, which can be executed at the first startup and each time the machine is turned on / reinstalled / restarted. When the selected image supports cloud-init, it supports input.
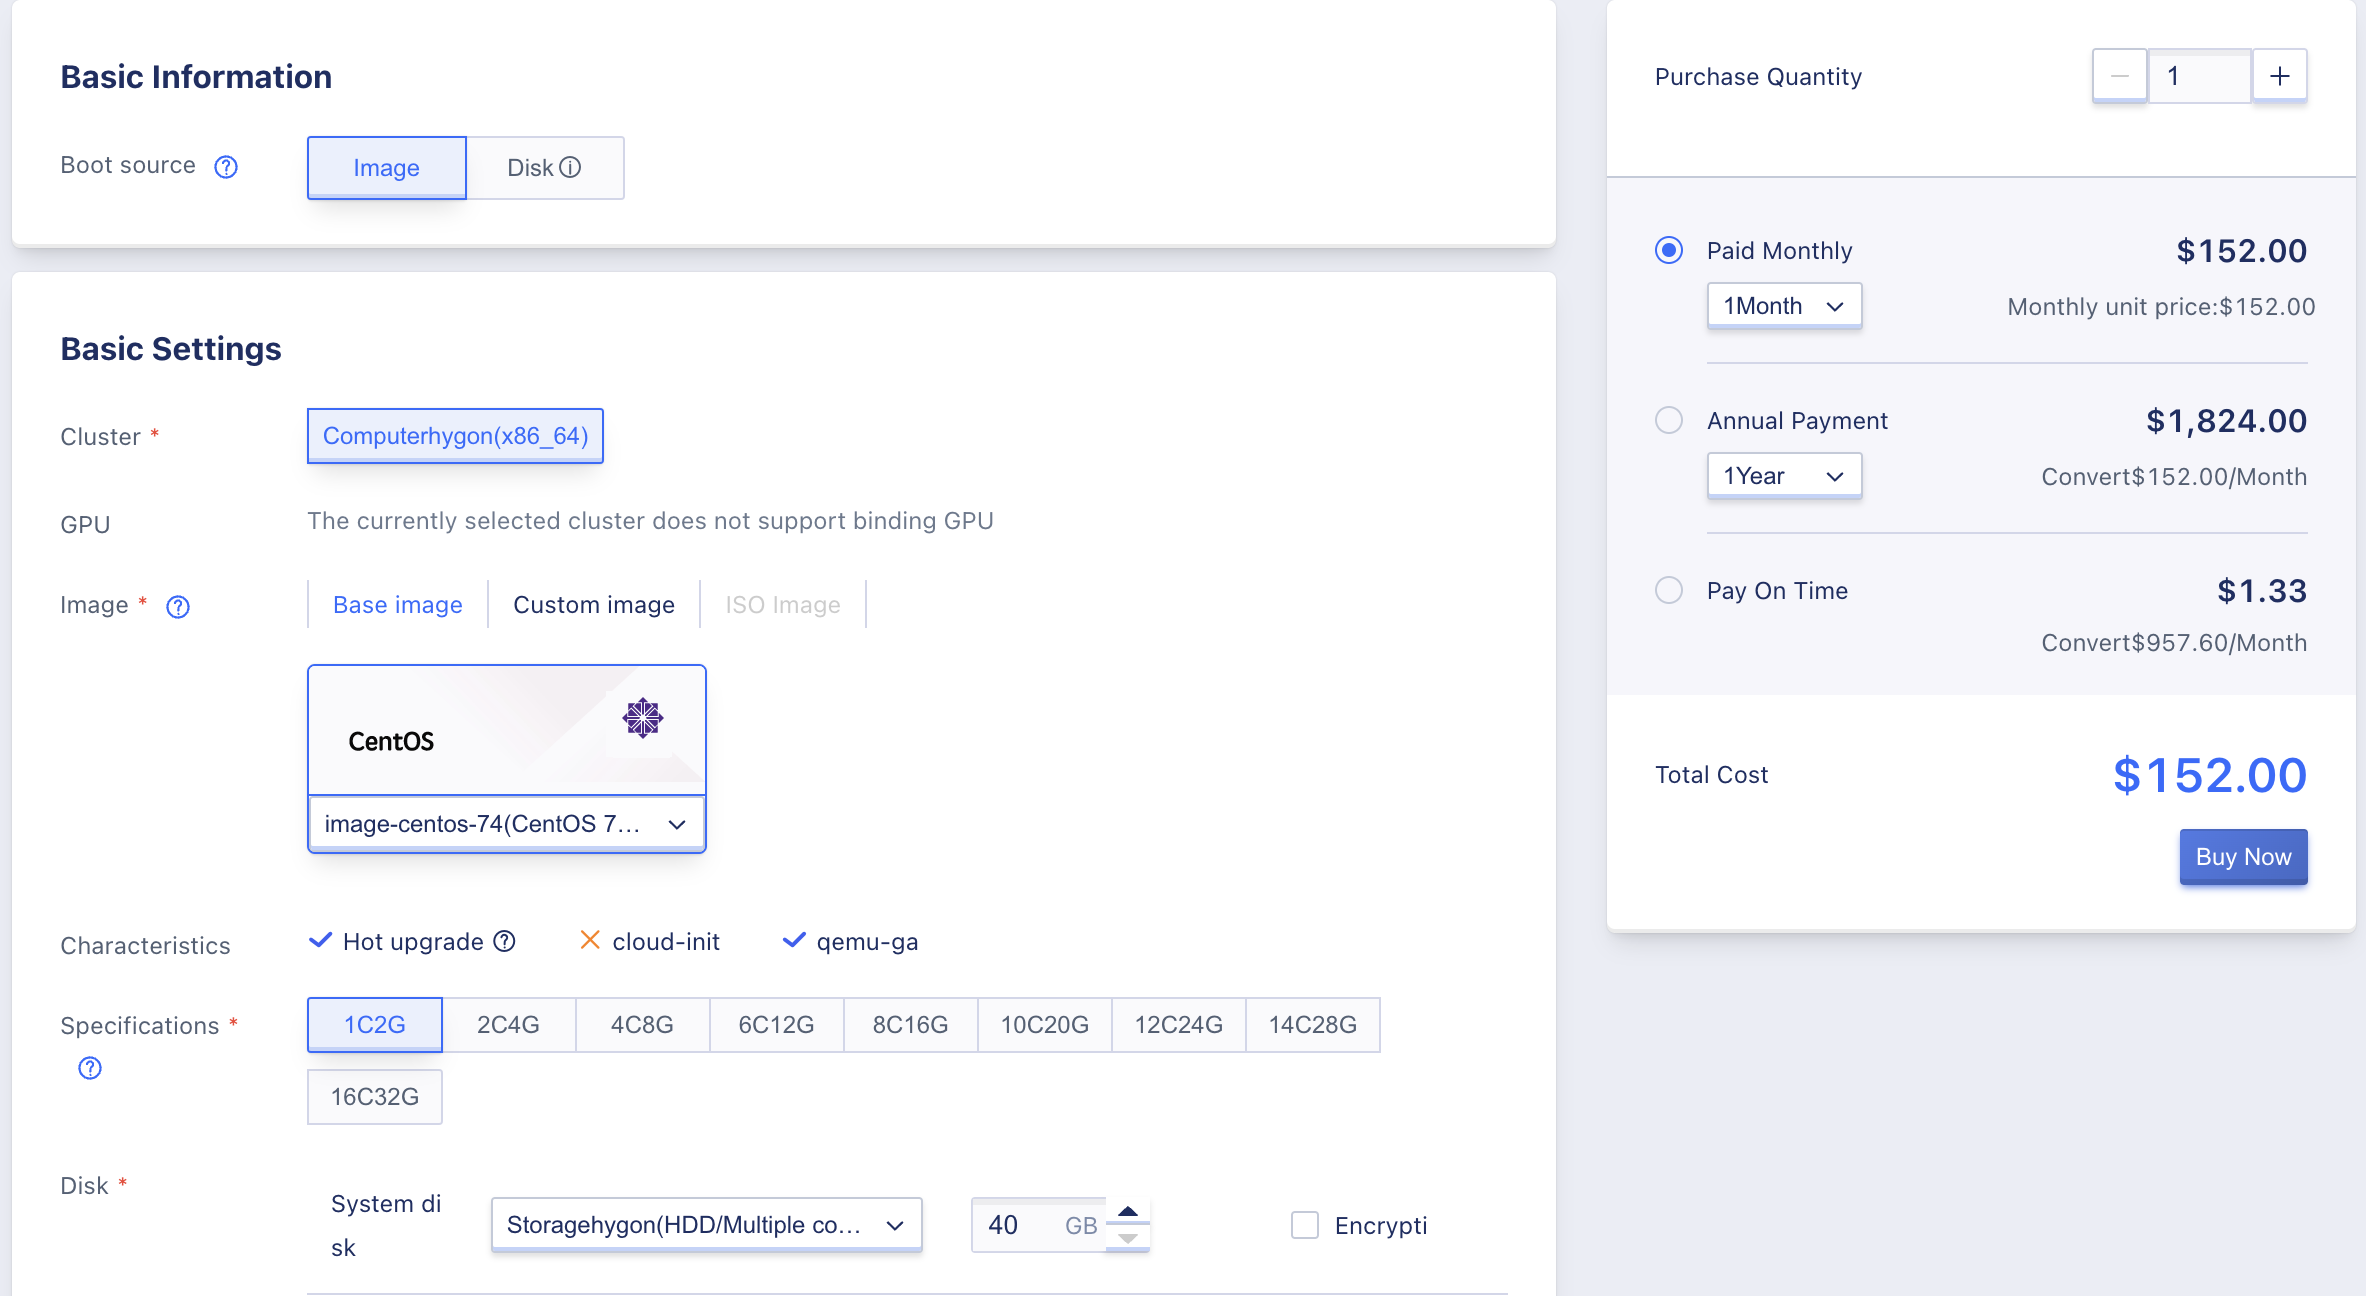
- Choose the quantity to purchase and the payment method, as shown in the following figure, confirm the order and click “Buy Now” to create the virtual machine.

- Purchase Quantity: Create multiple virtual machines according to the selected configuration and parameters, up to 10 virtual machines can be created in batches, manual setting of virtual machine IP address is not supported when creating in batches.
- Payment Method: Select the billing method for the virtual machine, supporting three methods of pay-per-hour, pay-per-year, and pay-per-month, and select the appropriate payment method according to the needs.
- Total cost: the cost of the user’s selection of virtual machine CPU, memory, data disk, external IP, GPU and other resources is displayed according to the payment method.
- Buy Now: After clicking “Buy Now”, you will be returned to the virtual machine resource list page, where you can view the creation process of the host. Usually the status will first show “Starting”, and it will be completed within 1-2 minutes.
3.3 View Virtual Machine
Enter the virtual machine console through the navigation bar to view a list of virtual machine resources. Through the virtual machine name on the list, you can enter the virtual machine details to view the detailed information of the virtual machine and related resources.
3.3.1 Virtual Machine List
The virtual machine list page can view the resource list of existing virtual machines under the current account, including name, resource ID, status, VPC, subnet, cluster and features, configuration, CPU usage, memory usage, disk usage, IP address, project group, high availability level, billing method, creation time, expiration time, tags and operations, etc. At the same time, you can also customize the list information through the “Custom List” button.

- Name: The name and remarks of the virtual machine can be modified through the edit button on the list page.
- Resource ID: The globally unique ID of the virtual machine, which can be copied by copying the ID button.
- Status: The current running status of the virtual machine, including starting, running, shutting down, shutting down, restarting, modifying configuration, reinstalling, deleting, power off and destroying, and in the administrator side there are also migration and crash migration states.
- VPC/Subnet: The VPC network and subnet specified when the virtual machine is created, i.e. the VPC network and subnet information where the virtual machine IP is located.
- IP Address: The IP address of the virtual machine, including the internal IP and external IP (if any), and the IP address can be copied by clicking the copy button.
- Cluster and features: Cluster type of virtual machines running on physical machines, representing different architectures, different types of CPUs or hardware features;
- Configuration: Basic configuration information of the virtual machine, including CPU memory specifications, number of GPUs, system disk image, total capacity of system disk and total capacity of data disk.
- Billing Method: The payment method specified when creating the virtual machine, including hourly, monthly, and yearly.
- Create Time/Expire Time: The create time of the virtual machine and the expire time within the billing cycle.
- CPU utilization, memory utilization, disk utilization: display three monitoring data on the list page.
- High Availability Level: Virtual Machine Keepalive Policy, which can trigger cloud host automatic restart to improve cloud host availability.
- Tags: Key-value pairs of tags associated with the virtual machine.
- Operations: More operations on a single virtual machine, including details, login, start, shutdown, delete, power off, restart, renewal, modify alarm template, make image, reset password, reinstall system, hot upgrade, bind public IP, modify public security group, modify private security group, modify configuration, bind USB, modify tags, modify custom data, uninstall ISO and get VNC information, etc.
The default list can display 10 pieces of virtual machine information per page, support pagination and set the number of virtual machines that can be displayed per page, up to 100 pieces of virtual machine data can be displayed per page, virtual machine list can be searched and filtered through the search box, support fuzzy search, CPU and memory support ascending order, reverse view according to the usage rate.
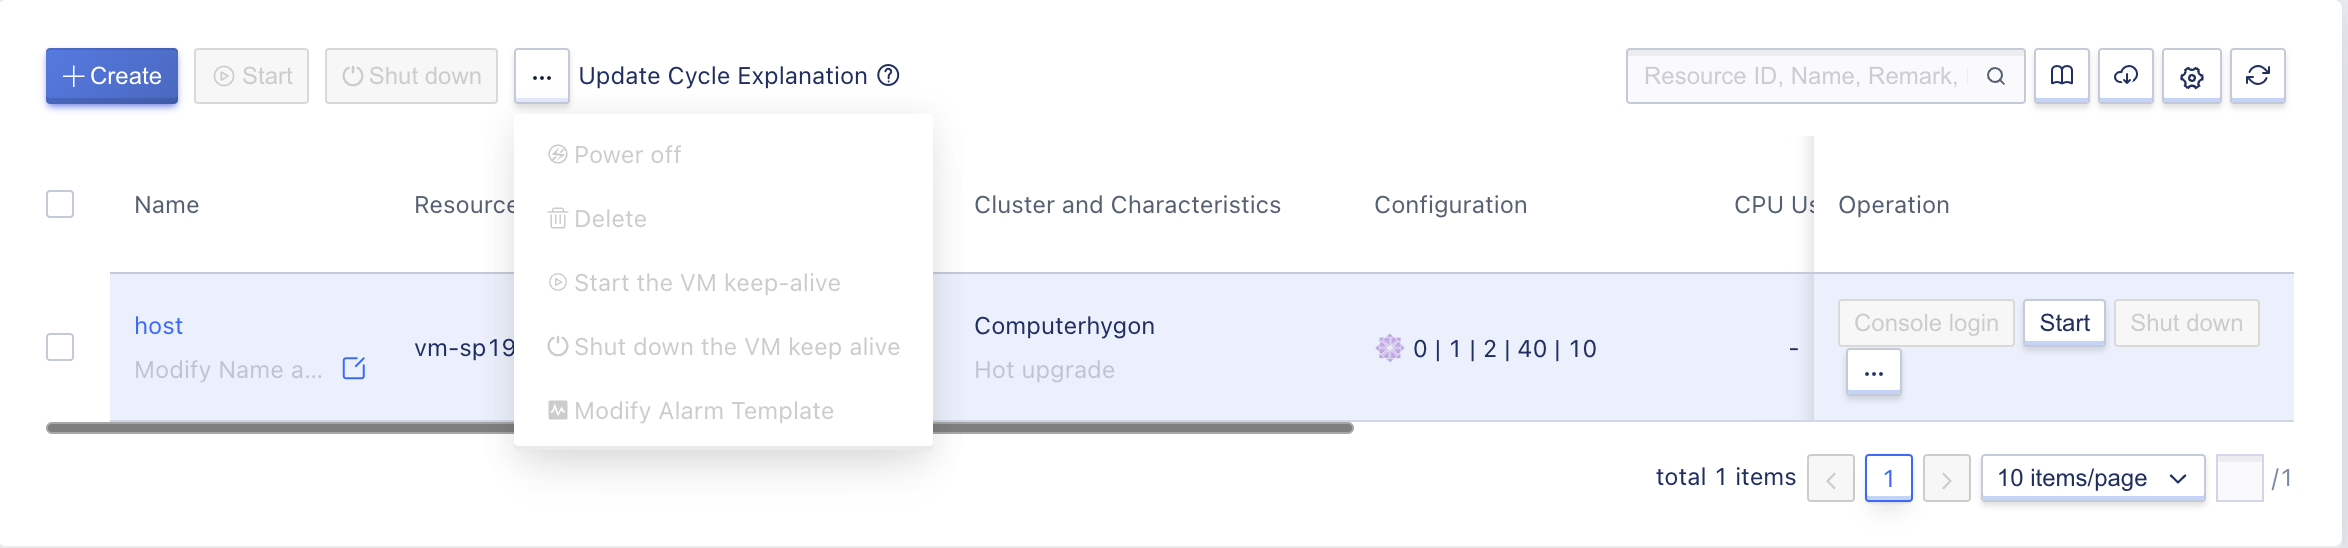
To facilitate tenants to maintain and operate virtual machines, the platform supports downloading all the virtual machine resource list information owned by the current user as an Excel table; at the same time, it supports batch operations on virtual machines, including batch start, shut down, power off, delete, open virtual machine keep alive, close virtual machine keep alive, modify alarm template operations. Multiple virtual machines can be selected and batch operations can be performed by clicking the batch operation button, as shown in the following figure:
3.3.2 Virtual Machine Details
On the virtual machine list, clicking on the name of the virtual machine will take you to the overview page of the current virtual machine to view the details and monitoring information of the virtual machine, as well as the operation log. You can also switch to the USB device, disk information, network, and external storage page to view the related disks, external storage disks, USB devices, networks, IP addresses, and elastic network card information, as shown in the following overview page:
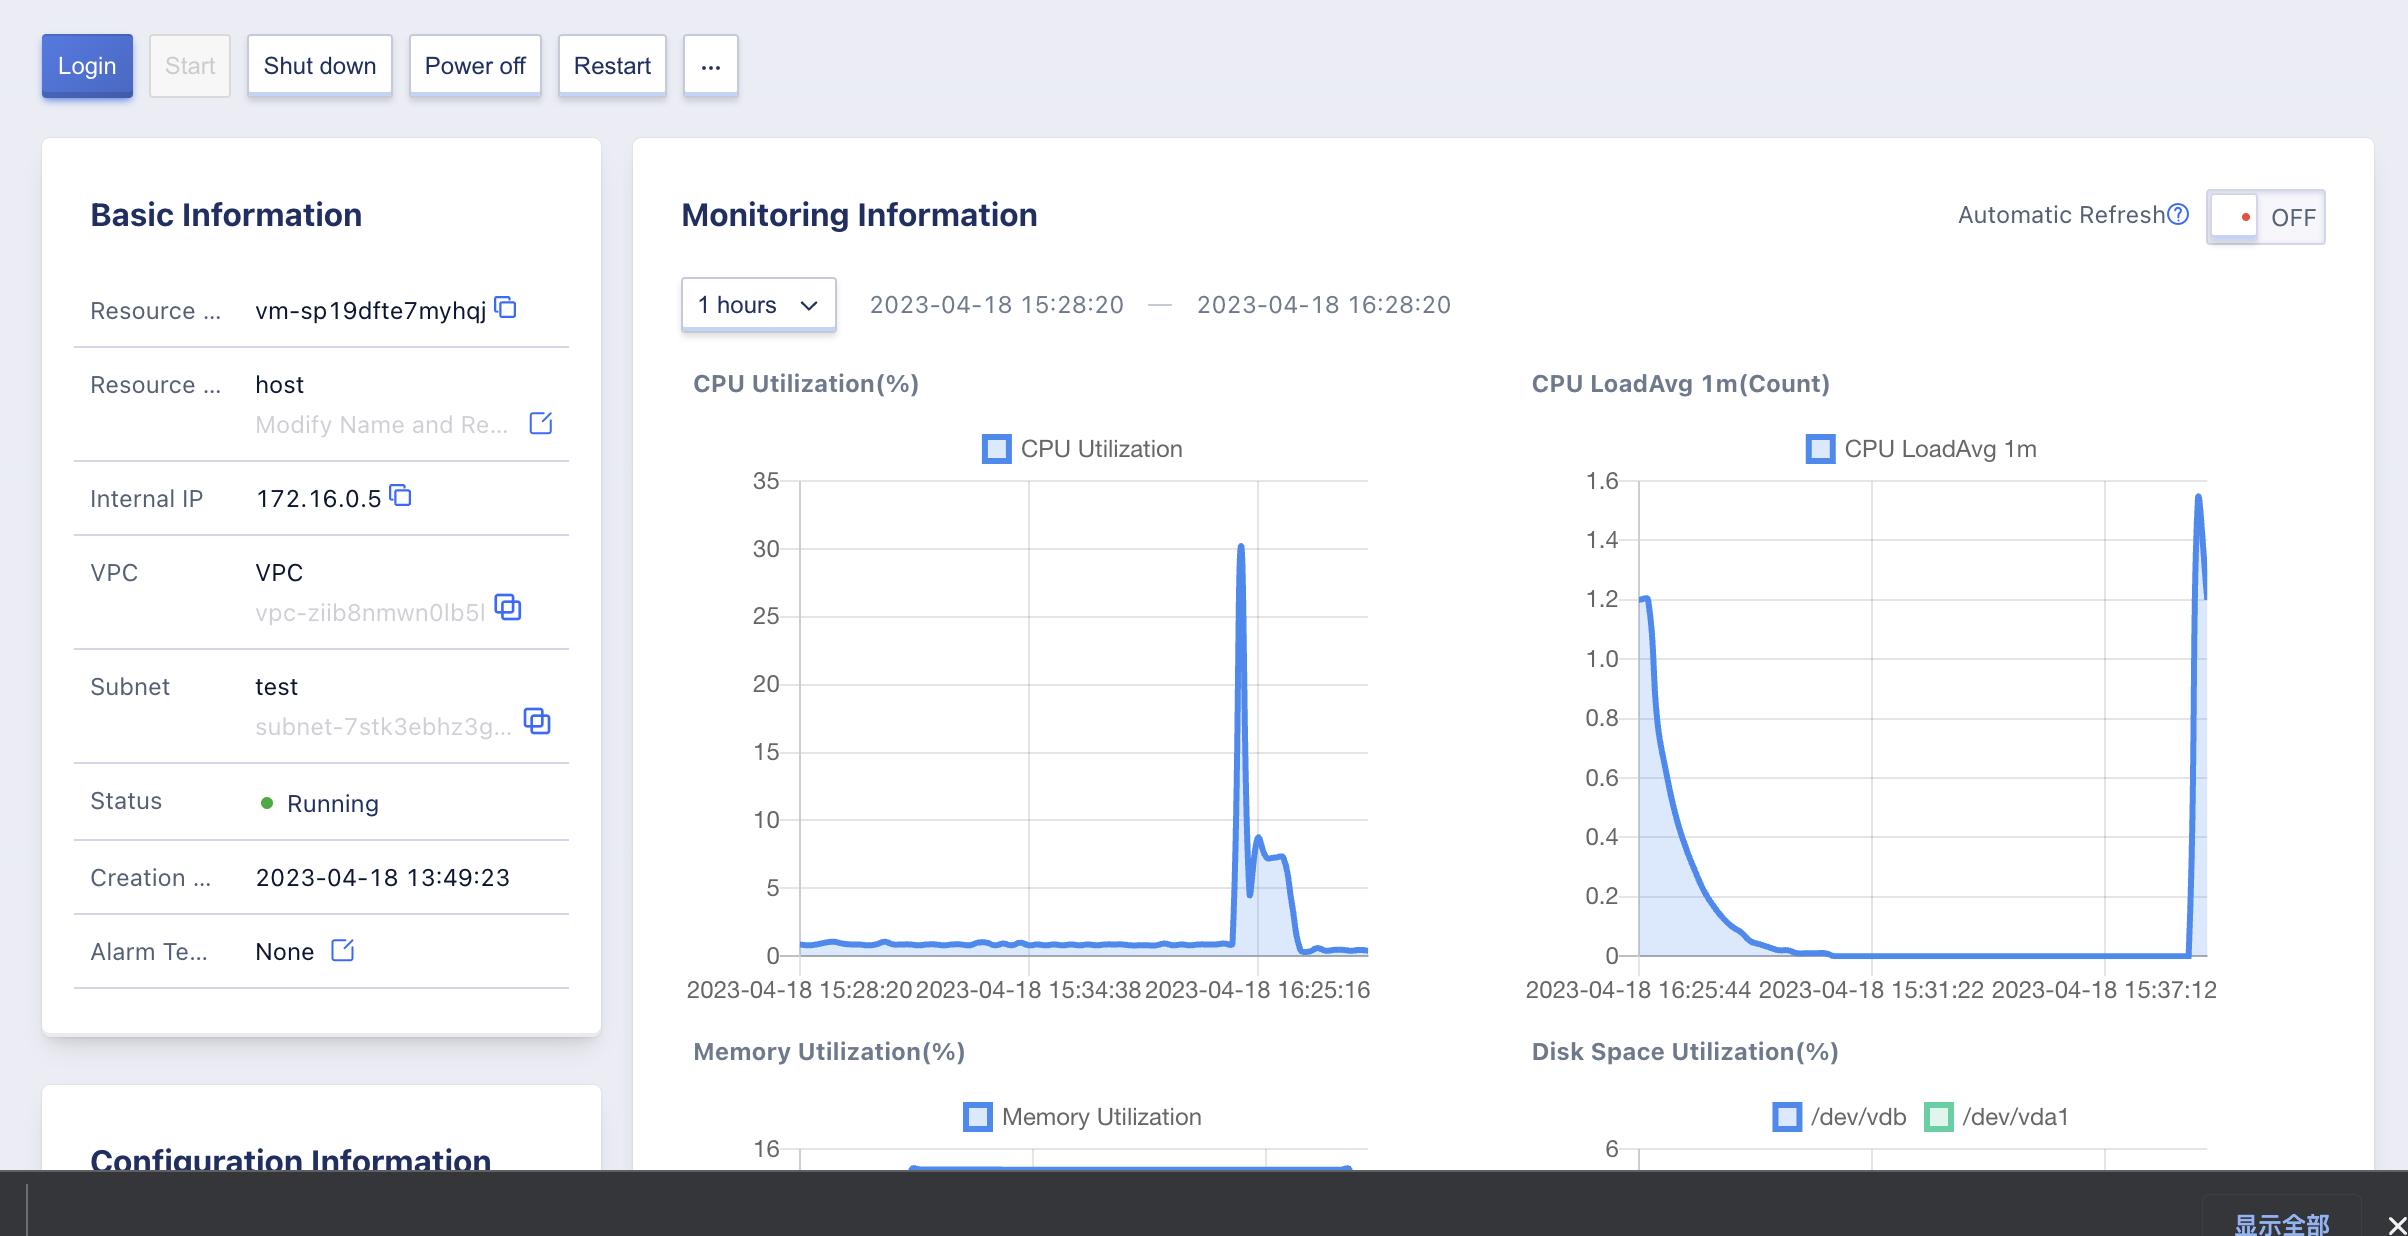
3.3.2.1 Virtual Machine Overview
The overview page displays basic information, configuration information, advanced settings and monitoring charts, and can also manage and operate virtual machines through the overview page.
- The basic information includes resource ID, name, private IP, VPC, subnet, status, creation time, and alarm template.
- Click the button to the right of the name to modify the name and remarks of the virtual machine.
- You can click the button on the right side of the alert template to modify the alert template associated with the virtual machine, and the virtual machine will not bind the alert template by default.
- The configuration information includes model, image, CPU, memory, system disk total capacity and system disk total capacity, among which the data disk capacity is the sum of the capacity of all cloud disks associated with the current virtual machine.
- Advanced settings include hostname, CPU mode, high availability level, isolation group, cloud-init, qemu-ga, click the High Availability Level Modify button to change the High Availability Level, click the CPU Mode Modify button to change the CPU mode.
- Monitoring Charts: Including CPU utilization, memory utilization, space utilization, network card out/in bandwidth, network card out/in packet volume, disk read/write throughput, disk read/write times, average load, TCP connections and blocked process numbers.
Users can turn on the “Auto Refresh” in the top right corner of the monitoring chart to make the page automatically refresh every 30 seconds to get the latest monitoring chart data.
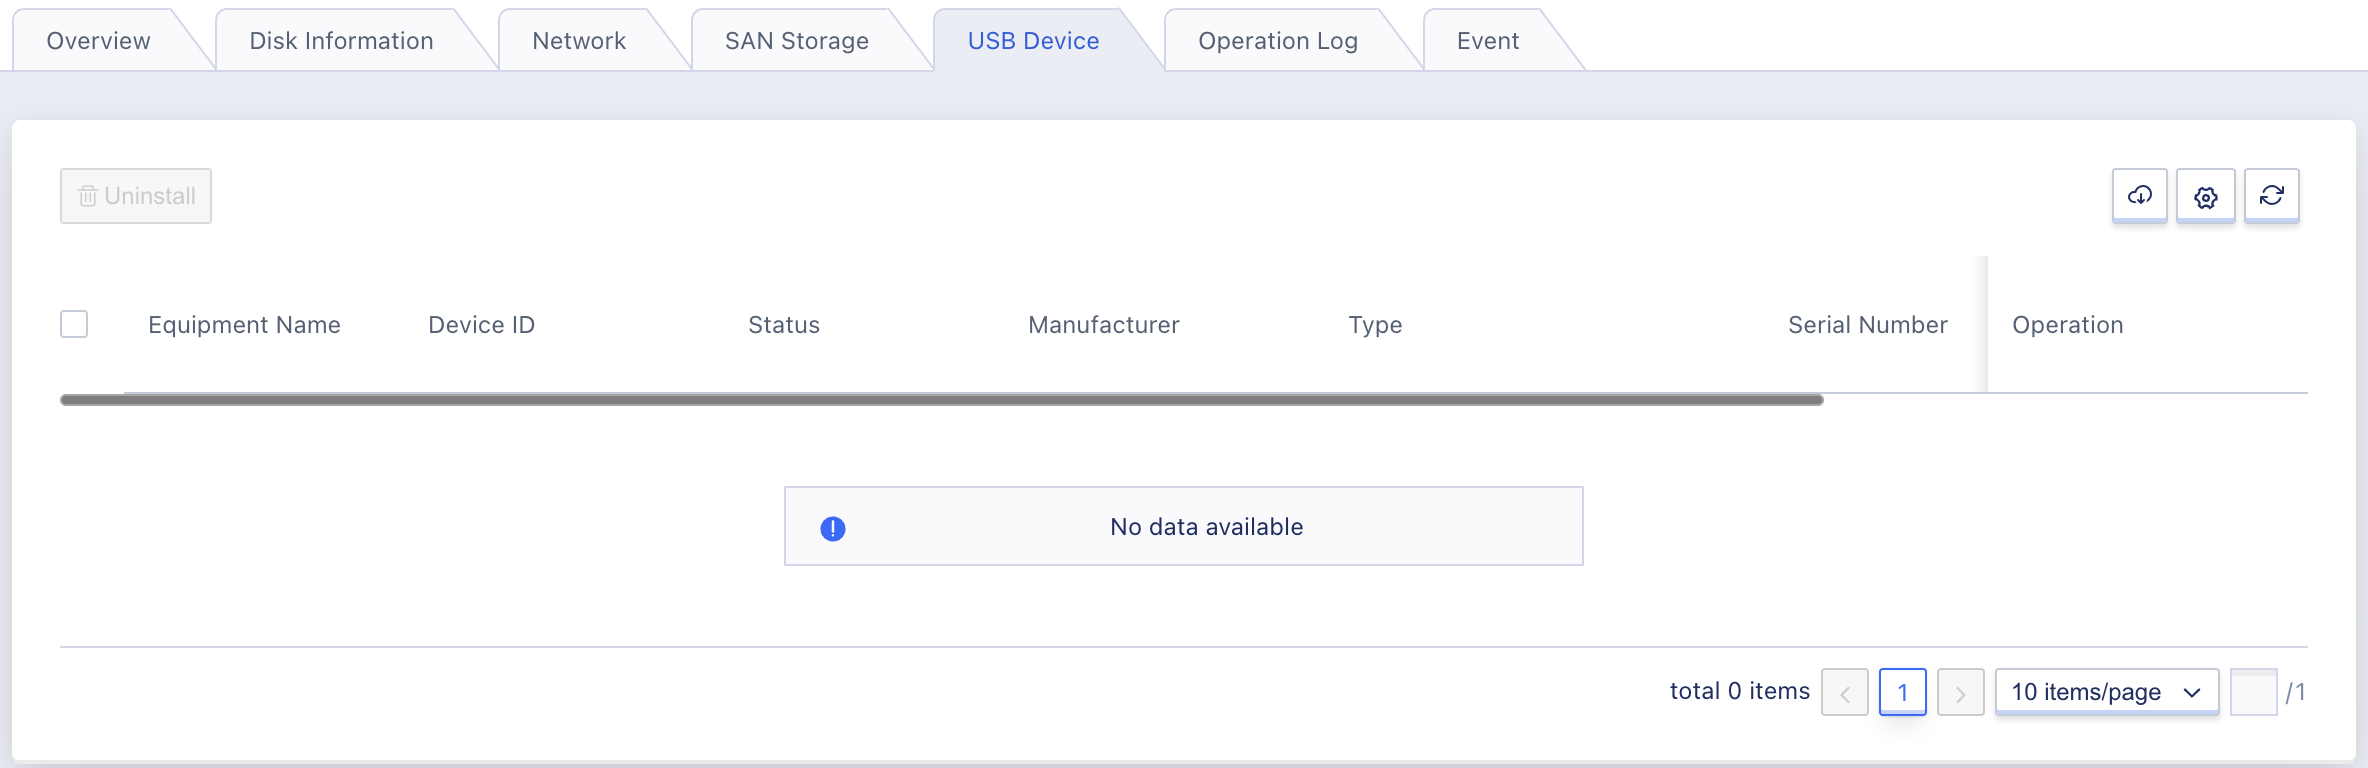
3.3.2.2 USB Device
The USB device page displays the USB devices bound to the virtual machine, including the USB device name, device ID, status, manufacturer, type, serial number, USB version, pass-through mode, and operation to unload the USB device. As shown in the following figure:
3.3.2.3 Virtual Machine Hard Disk
The disk page displays information about the current virtual machine’s system disk and mounted data disks and shared disks, including the name, ID, cluster architecture, cluster, encryption, disk type, disk capacity, billing method, status, creation time, expiration time and snapshot operations for each disk. As shown in the following figure:
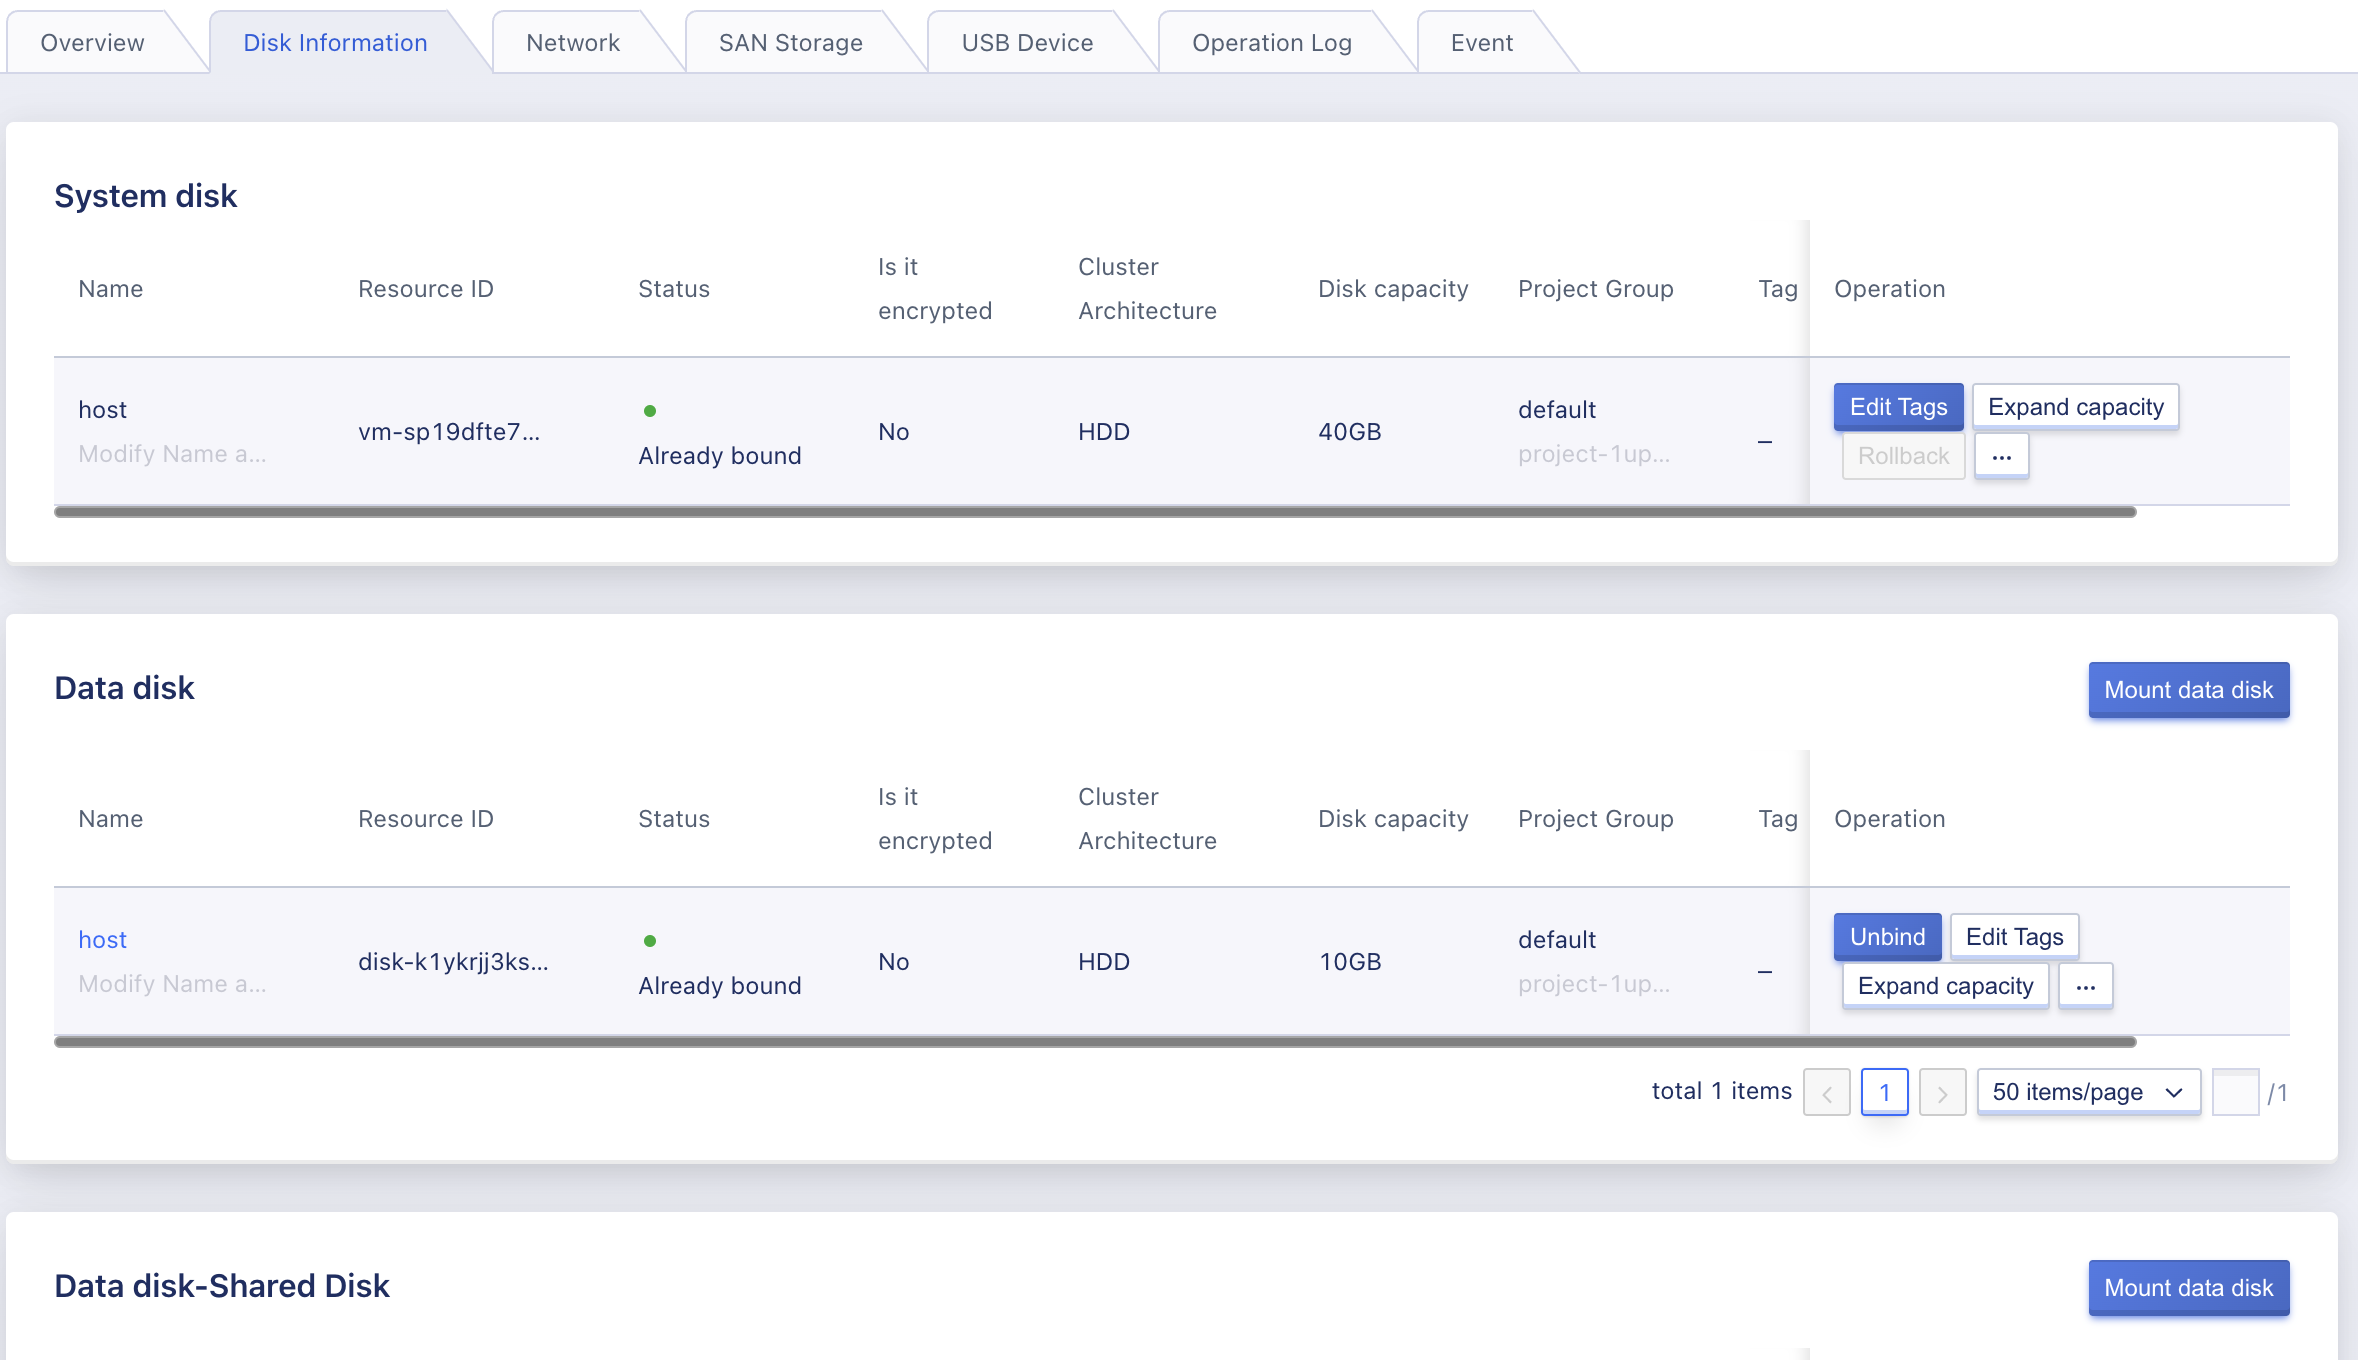
- Cluster architecture refers to the cluster architecture where the physical machine that the virtual machine system disk or data disk belongs to is located, including HDD, SSD, NVME, etc., representing the disk media type of the cluster.
- A cluster refers to the cluster where the physical machine that the virtual machine system disk or data disk belongs to is located, which can be customized by the administrator, such as capacity type or performance type, etc.
- Types of disks include system disks and data disks. Except for the system disk, any additional cloud disks bound are data disks.
- The disk capacity is the current capacity size of each disk.
- Only data disks support billing method and expiration time information, the system disk has the same life cycle as the virtual machine.
- Does encryption indicate the encryption status of the virtual machine disk.
In the operation items of the virtual machine disk management list, it supports the expansion, renewal and snapshot operations of the system disk and data disk of the virtual machine, supports the renewal, binding and unbinding operations of the data disk, the system disk is consistent with the life cycle of the virtual machine, and supports the mounting, expansion and renewal operations of the shared disk.
3.3.2.3.1 Disk snapshot
Support snapshot operations for system disk and data disk separately. Snapshots only capture data written to the disk, not including data cached in memory by applications or operating systems. To ensure that all application data is captured in the snapshot, it is recommended to shut down the virtual machine or unmount the data disk before taking the snapshot. The specific operation is shown in the following figure:

3.3.2.3.2 Disk expansion
Support for system disk and data disk expansion operations respectively, expanding cloud disk is to increase the capacity of the block device, without expanding the file system in the system, that is, after the system disk and data disk expansion, you need to enter the virtual machine to perform file system expansion (resize) operations, specific steps for system disk expansion can be found in: System Disk Expansion.
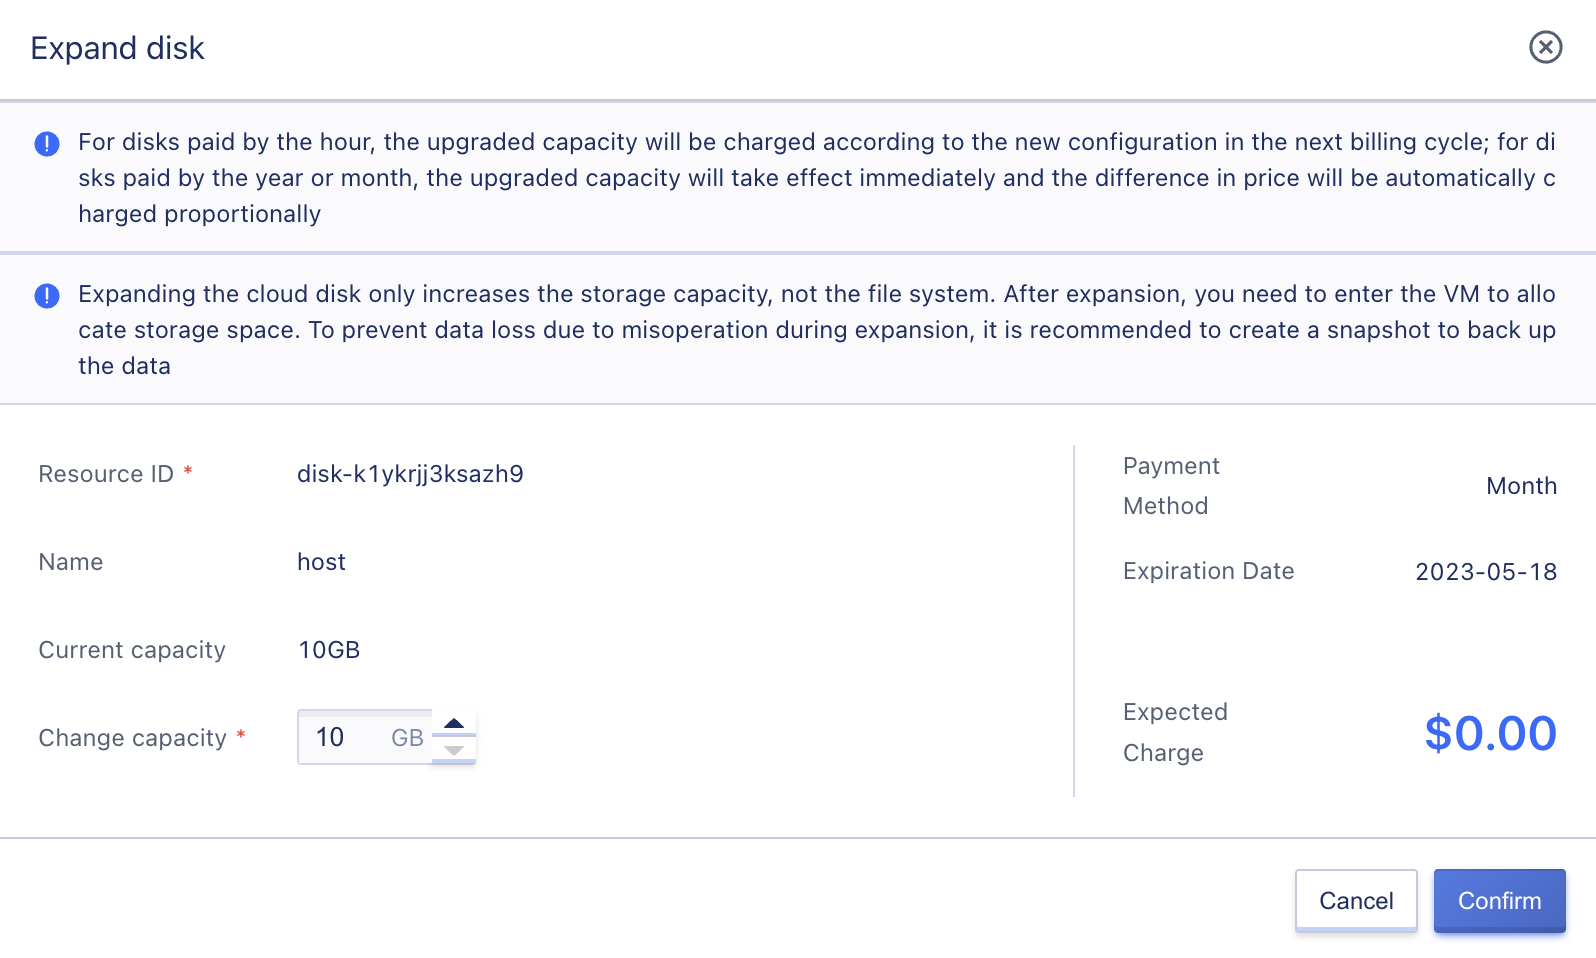
For disks that are charged by the hour, the new capacity will be charged according to the new configuration in the next billing cycle after the upgrade; for disks that are charged annually or monthly, the new capacity will take effect immediately and the difference in price will be automatically supplemented proportionally.
3.3.2.3.3 Data Disk Renewal
Support direct renewal operations for data disks mounted to virtual machines in virtual machines, and fees will be charged according to the renewal time, as shown in the following figure:
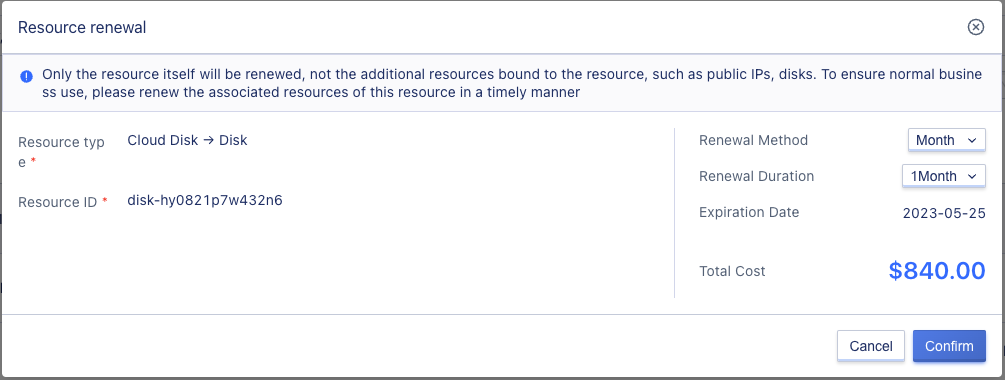
When renewing the cloud disk, it is supported to change the renewal method, only from short period to long period, for example, the monthly renewal method can be changed to monthly or yearly.
The renewal duration of the cloud disk matches the billing method of the resource. When the billing method of the data disk is “hourly”, the renewal duration is specified as 1 hour; when the billing method of the data disk is “monthly”, the renewal duration can be selected from 1 to 11 months; when the billing method of the data disk is “yearly”, the renewal duration of the data disk is from 1 to 5 years.
3.3.2.4 Virtual Machine Network
The web page displays the basic network information and advanced settings of the current virtual machine, and can also manage the external IP and elastic network card resources of the virtual machine.
The basic network information includes the VPC to which the current virtual machine belongs, the subnet it belongs to, the internal IP, the external security group, and the internal security group information, and the virtual machine’s external security group and internal security group can be updated through the button on the right side of the security group.
Advanced settings include DNS and network card mac. Click the modify button to modify the DNS and network card mac address. The network card mac address needs to be modified after shutdown, as shown in the following figure:

For details about the external IP and elastic network card resources of the virtual machine, please refer to External IP Management and Elastic Network Card Management.
3.3.2.5 External IP Management
The platform supports dual stack IPv4/IPv6 networks, with each virtual machine supporting up to 50 IPv4 and 10 IPv6 public IP addresses. The first IP address with the default route (including the IP address of the external network elastic network card) is used as the default network exit of the virtual machine. At the same time, the external IP addresses and network routes bound in the virtual machine can be viewed, and the traffic of the virtual machine accessing the external network is directly transmitted to the physical network card and the external network through the virtual network card, improving the performance of the network transmission.
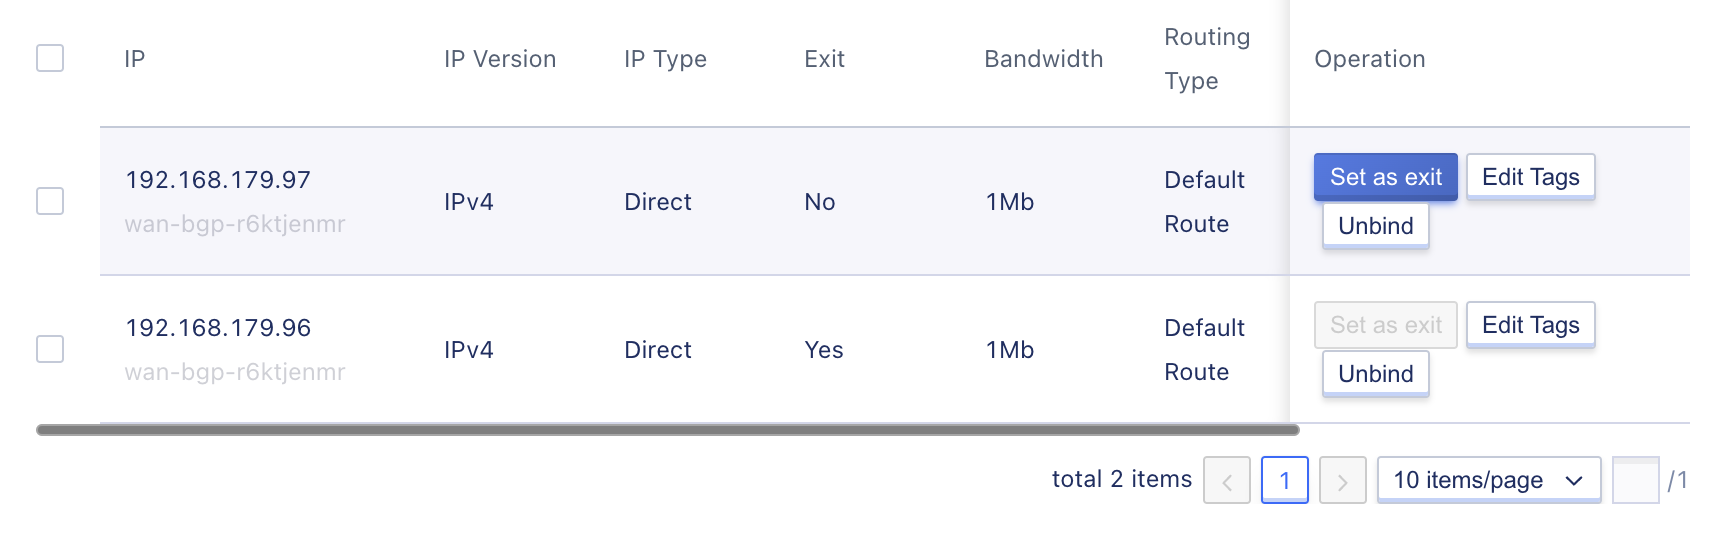
External IP information includes virtual machines and bound external elastic network cards IP, only supporting setting the external IP with default route as the default network outlet of the virtual machine. Detailed information and related management operations of the bound external IP can be viewed through the list information, as shown in the figure, the bound external IP information includes IP address, IP version, IP type, outlet, bandwidth, route type, binding time and status.
- IP refers to the IP address and network segment name of the currently bound external network IP (the network segment is a custom external network IP address pool by the platform administrator).
- The IP version refers to the IP version of the currently bound public IP, including IPv4 and IPv6.
- The IP type refers to the type of IP currently bound to the public network, including direct and NAT.
- The exit indicates whether the current IP is the default exit of the virtual machine, and a virtual machine can support up to two default exits (one for IPv4 and one for IPv6).
- Bandwidth refers to the bandwidth limit of the current IP address, which is specified when applying for an external IP address.
- Routing type refers to the type of routing issued for the current IP address segment (segment routing policy is customized by the platform administrator), including default routing and non-default routing, and only supports setting the external IP with default routing as the default network exit of the virtual machine.
- The default route type indicates that when the virtual machine binds the IP address, a route with the destination address of
0.0.0.0/0will be automatically issued to the virtual machine. - Non-default routes refer to the specified destination address routes configured by the administrator for the segment when the virtual machine binds the IP address, such as issuing the destination address
10.0.0.0/24route for the virtual machine. - If multiple public IP addresses bound to the virtual machine are all default route types, the first IP address with default route is used as the default egress of the virtual machine by default.
- The default route type indicates that when the virtual machine binds the IP address, a route with the destination address of
Users can use the operation items of the external network IP management console to bind, unbind, and set as the default exit operation of the external network IP address, and support batch unbinding.
The IP address of the external network elastic network card bound to the virtual machine will be displayed in the external network IP list at the same time, supporting the set as the exit operation but not supporting the unbinding, and the unbinding and release of the external network IP of the elastic network card can be achieved by unbinding the elastic network card.
3.3.2.5.1 Bind external IP
It supports up to 50 IPv4 and 10 IPv6 external IP addresses, and the default network exit of the virtual machine is the first IP address with the default route.
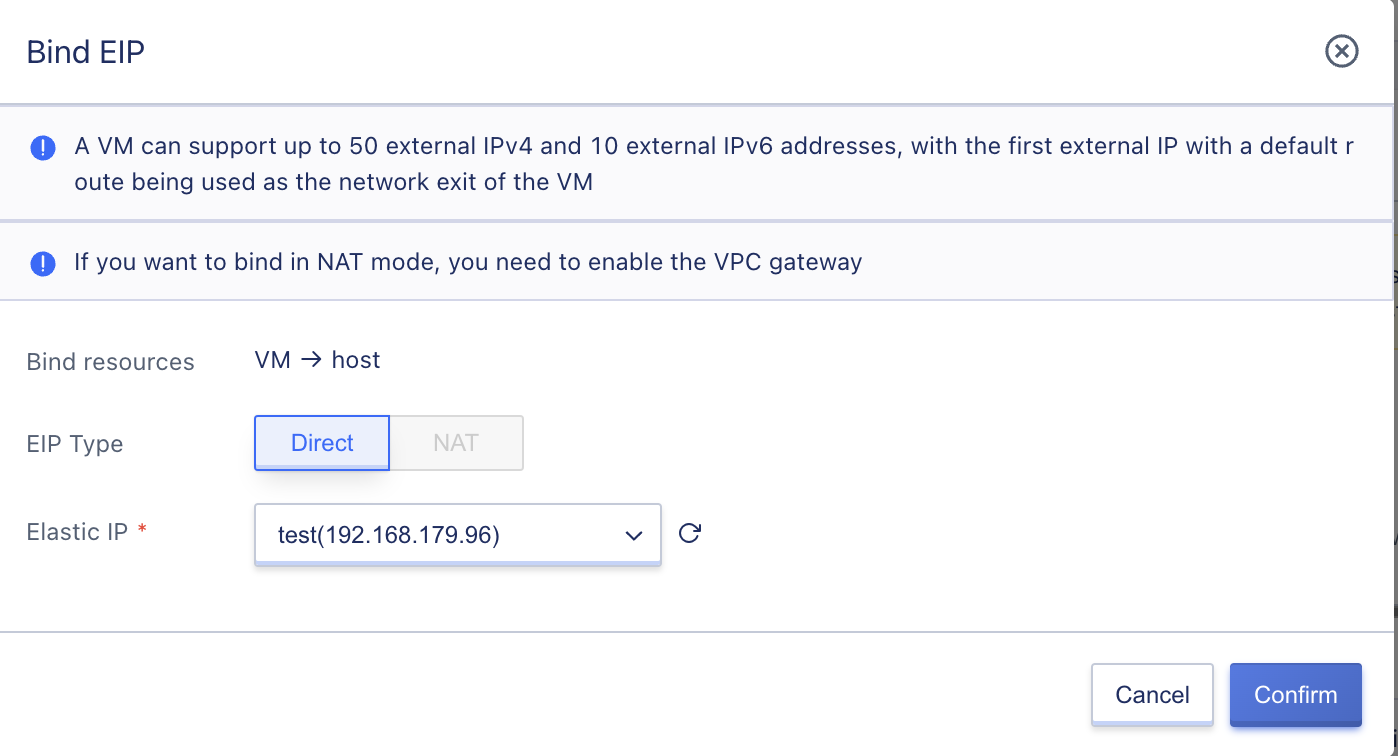
After binding is successful, the IP address that has been bound can be viewed in the virtual machine, and the second network card of the virtual machine is configured. This chapter takes the “Centos” operating system as an example, as shown in the following figure:
When the virtual machine image is not installed with qemu-ga, only external IPs of NAT type are supported.
3.3.2.5.2 Unbind external IP
Support unbind external IP address of virtual machine, if the default external IP is unbinded, then automatically select the next external IP with default route as the default network exit of the virtual machine.
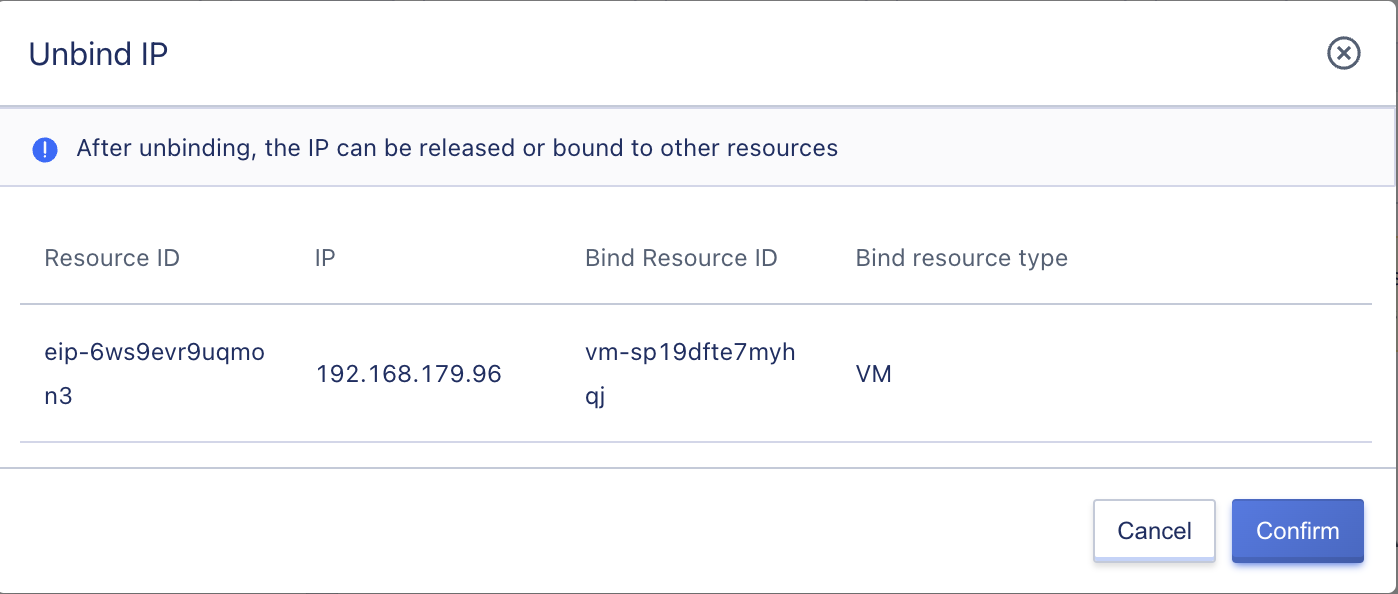
The public IP bound to the virtual machine cannot be unbound, if you need to unbind the IP address of the elastic network card, you can directly unbind the elastic network card.
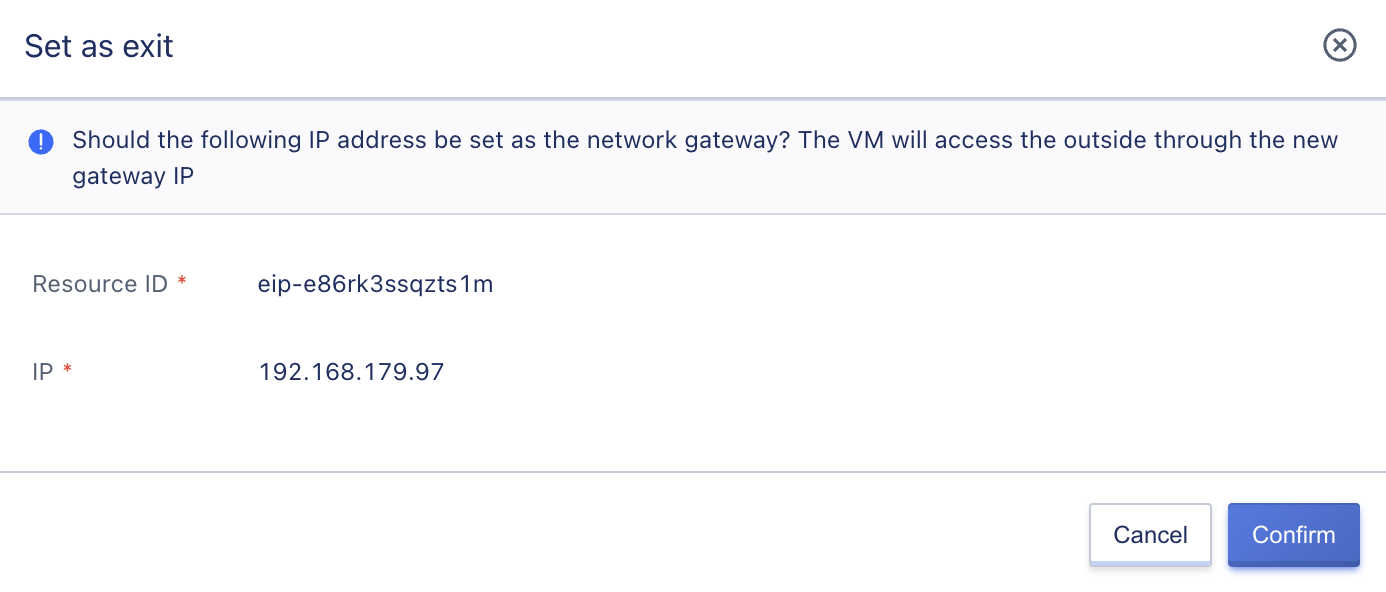
3.3.2.5.3 Set as default exit
Support users to manually set a bound external IP as the default network exit of the virtual machine, only supporting external IPs with default routes to be set as the default network exit of the virtual machine. Users can set the default network exit for the bound IPv4 and IPv6 external IPs of the virtual machine through the virtual machine external IP management console, as shown in the following figure:
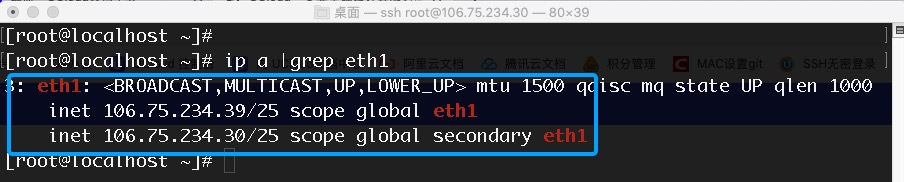
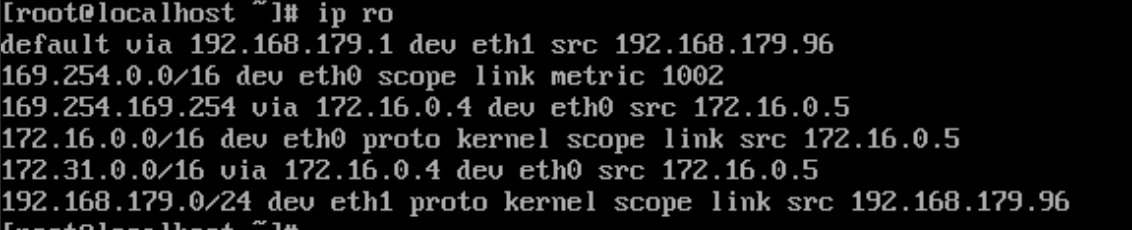
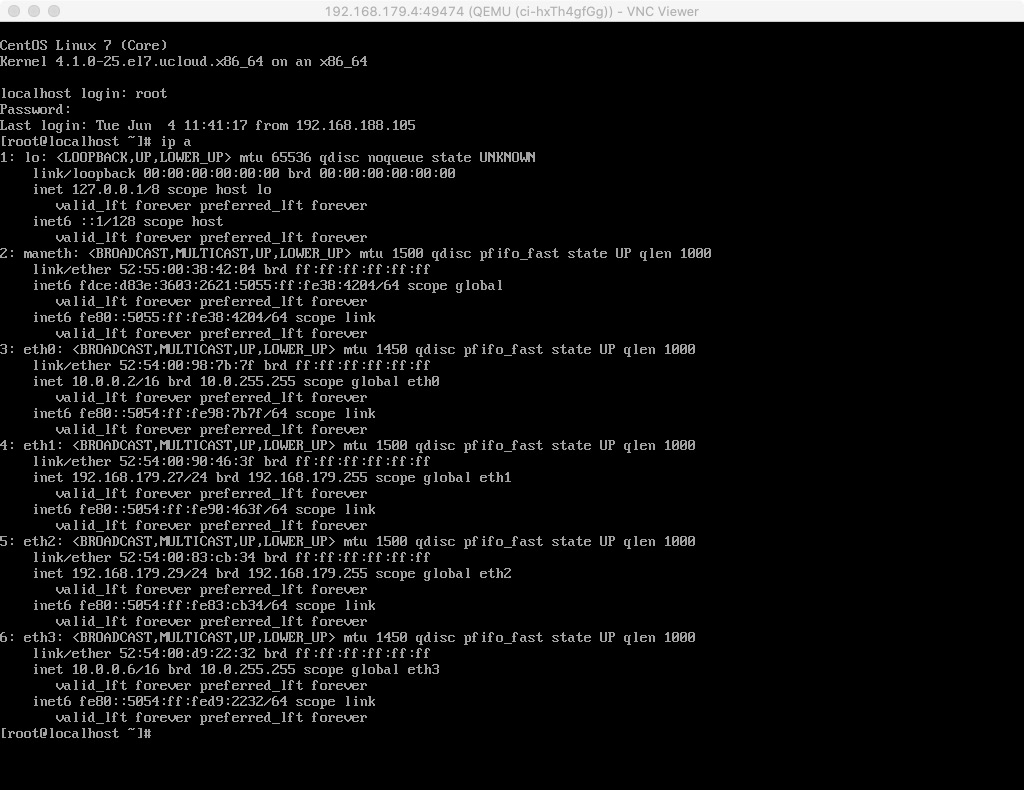
After setting as the exit, you can log in to the virtual machine to verify whether the IP address of the virtual machine accessing the external network is the set external IP address. Taking CentOS 7.4 system setting IPv4 default exit as 192.168.179.96 as an example, as shown in the following figure, the list of bound external IP addresses has set the new IP address as the exit:
Log in to the CentOS virtual machine, enter ip ro to check that the virtual machine’s access to the Internet has been changed to 10.76.197.67, as shown in the output result below:
The external IP address pool resources are customized by the administrator, supporting the use of private IP address segments to simulate public IP addresses, and doing NAT transformation on the upper physical network devices to access the Internet or IDC data center networks.
3.3.2.6 Elastic Network Card Management
Virtual machines with x86 architecture can support up to 6 elastic network cards, while virtual machines with ARM architecture can support up to 3 network cards, which can be used for fine-grained network management or high availability business applications. The virtual machine can view the information of the bound elastic network card and the associated IP address, and in the Linux operating system, it is usually named starting with “eth2”.
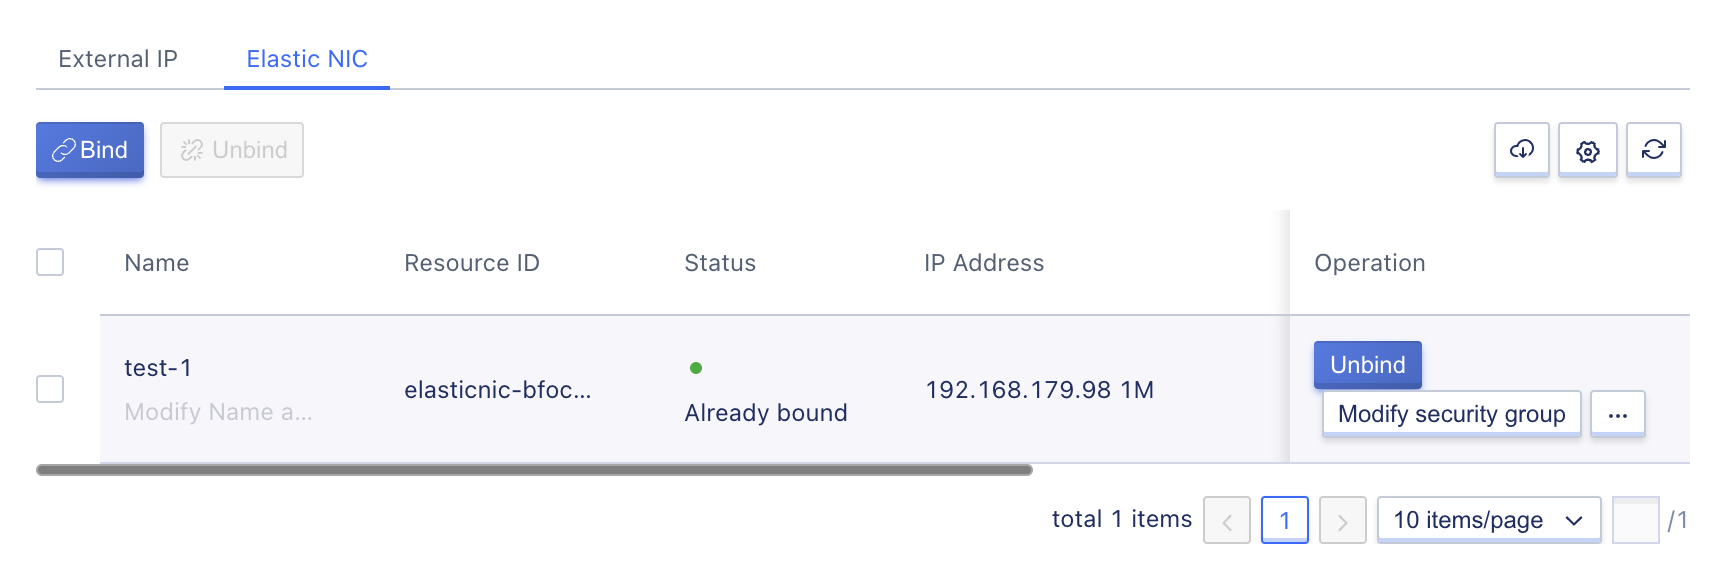
As shown in the above figure, the Elastic Network Interface tab can be used to view the list of currently bound Elastic Network Interfaces of the virtual machine and unbind operations, supporting batch unbind operations. The information of the bound Elastic Network Interfaces includes name, ID, network type, network, IP address, security group, and status information.
- Network card type: refers to the type of elastic network card currently bound to the virtual machine, including internal network card and external network card.
- An internal-type elastic network interface can only assign IP addresses from the associated VPC subnet automatically or manually.。
- External-type elastic network cards can only automatically or manually assign IP addresses from the associated external network segment, and the assigned IP address is consistent with the life cycle of the elastic network card, and only supports release with the destruction of the elastic network card.
-
Network Attached: The IP address of the elastic network card belongs to the network, the internal network type belongs to the VPC network and subnet information of the elastic network card; the external network type belongs to the external network segment information of the elastic network card.
- IP Address: refers to the IP address of the current elastic network card, the internal network type network card IP is the internal network IP address allocated by the VPC subnet, and the external network type network card IP is the external network IP address allocated by the corresponding external network segment.
- Security Group: refers to the security group that the current elastic network card is bound to. If it is not bound to a security group, it is empty. The platform security group acts on the network card, that is, each elastic network card can specify its own security group to control the traffic associated with the network card.
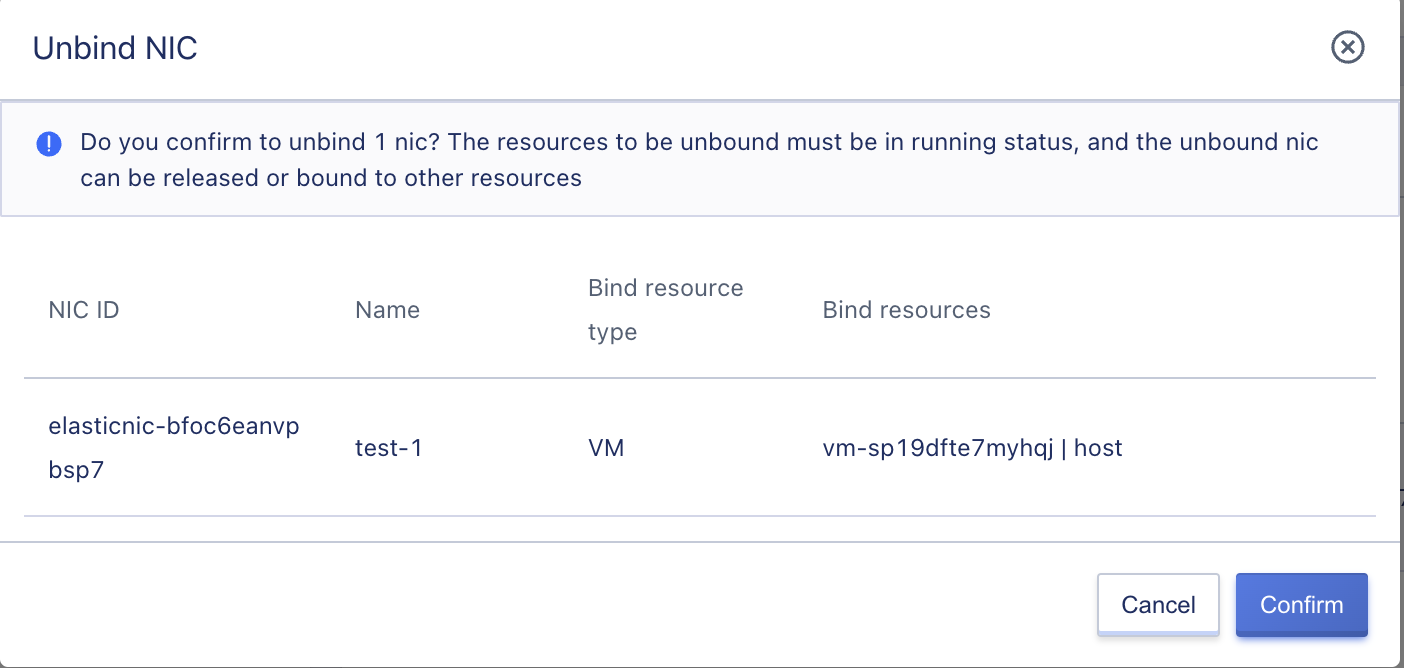
Support unbinding the bound elastic network card in the virtual machine details, after unbinding, the elastic network card can be bound to other virtual machines, and the unbinding operation can be performed on the network card through the unbinding operation item in the list of bound elastic network cards, the specific operation is as follows:
When the virtual machine image is not installed with qemu-ga, binding of elastic network cards is not supported.
3.3.2.7 Event
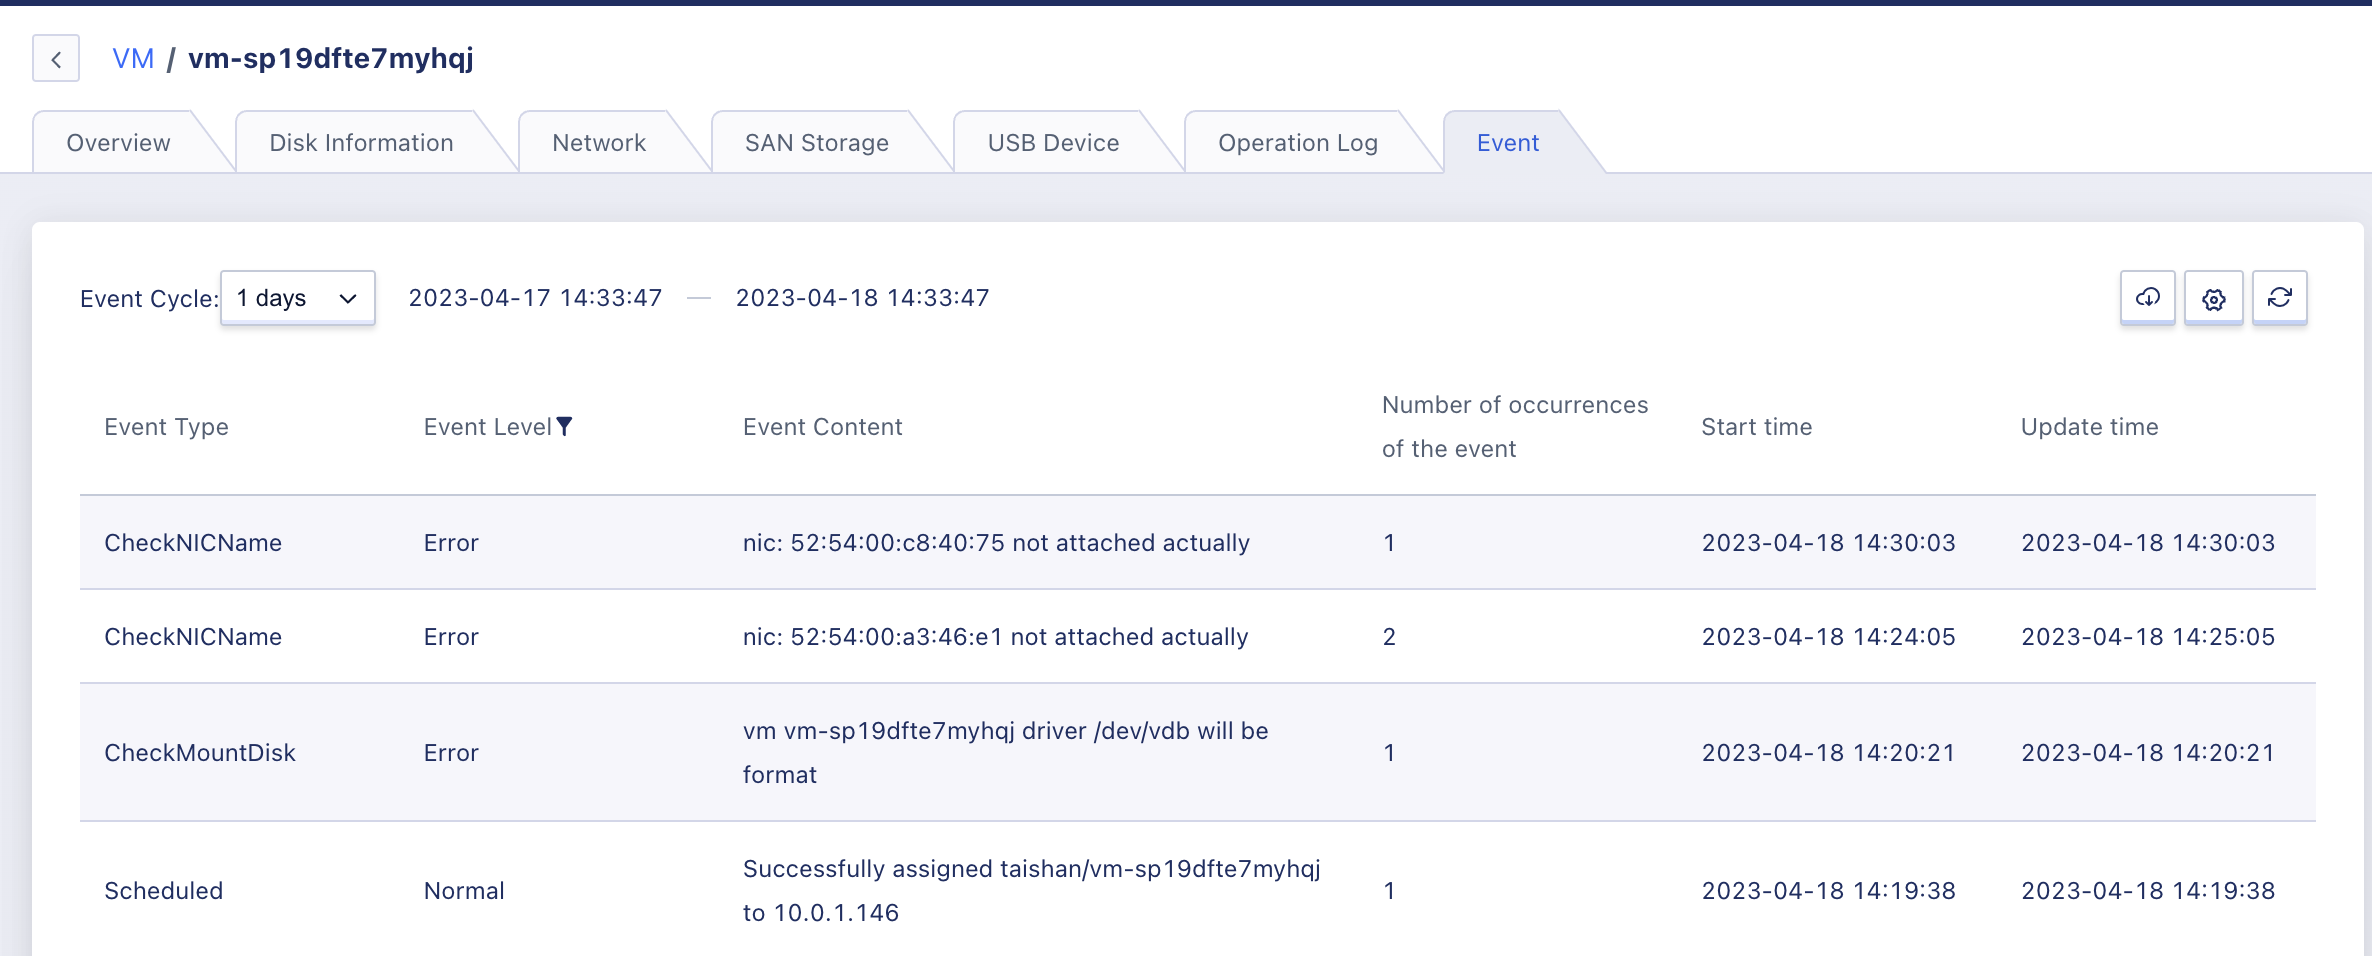
Support users to view resource events related to virtual machine operations, including event type, event level, event content, event occurrence times, start time and update time. As shown in the following figure:
3.4 Login to VNC
VNC (Virtual Network Console) is a login method provided by the private cloud platform for users to connect to virtual machines through a web browser, which is suitable for scenarios where remote login clients (such as SecureCRT, remote desktop, etc.) cannot connect to virtual machines. By logging in to the virtual machine through VNC, you can view the complete startup process of the virtual machine, and manage the operating system and interface of the virtual machine like SSH and remote desktop, support sending operation management instructions, such as CTRL+ALT+DELETE.
Users can log in to the current virtual machine using VNC connection by clicking the “Console Login” button in the virtual machine list or overview page, providing the same function as a monitor, allowing them to log in to the virtual machine operating system and perform system-level operations and management. As shown in the following figure:
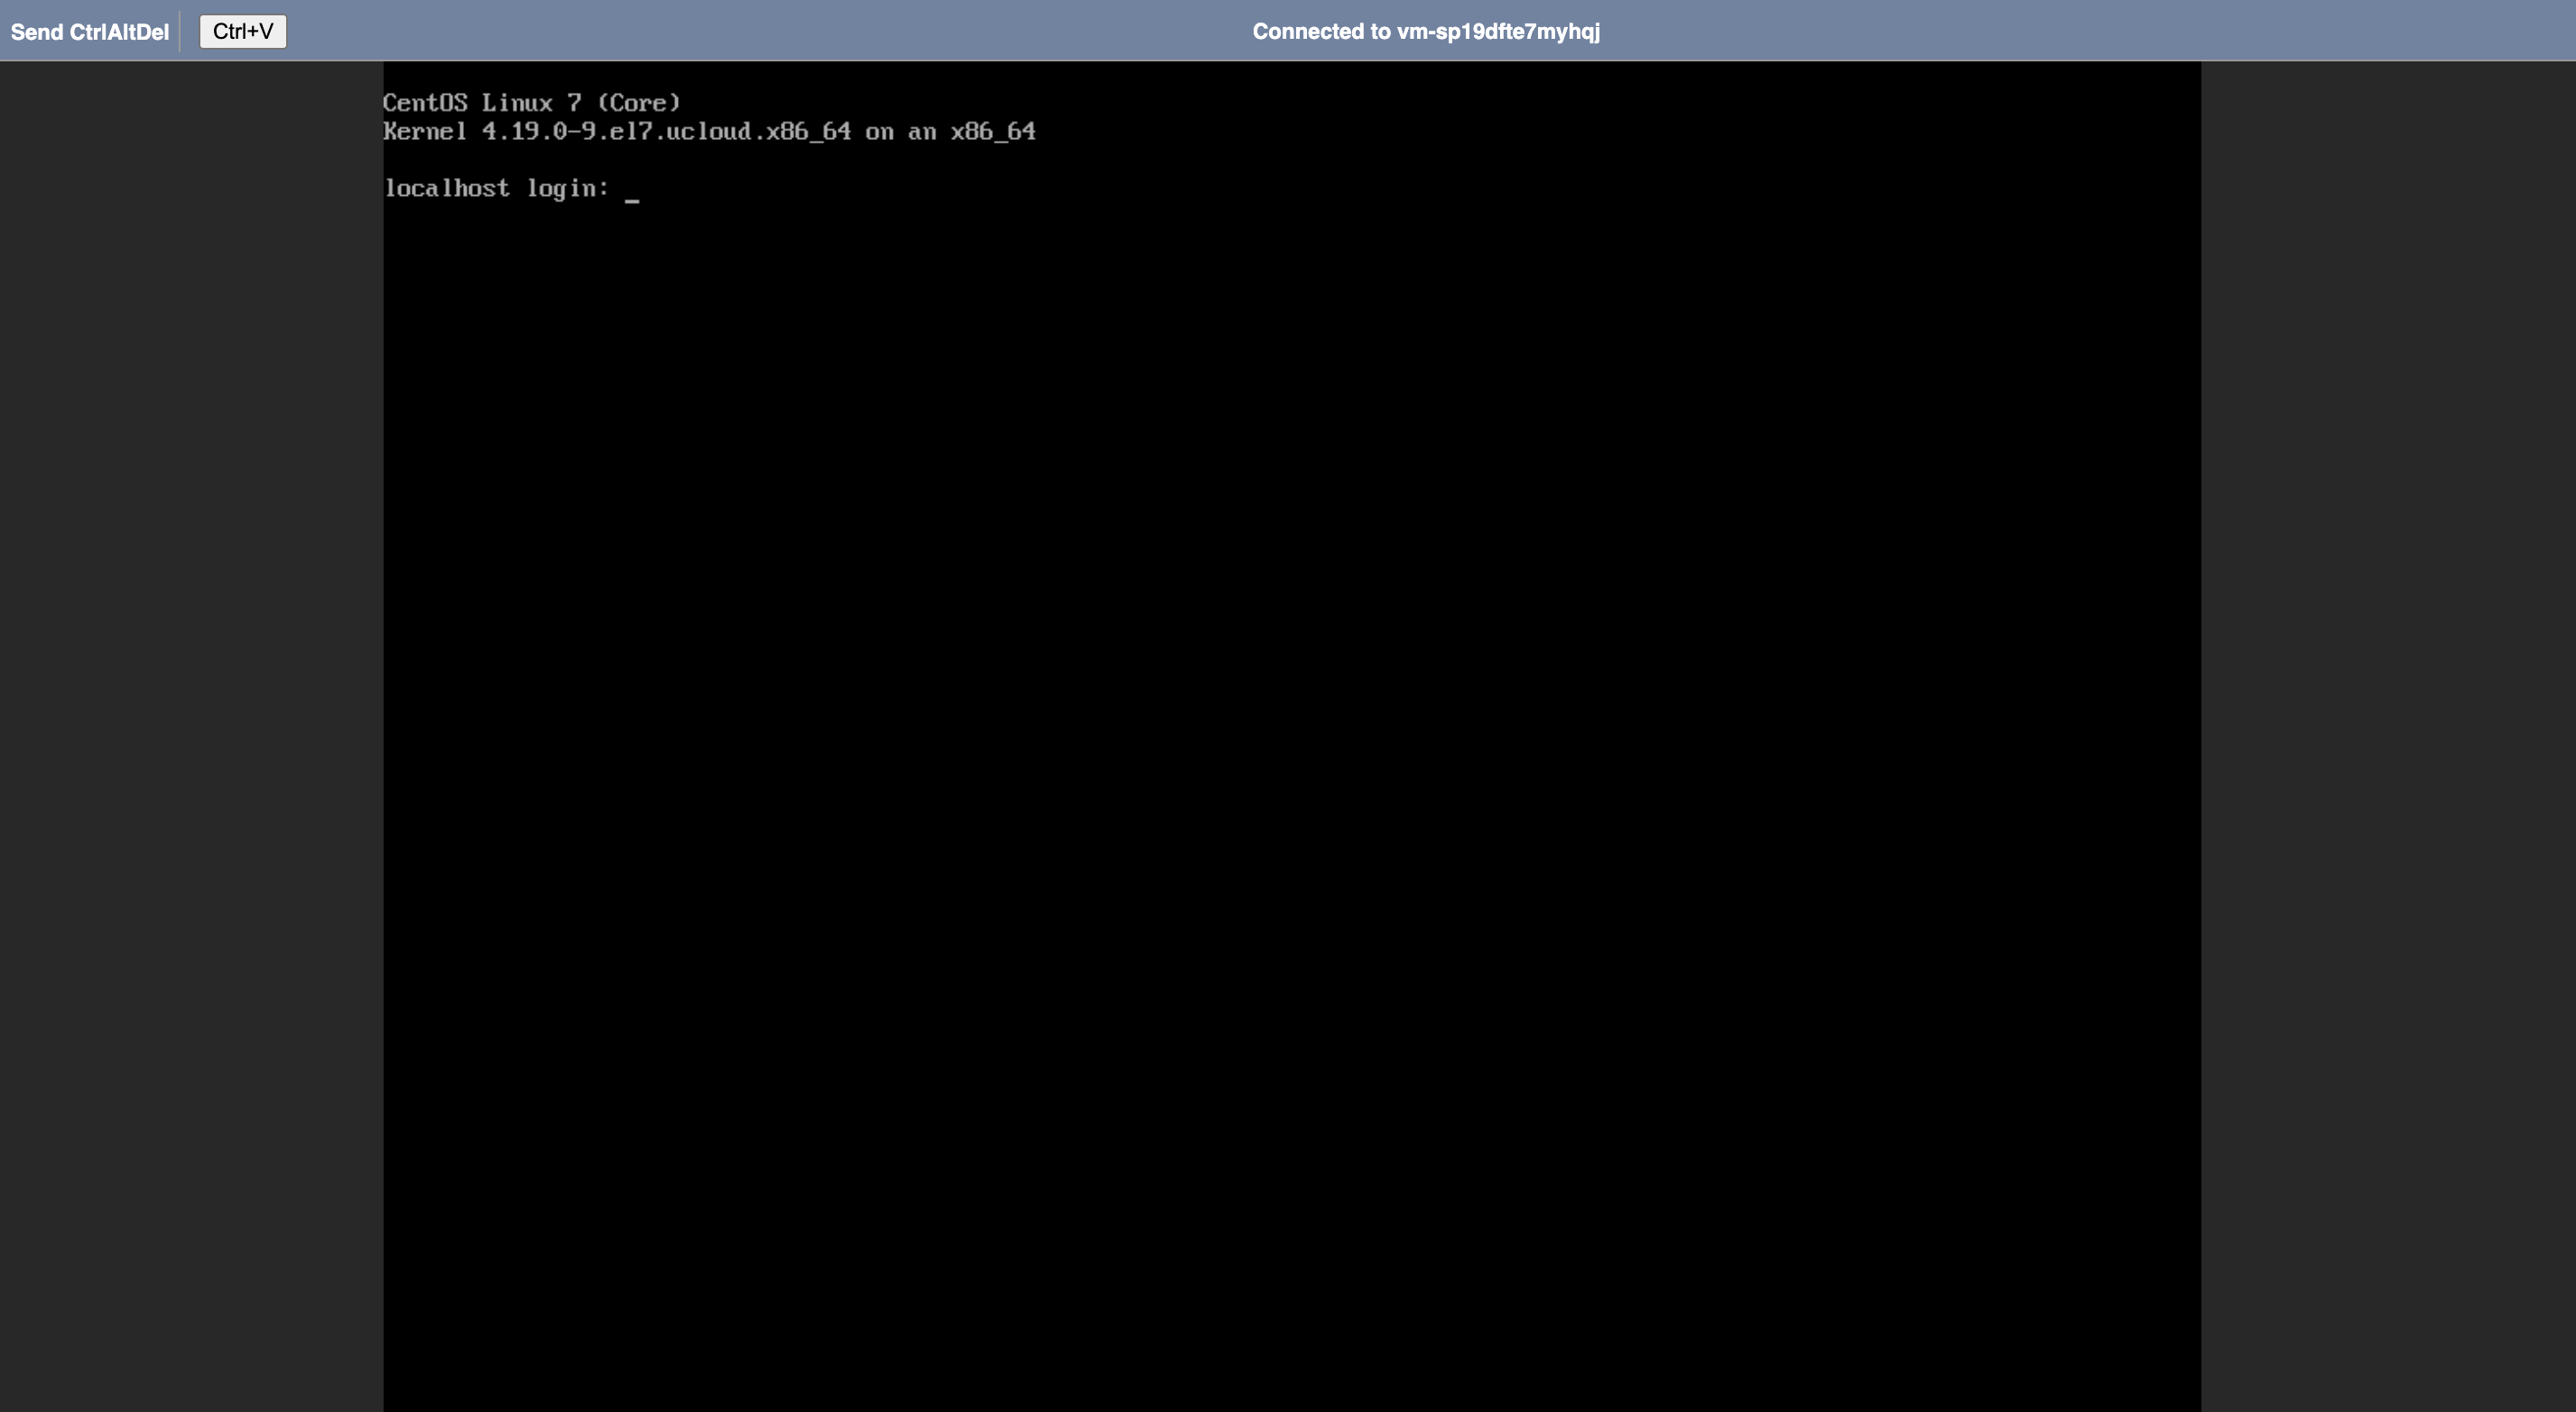
The prerequisite for logging into a virtual machine is to have an operating system account and password, and VNC login is suitable for scenarios where the virtual machine does not have an external IP address.
3.5 Start/Shutdown/Power Off/Restart
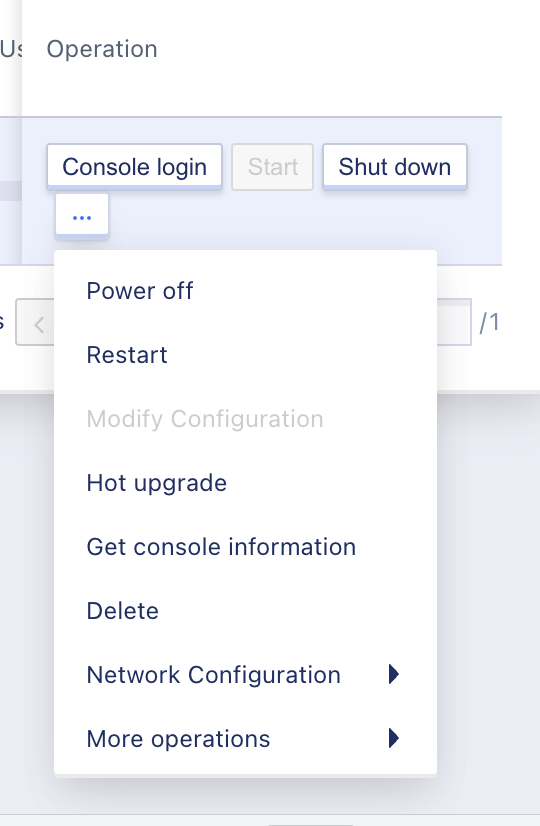
Users can perform basic operations such as shutting down, starting up, power off and restarting the virtual machine, and all support batch operations of multiple APIs, as shown in the following figure:
- Shut down
- Support users to shut down the virtual machine by clicking “Shut Down” in the console, and the virtual machine must be in running state when shutting down.
- When the virtual machine is shut down, the status will change from running to shutting down, and finally to shut down, indicating that the shutdown is successful.
- If the virtual machine is stuck in shutdown, support power off operation on the virtual machine.
- After shutdown, the memory information of the virtual machine is lost, and all disk data will be retained.
- After shutdown, you can perform operations such as startup, deletion, image creation, system reinstallation, configuration modification, binding of external IP and modification of security group, mounting of cloud disk, resetting of password, modification of tags, etc.
- Start
- Users can turn on the virtual machine by clicking the “Start” button on the console, which is only available when the virtual machine is in the shutdown state.
- When the virtual machine is turned on, the status will change from shut down to starting up, and finally to running, indicating that the start-up is successful.
- If the virtual machine is stuck in the booting process, support power off operations on the virtual machine.
- The running virtual machine can perform operations such as shutdown, login, delete, power off, restart, reset password, hot upgrade, bind public IP, modify security group and modify alarm template.
- Power cut
- Powering off is forcing the virtual machine to shut down, which is the same as directly cutting power to the physical machine. Powering off may result in data loss or even damage to the operating system.
- Power off operation is applicable to virtual machine crash and extreme testing scenarios, and the virtual machine can be forcibly shut down by pressing the “Power Off” button in the virtual machine list operation.
- When the virtual machine is forced to shut down, it will directly enter a shut down state, and can be restarted again.
- Restart
- Rebooting is restarting the virtual machine’s operating system normally, which is the same as the physical machine’s operating system restart operation.
- When the virtual machine restarts, the status will change from running to restarting, and finally to running.
- If the virtual machine is stuck in the reboot, support power off operations on the virtual machine.
- After reboot, the virtual machine’s memory information will be lost, but all disk data will be retained.
3.6 Create an image
Self-made images can be exported from the virtual machine through the cloud platform account, which can be used to create virtual machines. Only the account itself has the authority to view and manage. It only supports making images in the virtual machine shutdown state, that is, the virtual machine can be exported to the image operation only in the shutdown state.
Users can make an image by clicking the “Make Image” button in the virtual machine list operation, and need to enter the image name and image description, as shown in the following figure:
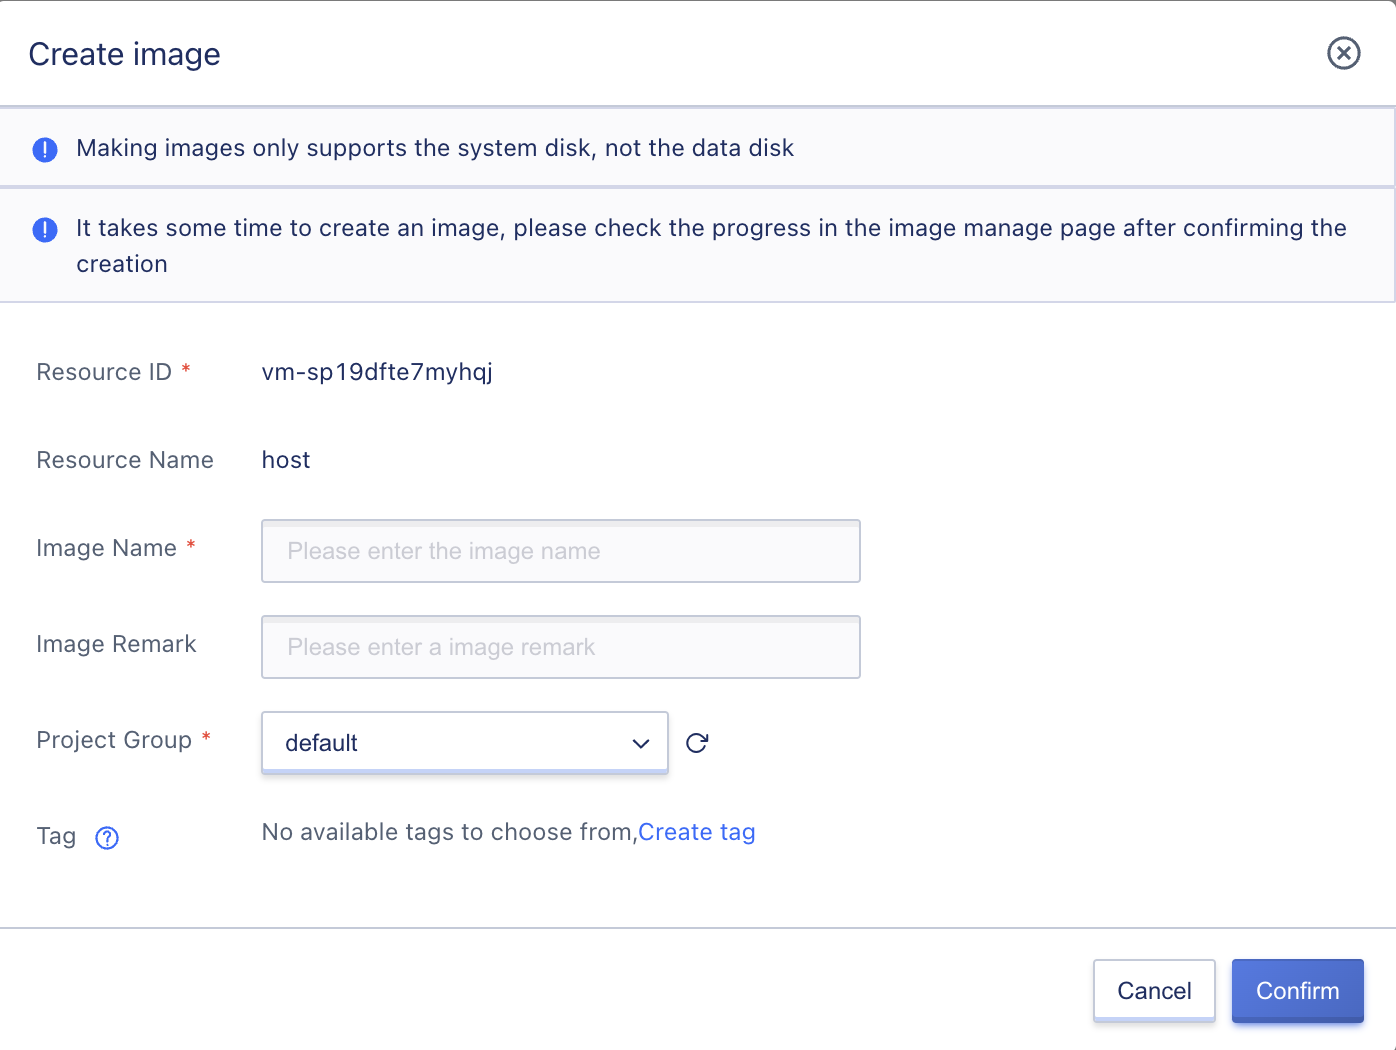
- Mirror name: The name and identification of the self-made mirror.
- Mirror description: Description and notes of self-made mirror, optional.
During the image creation process, do not stop, start, power off, reinstall the system or modify the configuration of the virtual machine, so as not to affect the image creation process. After the image is successfully created, it will be displayed in the virtual machine console - image management page. You can view the image creation process through the page. When the image status is converted to available, you can use the self-made image to create a virtual machine.
When making an image through a virtual machine, only the data and information of the system disk are exported, and data disks are not supported.
3.7 Reinstall the system
Reinstalling the system is a reset of the virtual machine’s operating system, i.e. replacing the virtual machine image. Linux virtual machines only support replacing the Centos and Ubuntu operating systems, and Windows virtual machines only support replacing other versions of the Windows operating system. The prerequisite for reinstalling the system is that the virtual machine must be in a shutdown state.
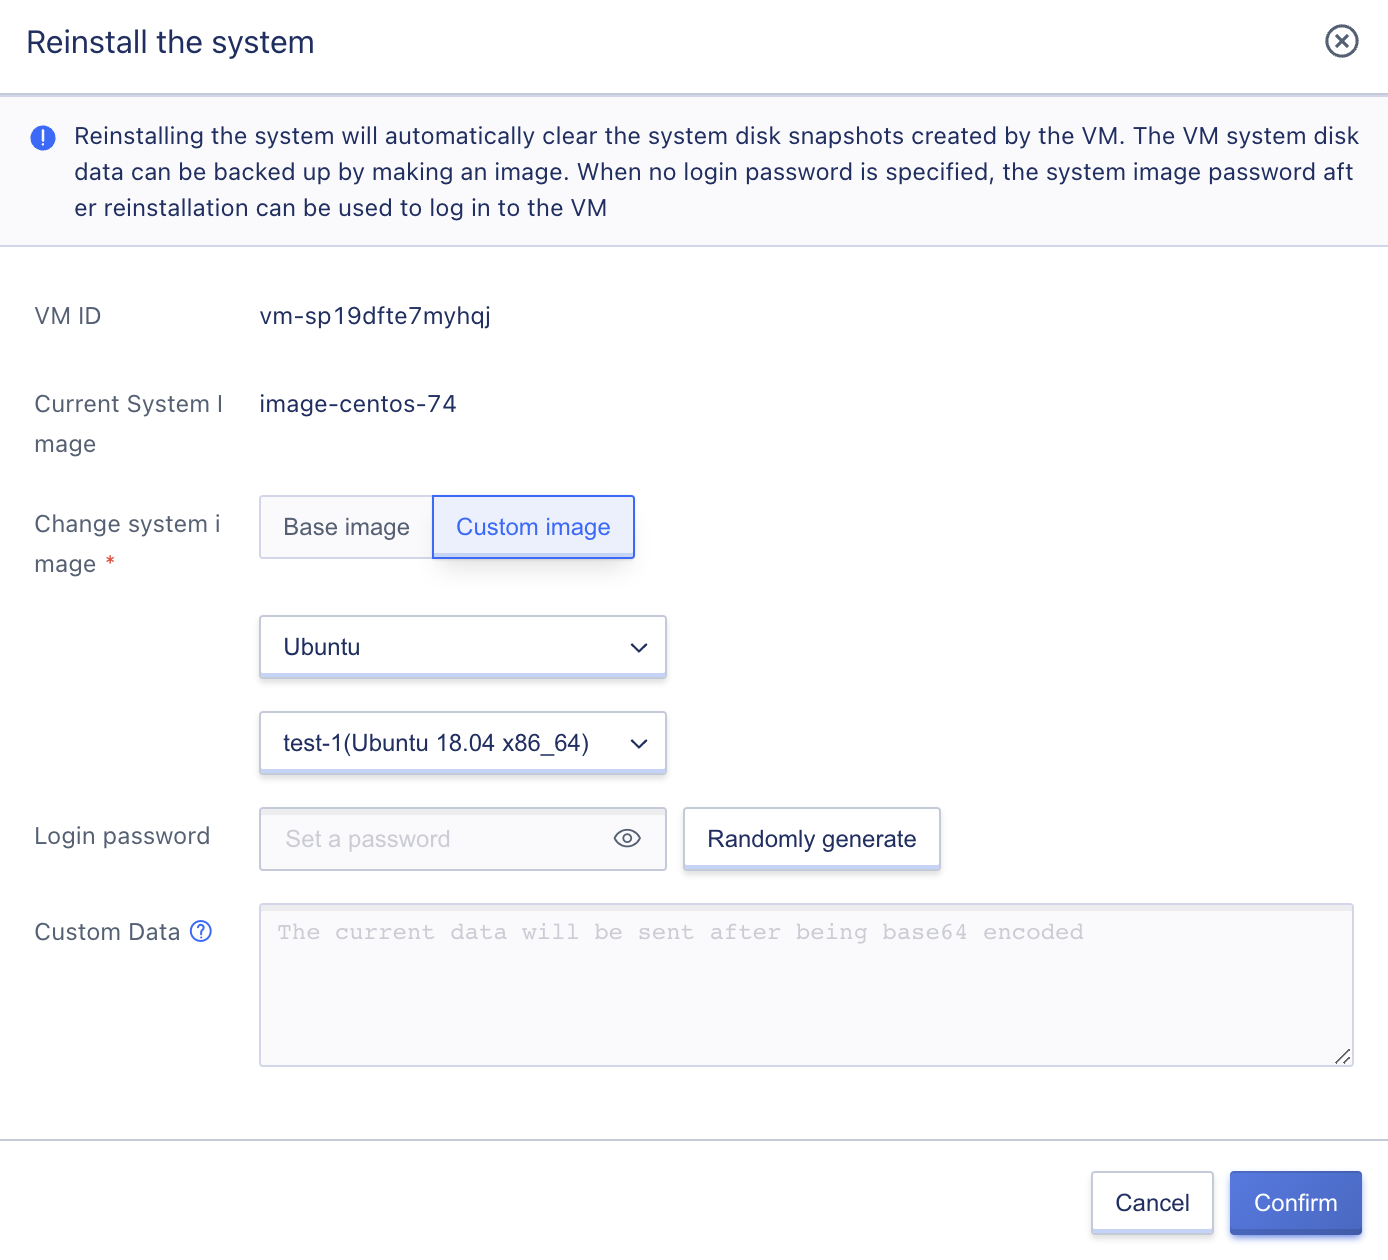
After the virtual machine is shut down, the image of the virtual machine can be changed by clicking the “Reinstall System” button in the Virtual Machine Console operation, as shown in the following figure, and the password can be reset during the reinstallation:

Reinstalling the system will automatically clear the system disk snapshots created by the virtual machine, and the virtual machine system disk data can be backed up by making an image. During the reinstallation process, the virtual machine’s status will automatically be converted to “Reinstalling”, and after the reinstallation is successful, it will be converted to “Shutdown”. The virtual machine can be started through the start operation, and when the virtual machine starts, it will use the new image to run the virtual machine.
If the image selected for system reinstallation has the cloud-init feature, it supports inputting custom data, as shown in the following figure:
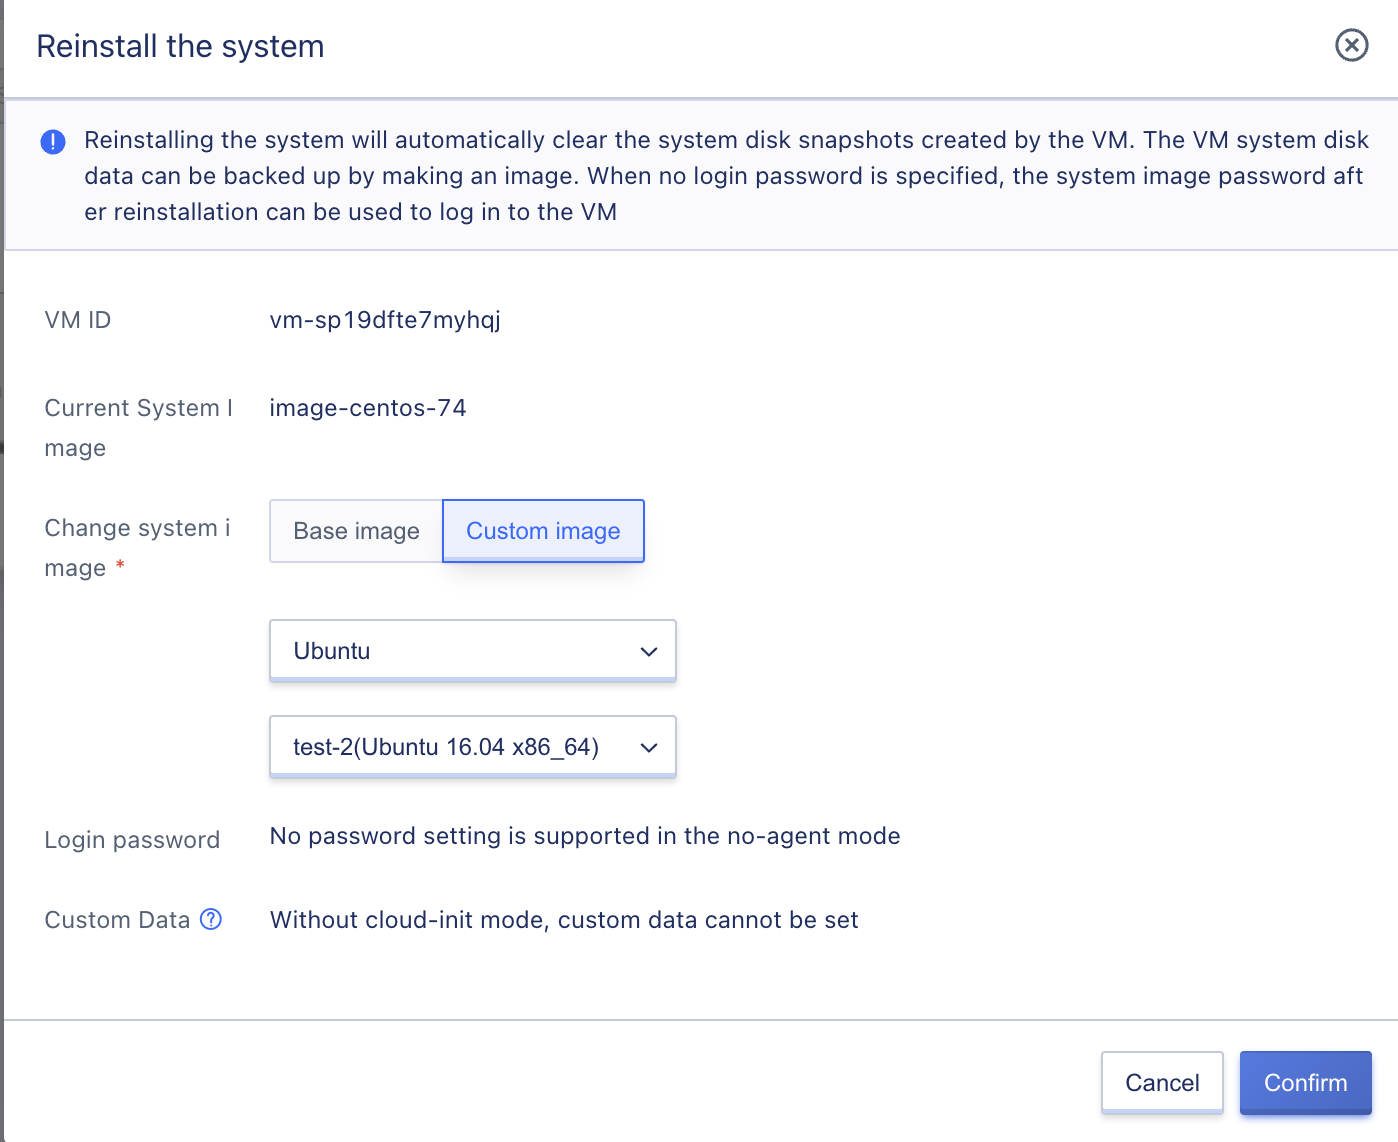
If the image selected when reinstalling the system does not have the cloud-init or qemu-ga features, password reset is not supported. The login password after reinstalling is the image password, as shown in the following figure:
Note: After reinstalling the system, the previous operating system and data content of the virtual machine will be cleared, the cloud disk data disk and snapshot mounted will not be affected, and reinstalling the system will not affect the encryption attributes of the disk.
3.8 Reset Password
Resetting the password refers to online modification of the login password of the virtual machine operating system, which is suitable for scenarios where the login password is forgotten or the password needs to be quickly modified through the console.
To reset the password in Linux operating system, the root or ubuntu account needs to be modified. To reset the password in Windows operating system, the administrator account needs to be modified. The virtual machine must be running in order to reset the password. The user can reset the password by clicking the “Reset Password” button in the Virtual Machine Console Operation, as shown in the following picture.
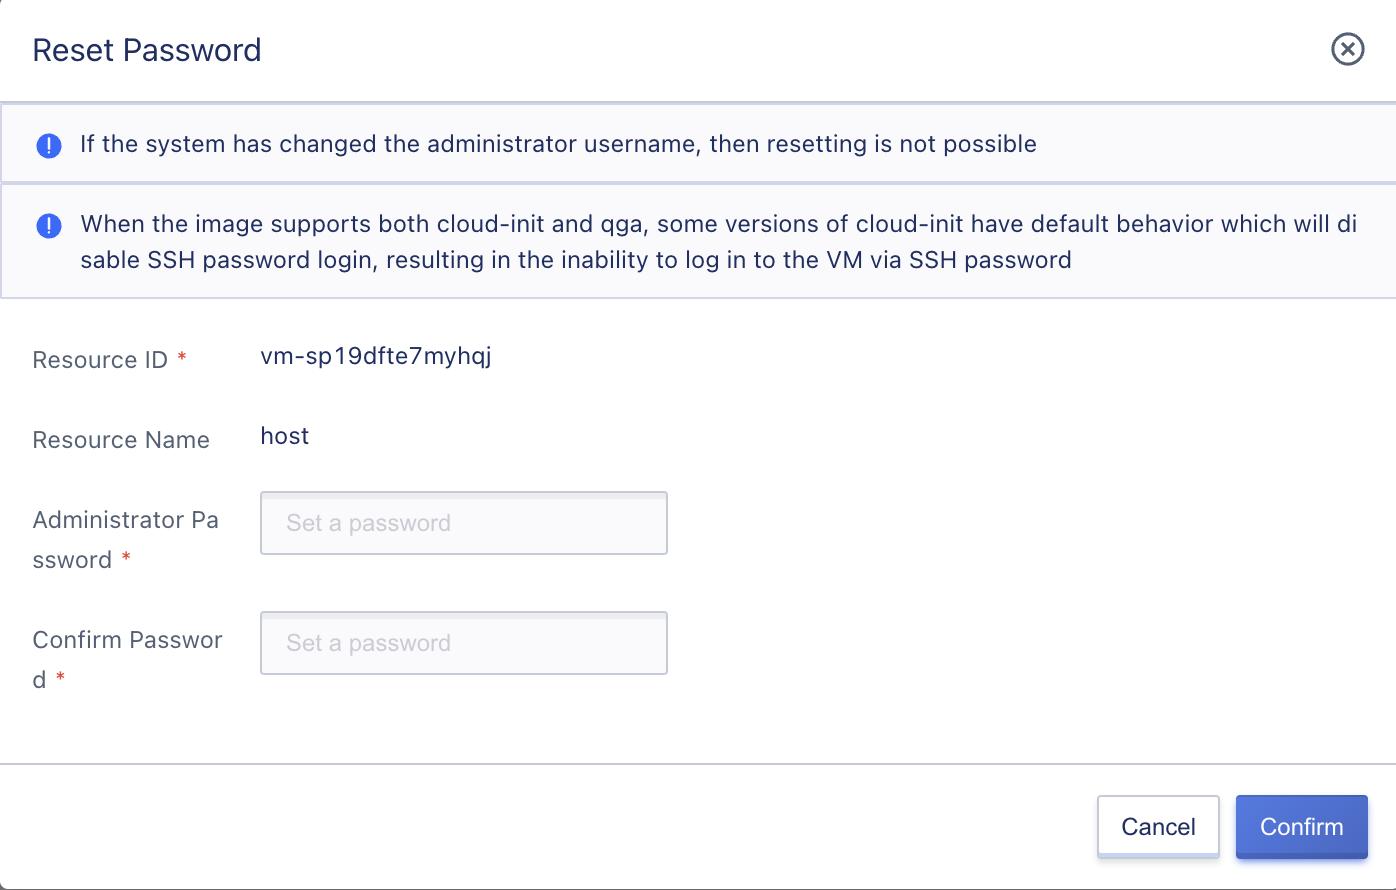
- Virtual Machine Name: The virtual machine name and identifier for the current password change.
- Administrator Password/Confirm Password: New Password to be modified.
- If the user has actively changed the administrator account of the virtual machine operating system, then password reset cannot be performed.
When the virtual machine has neither cloud-init nor qemu-ga features, resetting the password is not possible.
Do not reset the password during the image creation process.
Users can also log into the operating system and use operating system commands or interfaces to change their passwords.
3.9 Modify configuration (upgrade/downgrade)
Modifying the configuration changes the CPU and memory specifications of the virtual machine, supporting upgrades and downgrades to adapt to scenarios where the virtual machine configuration needs to be adjusted due to changes in business.
Before modifying the configuration, the virtual machine must be shut down, that is, the configuration modification operation must be performed in the shutdown state. After the configuration is changed, it must be restarted to take effect. Users can click “Modify Configuration” in the operation list of the virtual machine console resource list to adjust the CPU and memory of the virtual machine, as shown in the following figure:
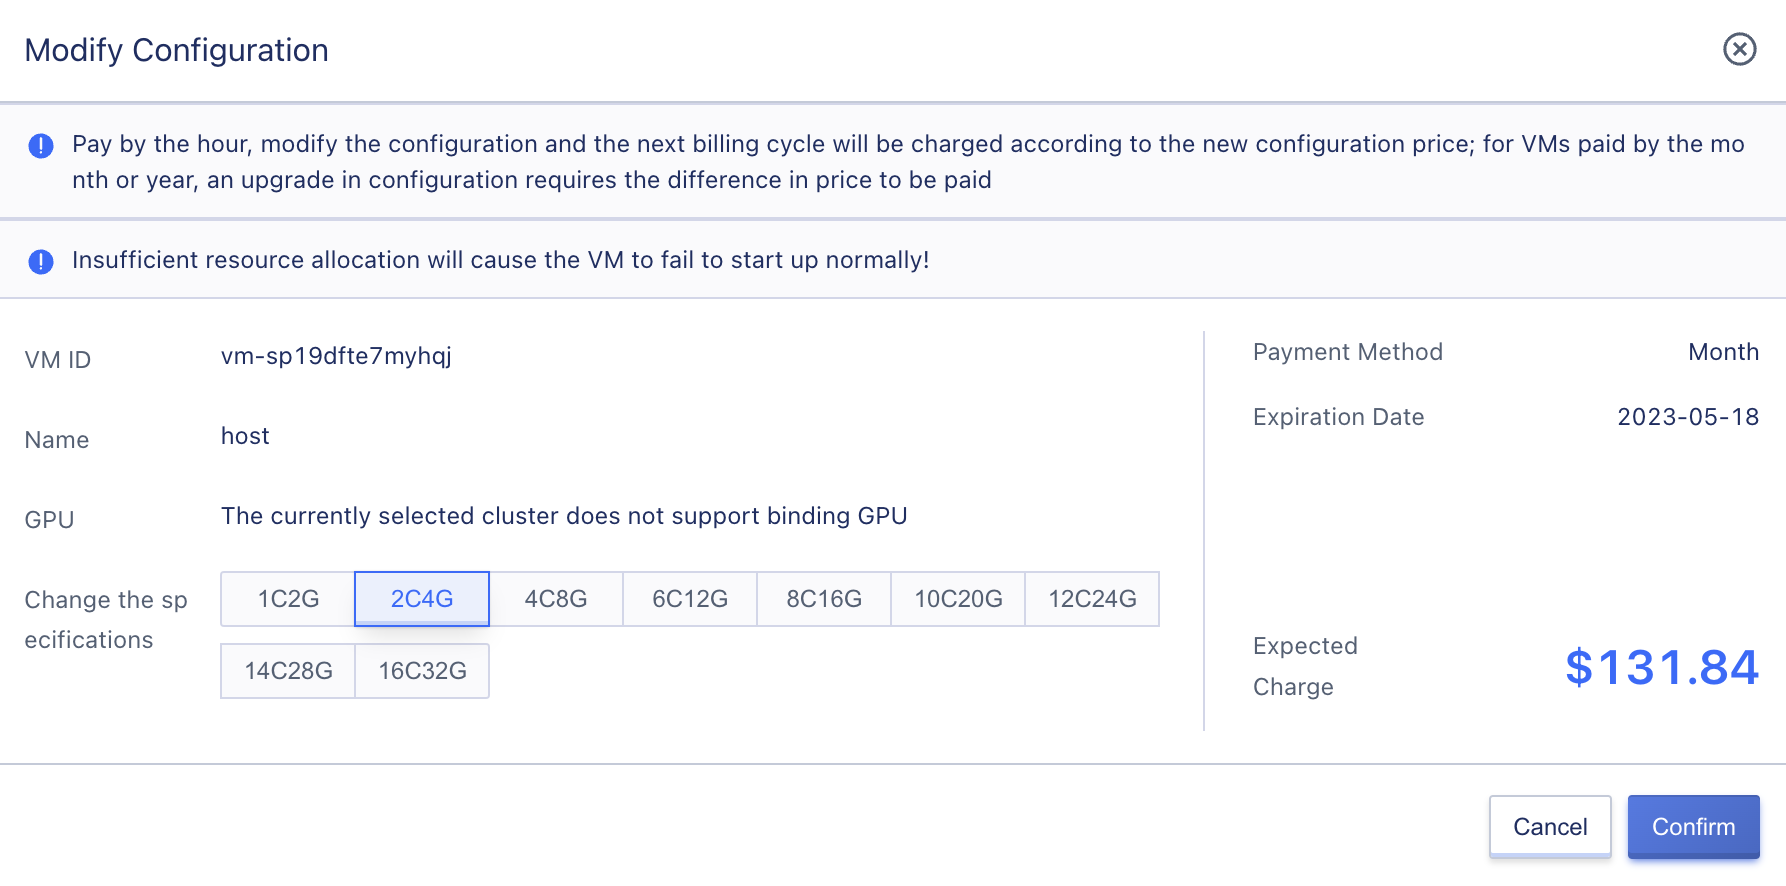
For virtual machines with downgraded configurations, the next billing cycle will be charged according to the new configuration. For virtual machines that are charged hourly, the upgraded configuration will be charged in the next billing cycle; for virtual machines that are charged annually or monthly, the upgraded configuration will take effect immediately, and the price difference will be automatically supplemented proportionally.
- Virtual Machine ID and Name: The name and globally unique ID identifier of the virtual machine that needs to change its specifications configuration.
- Billing method: the current virtual machine’s payment method.
- Current specification: CPU and memory configuration prior to current virtual machine change.
- Change specification: The new specification configuration that the current virtual machine needs to change, supports upgrading or downgrading configuration.
- Expected charge: The fee expected to be deducted after the configuration is changed.
After clicking Confirm, the virtual machine will remain in a shutdown state, and when it is started next time, it will run with the new changed configuration. After the virtual machine is turned on, the user can log in to the operating system to view the changed configuration.
Modifying the configuration only takes effect on the CPU and memory; if the virtual machine comes with GPU capabilities, it does not support increasing or decreasing the number of GPUs.
3.10 Hot Upgrade
Virtual machines provide hot upgrade capabilities, supporting CPU and memory upgrades while the virtual machine is in the boot state. Before using hot upgrades, you need to familiarize yourself with the following basic concepts:
- Modify configuration: that is, upgrade or downgrade the CPU and memory specifications of the virtual machine while the virtual machine is shut down.
- Hot upgrade: That is, in the virtual machine boot (running) state, support upgrading the virtual machine’s CPU and memory.
- Base image: It is a base image that users can use to start a virtual machine and make a custom image based on the virtual machine.
Note: Currently only virtual machines with Base image of Centos7.4 are supported for hot upgrade, online downgrade is not supported.
The platform supports hot upgrade of virtual machines, which will automatically be displayed on the list as shown in the following figure:

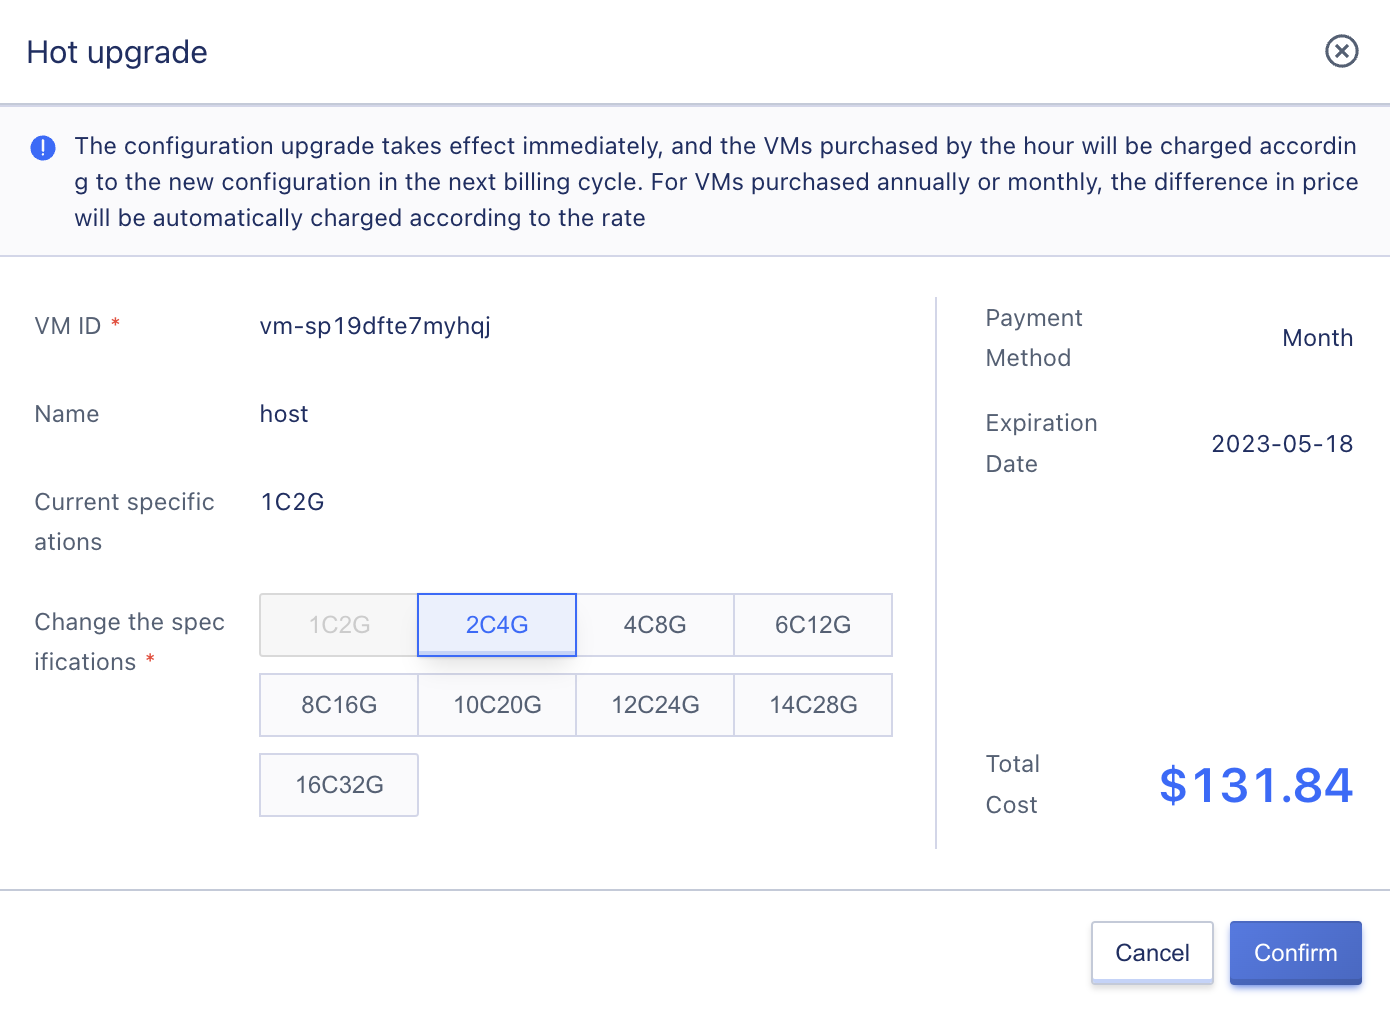
(1)When the user sees the hot upgrade prompt, they can adjust the configuration of the virtual machine online through the “Hot Upgrade” option in the list of operations, as shown in the following figure:

(2)In the hot upgrade wizard, you can perform hot upgrade operations on the CPU and memory specifications of the virtual machine. The hot upgrade takes effect immediately. For virtual machines purchased by the hour, the next billing cycle will be charged according to the new configuration. For virtual machines purchased by year or month, the difference in price will be automatically supplemented proportionally, as shown in the following figure:
If the user customizes the image, and the base image is made based on Centos7.4, then hot upgrade operations are allowed by default.
3.11 Edit alarm template
Modifying alarm templates is the configuration for monitoring data of virtual machines to trigger alarms. Through the indicators and thresholds defined by the alarm template, when the relevant indicators of the virtual machine fail or exceed the threshold of the indicator, an alarm will be triggered to notify the relevant personnel to handle the fault and ensure the normal operation of the virtual machine and business.
Users can click the button on the right of the alarm template in the virtual machine details overview page to modify the alarm template. In the modify alarm template wizard, select the new virtual machine alarm template and click Confirm to take effect immediately.
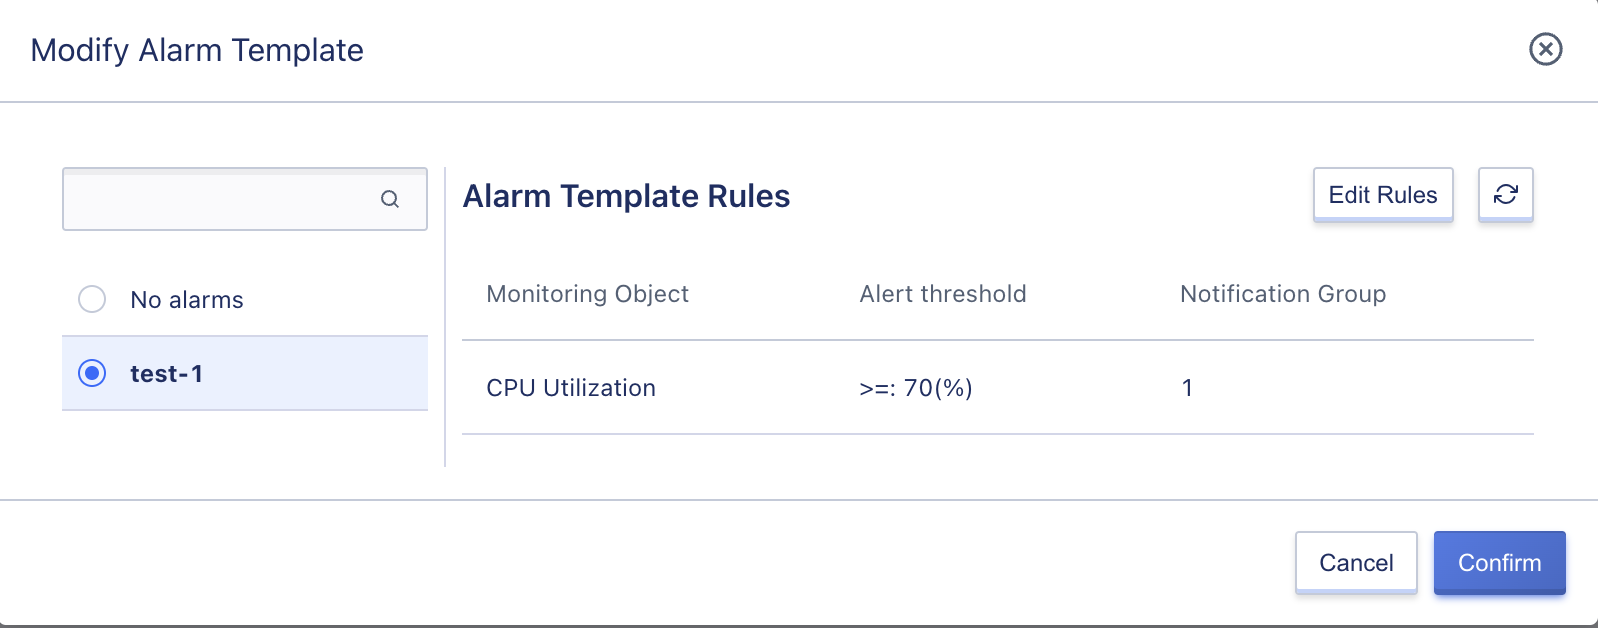
- Resource ID: The VM ID of the virtual machine that needs to add or modify the alert template.
- Resource type: The resource type that needs to be added or modified for the alarm template.
- Alarm template: The alarm template to be changed, one virtual machine only supports one alarm template.
If the default alarm templates provided by the system cannot meet the requirements, you can go to the “Alarm Template” page to add and configure.
3.12 Bind external IP
Binding an external IP refers to binding a tenant’s external IP address to a virtual machine to provide an external network exit for the virtual machine. The platform supports IPv4/IPv6 dual-stack networks, and each virtual machine can bind up to 50 IPv4 and 10 IPv6 external IP addresses. At the same time, an external network elastic network card can be bound to the virtual machine to provide external network communication capabilities, and the default IP address with the first default route is used as the virtual machine’s default network exit.
After binding the external IP address, the platform will configure the specified external IP address to the virtual machine’s network card, including the gateway, subnet mask and routing information of the external IP address segment. Users can view the bound external IP address and network routing in the virtual machine. The traffic of the virtual machine accessing the external network is directly transmitted to the physical network card and the external network for communication, improving the performance of the network transmission.
When a virtual machine is created, it comes with two default network cards, an internal network card and an external network card. For example, in Linux, the internal network card is usually eth0 and the external network card is usually eth1. The default external IPs are all configured on the virtual machine’s eth1, that is, the 50 external IPs are all bound to the external network card and share the virtual machine’s external security group. When binding an external elastic network card to the virtual machine, an elastic network card will be added directly in the virtual machine and the external elastic network card configuration IP address and security group policy will be automatically configured.
The virtual machine must be in running or shutdown state to bind the external IP address, and the external IP binding operation can be performed through the operation item “Bind External IP” in the virtual machine management console list or virtual machine detail network management. Specific operation steps can refer to Virtual Machine External IP Management. The binding operation requires specifying the external IP address to be bound, and only supports binding 50 IPv4 and 10 IPv6 external IP addresses.
- If the virtual machine has already bound 50 IPv4 external IP addresses, no more IPv4 external IP addresses can be bound.
- If the virtual machine has already bound 10 IPv6 public IP addresses, it cannot bind IPv6 public IP addresses again.
- If the virtual machine has already bound 50 IPv4 and 10 IPv6 external IP addresses, it is not possible to bind any more external IP addresses, but additional external elastic network cards can be added.
When the virtual machine image is not installed with qemu-ga, only binding a NAT type external IP is supported.
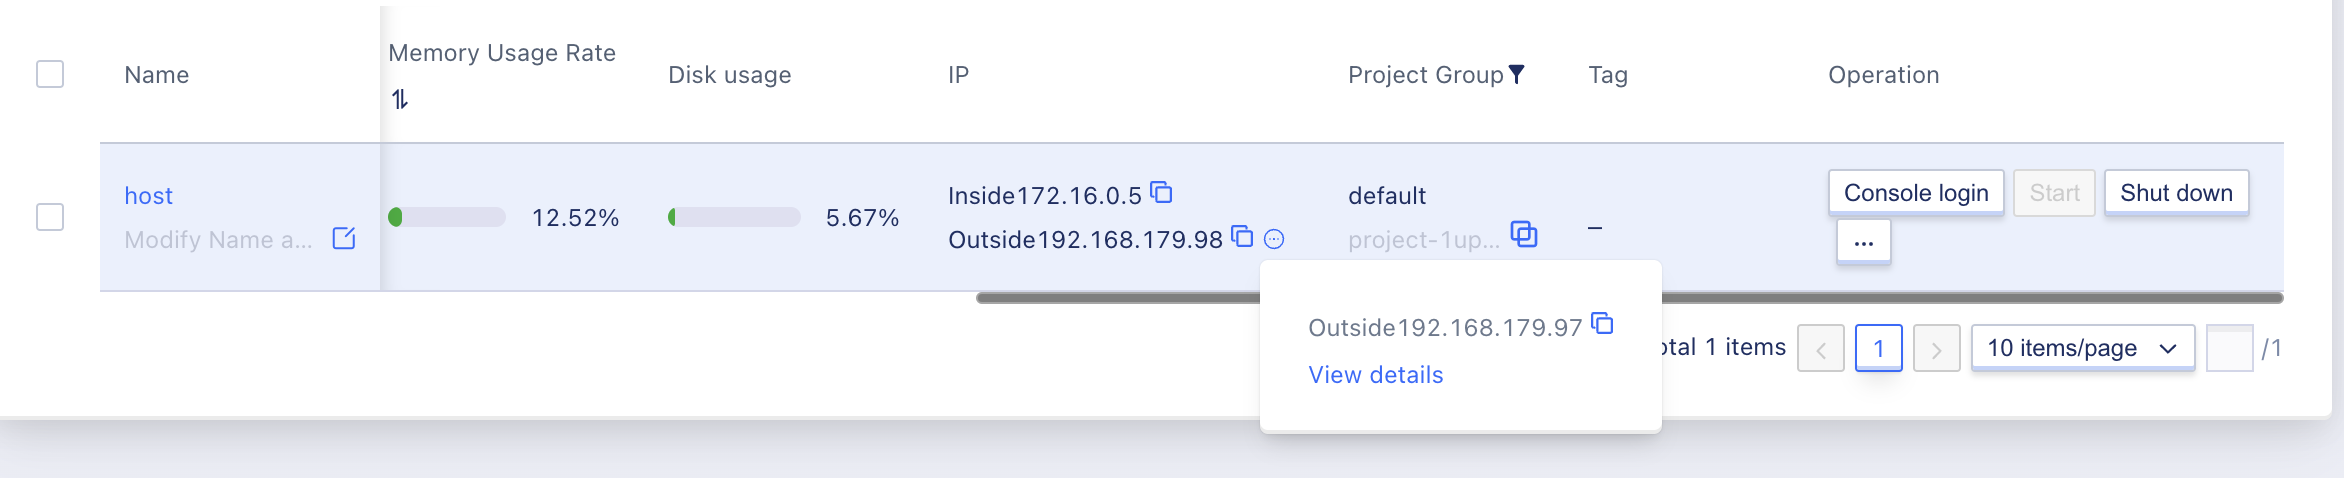
After the external IP address is bound successfully, you can view the bound external IP address through the IP information in the virtual machine list, and you can also view the detailed information of the bound external IP address through the external IP label page in the network management of the virtual machine details, and you can also perform related operations such as setting as the default exit and unbinding.
Only the external IP addresses in the same data center can be bound, and the bound external IP must be in an unbound state. For unbinding the external IP address of the virtual machine, please refer to External IP Management.
3.13 Modify Security Group
Platform users created virtual machines will come with two virtual network cards by default, which are in line with the virtual machine life cycle, namely the internal network card and the external network card, and elastic network card resources can also be bound on the virtual machine.
- Internal network card: Specify the IP address and related network information of the VPC/subnet when creating the virtual machine.
- External network card: Configure all external IP addresses bound to the virtual machine, including 50 IPv4 and 10 IPv6 addresses.
- Elastic Network Interface: Configure the IP address and security group assigned to the network to which the elastic network interface belongs. If the elastic network interface is of internal type, the network to which it belongs is VPC and subnet. If the elastic network interface is of external type, the network to which it belongs is external network segment.
The cloud platform security group (software-defined virtual firewall) is at the network card level, that is, the bound security group will restrict the traffic in and out of the virtual machine network card. The platform defines the security group bound to the virtual machine internal network card as the internal network security group; the security group bound to the virtual machine external network card is defined as the external network security group; the security group bound to the elastic network card is the security group of the elastic network card.
Internal security groups are used for secure access control between virtual machines; external security groups are used to control traffic to and from (external IPs) of virtual machines. When creating virtual machines, internal and external security groups can be specified, and internal and external security groups can also be modified after the virtual machines are running.
3.13.1 Modify external network security group
Modifying the external network security group refers to modifying the security group associated with the external network NIC of the virtual machine, that is, changing the security group bound to all external network IP addresses on the external network NIC.
Users can operate through the “Modify External Security Group” button on the Virtual Machine List and Virtual Machine Details Network page, as shown in the following figure:
Choose the external security group to be modified. A virtual machine only supports binding one external security group. After the modification is successful, the user can view the modified external security group information through the network information of the virtual machine details.
The access restrictions of the external network security group rules apply to all external IPs bound to the current virtual machine.
3.13.2 Modify Internal Network Security Group
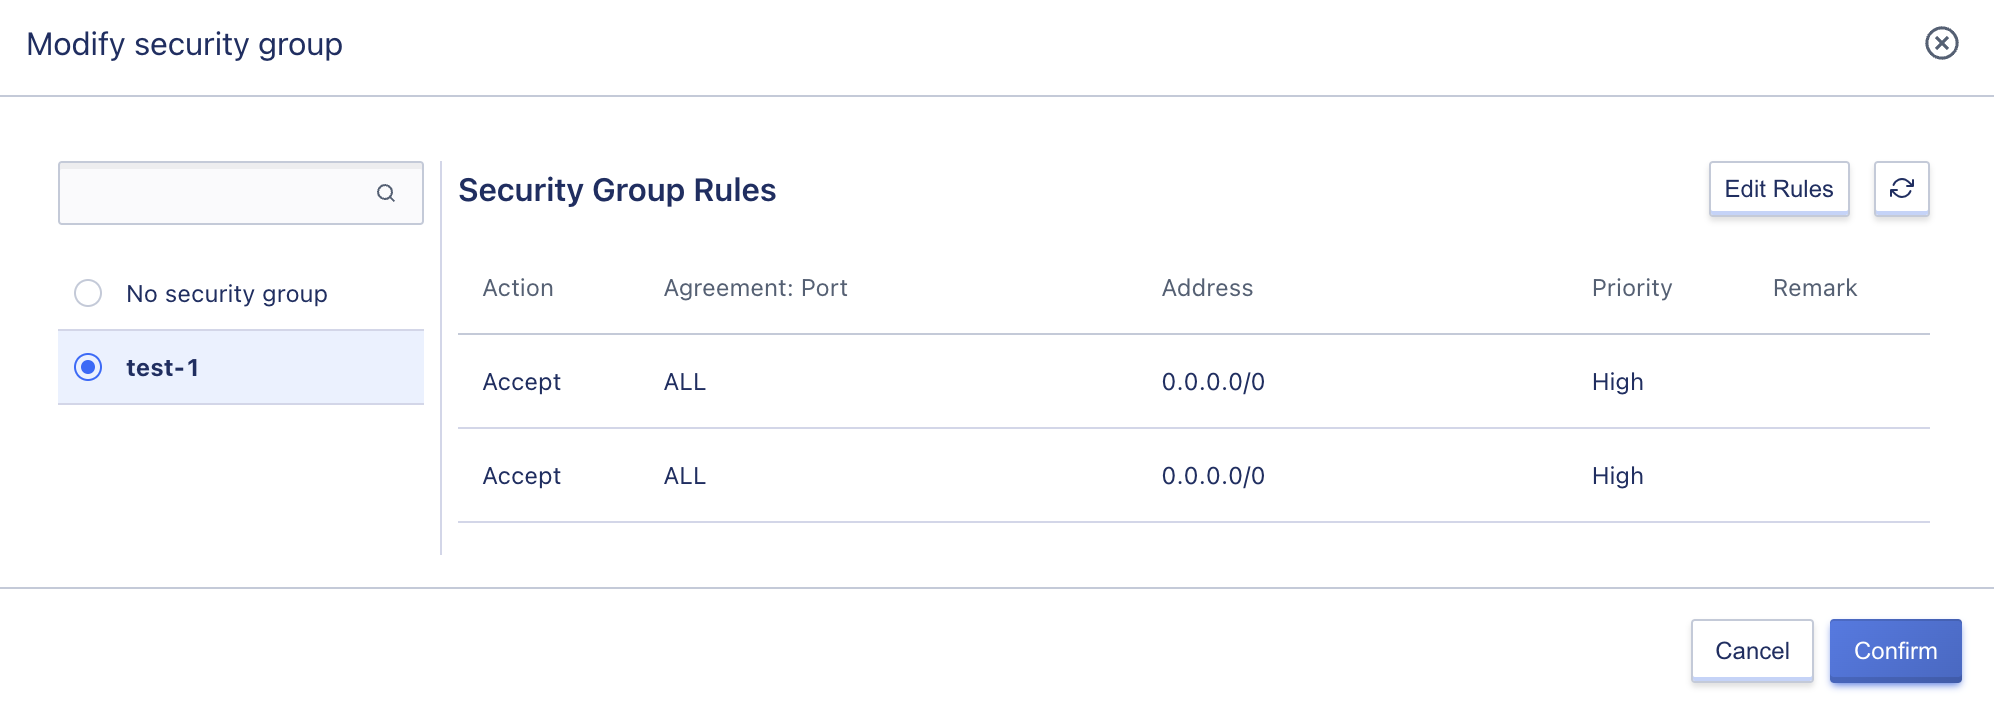
Modifying the internal network security group refers to modifying the security group associated with the internal network card of the virtual machine, that is, changing the security policy of the internal network of the virtual machine, used for traffic control between virtual machines. Users can operate through the virtual machine list and virtual machine detailed request network page “Modify Internal Network Security Group” button, as shown in the following figure:
Choose the internal security group you want to modify, and you can modify it to “No Security Group” to unbind the internal security group. A virtual machine only supports binding one internal security group. After the modification is successful, the user can view the modified internal security group information through the network information in the virtual machine details.
The internal and external security groups support binding to the same security group, meaning that the internal and external security groups use the same security group and policy.
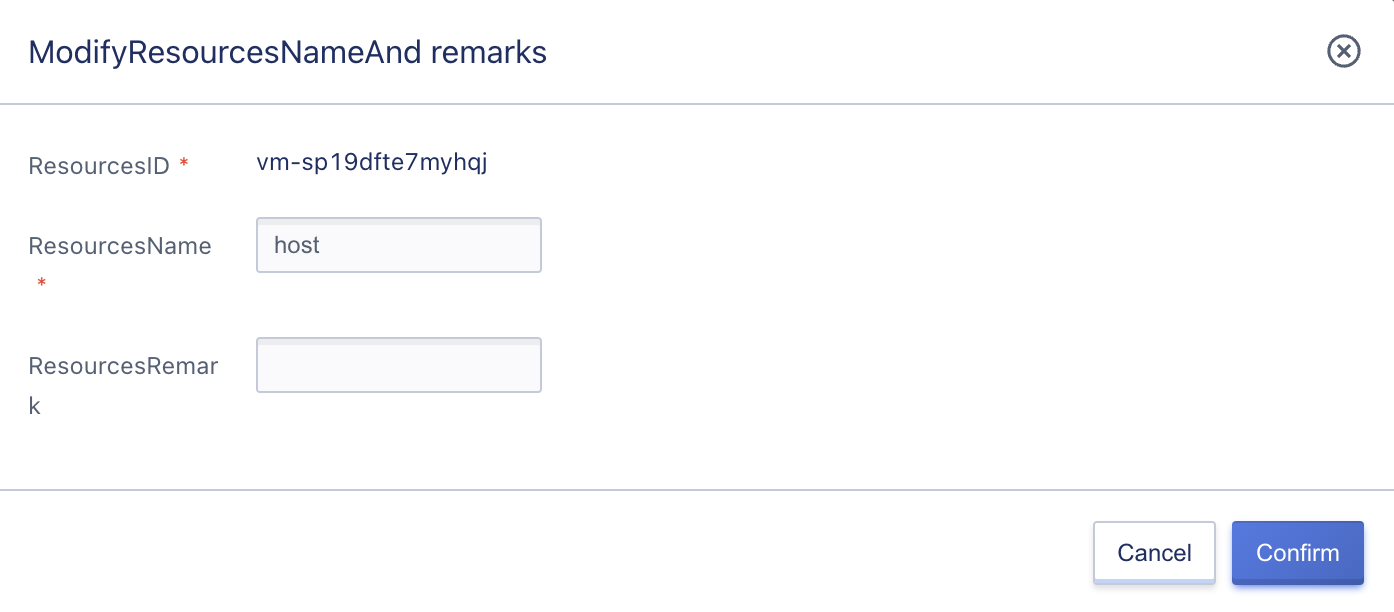
3.14 Change the name and remarks
You can modify the name and description of the virtual machine at any time. Click the button on the right side of the virtual machine name on the virtual machine list page to modify it, as shown in the following figure:
3.15 Virtual Machine Renewal
Support users to manually renew virtual machines, the renewal operation only applies to the resource itself, not the additional resources associated with the resource, such as public IP, cloud disk, public network elastic network card, etc. After the expiration of the additional associated resources, it will be automatically unbundled. To ensure normal business use, it is necessary to renew the relevant resources in time, as shown in the following figure:
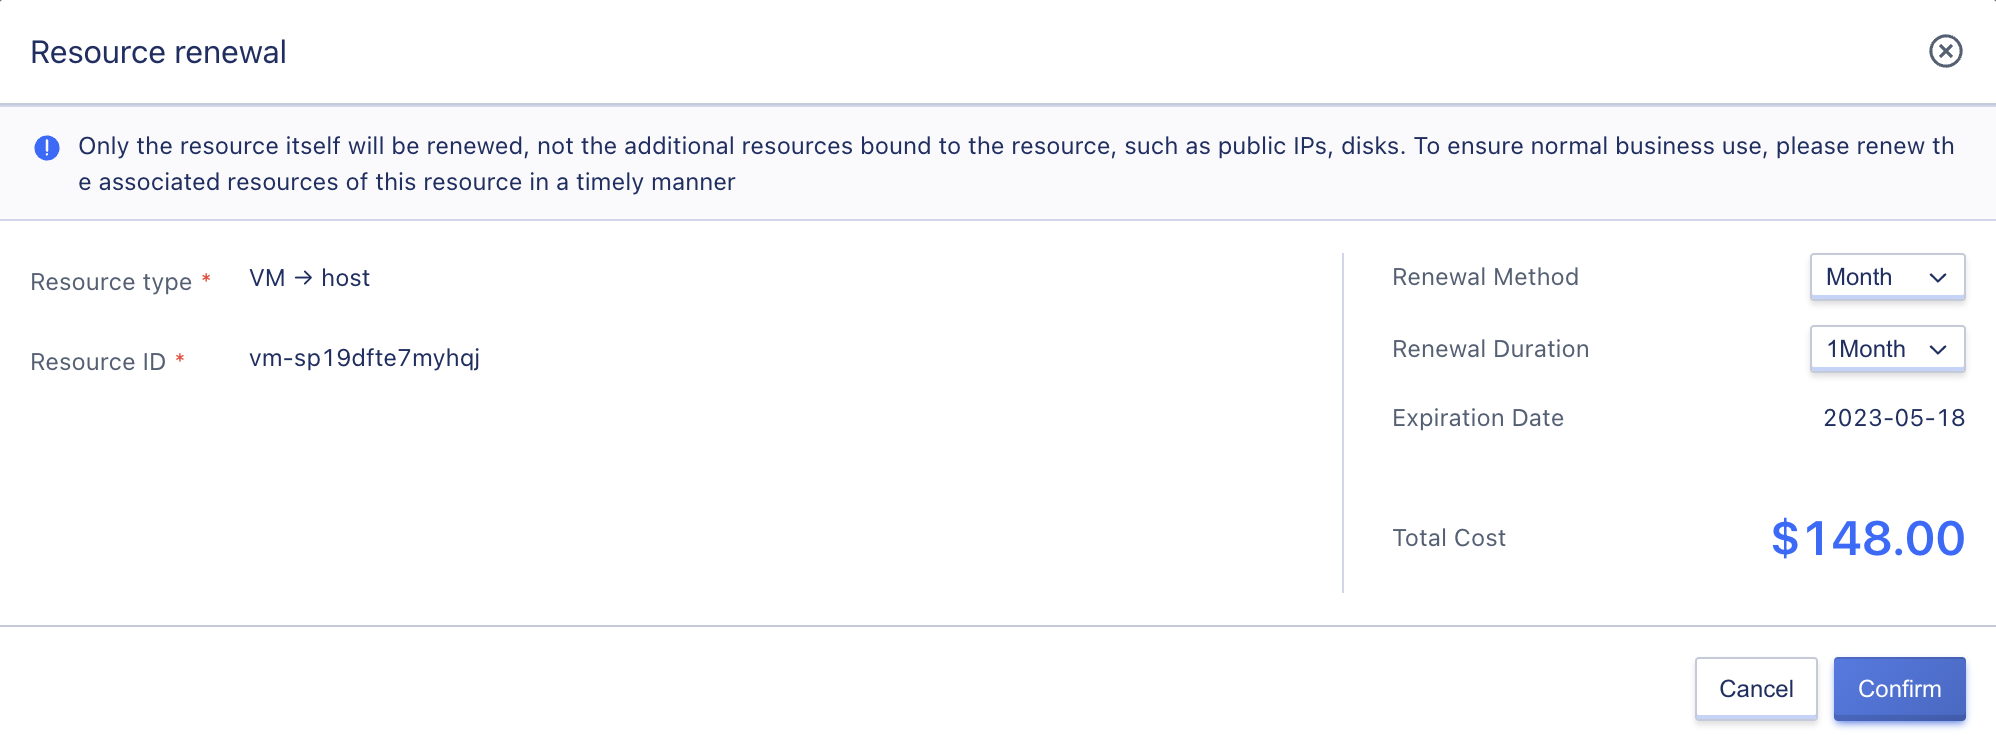
When renewing a virtual machine, it is possible to change the renewal method, only from a short period to a long period, for example, from a monthly renewal to a monthly or yearly renewal.
When renewing a virtual machine, fees will be charged according to the renewal period. The renewal period matches the billing method of the resources. When the billing method of the virtual machine is “Hourly”, the renewal period can be selected from 1 to 24 hours; when the billing method of the virtual machine is “Monthly”, the renewal period can be selected from 1 to 11 months; when the billing method of the virtual machine is “Yearly”, the renewal period of the virtual machine is from 1 to 5 years.
3.16 Get VNC login information
Support users to get VNC login information of virtual machines, applicable to scenarios using VNC clients to connect to virtual machines. For example, in desktop cloud scenarios, desktop terminals of desktop cloud providers usually connect to desktop virtual machines provided by the platform through protocols such as VNC, Spice, and RDP, among which VNC and Spice protocols are basically the common protocols of desktop service providers.
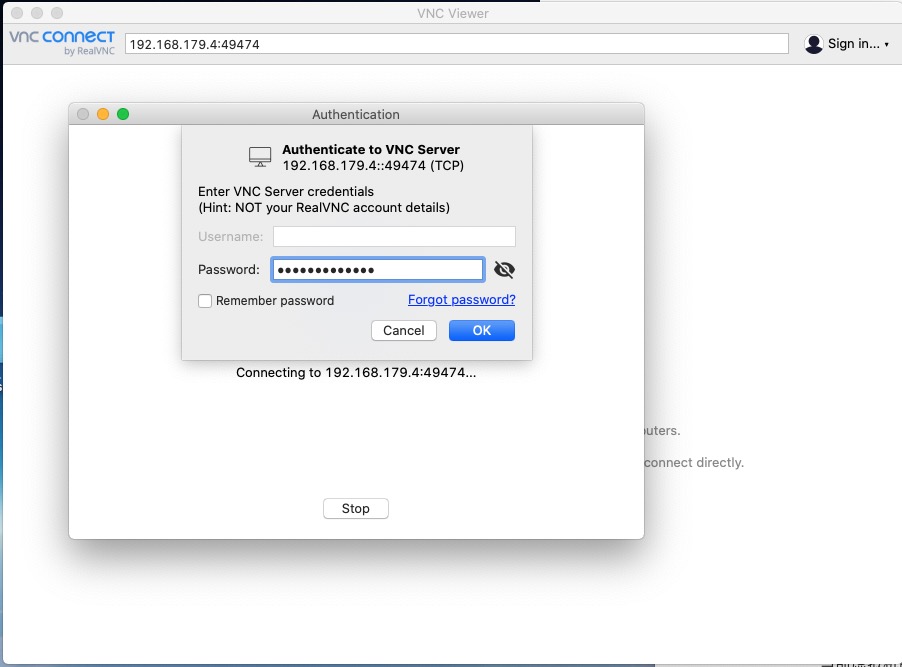
Users can view the VNC login information of the virtual machine, including the virtual machine ID, VNCIP address, VNC port, and VNC client login password, through the “Get VNC Information” in the user API interface or virtual machine console operation items, as shown in the following figure:

- VNCIP Address: The address allocated from the current cloud platform’s public IP address pool, networks that can access the public IP address can use VNCIP:port and password to connect to the virtual machine via a VNC client, such as the VNCView client software.
- VNC Port: The port used when logging in to VNC, to ensure security, the platform will change to an unused port each time it obtains VNC information.
- VNC Password: The password used when logging in to VNC, which will randomly provide a new VNC login password each time it is viewed according to the algorithm, in order to ensure the security of VNC login to the virtual machine (for example: when the user first logs in to the virtual machine through VNC, they enter the desktop or command line through the login password of the virtual machine operating system, then the next time they log in to VNC, they will automatically enter the desktop and command line, which brings unavoidable security risks to the user’s virtual machine).
To ensure the security of the VNC connection, the validity of the VNC login information obtained each time through the API or the interface is 300 seconds. If the user does not connect with the IP and port within 300 seconds, the information will be invalidated and a new login information needs to be obtained. At the same time, if the user does not perform any operation within 300 seconds after logging in to the virtual machine with the VNC client, the connection will be automatically disconnected.
When using the cloud platform, at least one segment of external IP address accessible to the cloud platform will be provided, and the VNC IP address is the IP address allocated in this segment to ensure network accessibility.
Users can log in to the platform virtual machine in an environment where the network is accessible, using a client such as VNCView, as shown in the following figure:
3.17 Delete the virtual machine
Platform users can delete virtual machine resources that are shut down or running in the console, supporting batch deletion. After the virtual machine is deleted, it automatically enters the “Recycle Bin”, which can be restored or completely destroyed. You can operate through the “Delete” in the virtual machine list operation item, as shown in the following figure:
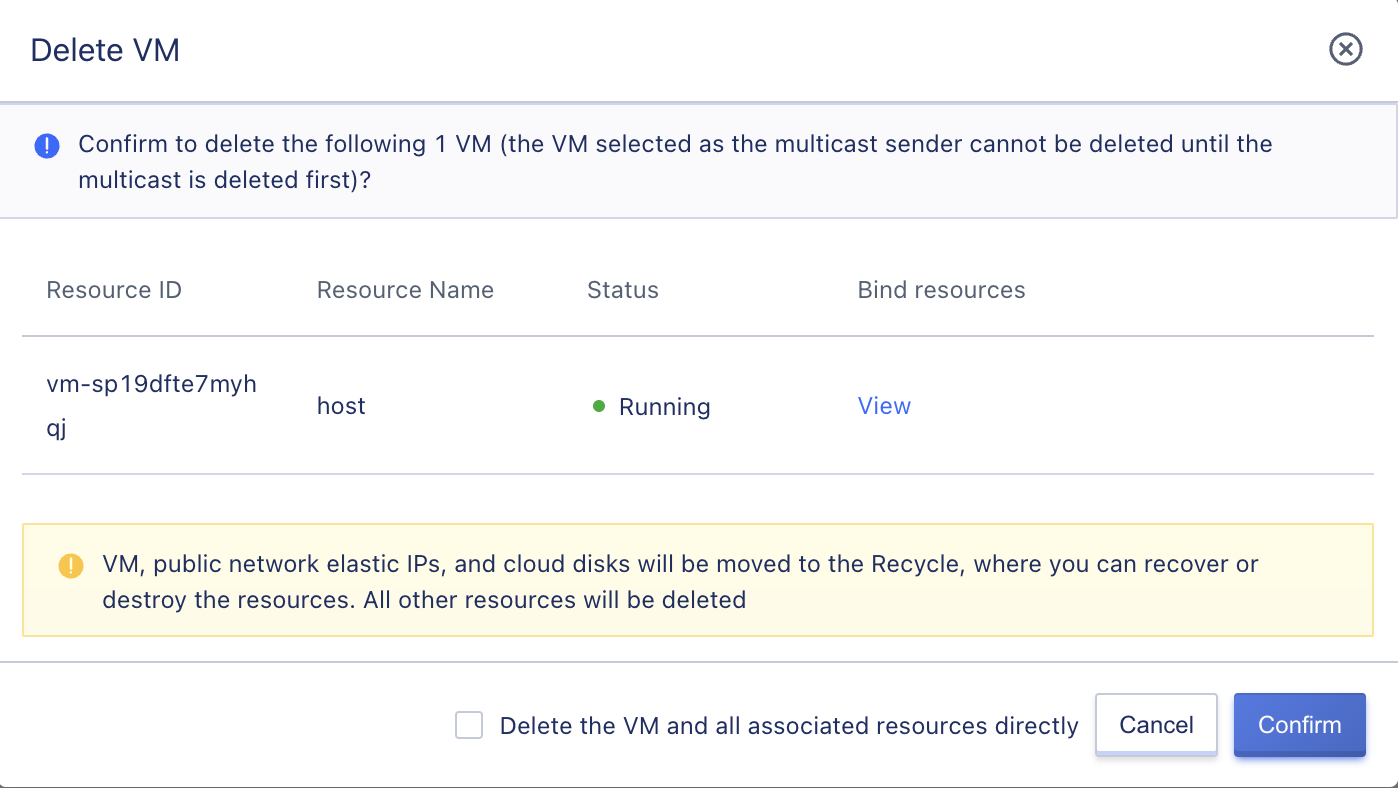
- When deleting a virtual machine, the external IP, elastic network card, cloud disk and other resources bound to the virtual machine will be automatically unbound.
-
If the virtual machine has been added to the NAT gateway whitelist or the service node of the load balancer, it will be automatically unbound when the virtual machine is deleted.
- Support users to select to delete the bound resources when deleting the virtual machine, that is, automatically unbind and delete the bound public IP, elastic network card and cloud disk.
- When deleting a virtual machine, the public IP and cloud disk will automatically enter the recycle bin, while the elastic network card will be completely destroyed.
- If the virtual machine expires and is not successfully renewed within the allowed time, the virtual machine will be automatically recycled and the associated resources will be automatically unbound.
After the virtual machine is deleted, the two default network cards, system disk, and system disk data created with the virtual machine will enter the recycle bin with the virtual machine, and the virtual machine can be destroyed or restored in the recycle bin.
When the external IP and cloud disk that enter the recycle bin with the virtual machine are restored, the original binding relationship will not be maintained, and the resource binding operation needs to be re-performed.
3.18 Remote Login
Remote login refers to remotely logging in and managing virtual machines through a remote management client software over the network, providing different ways to remotely log in for Linux and Windows virtual machines. The prerequisite for remote login is that the virtual machine must be bound to an external network IP address and can access the server’s remote login port (Linux SSH is 22, Windows Remote Desktop is 3389) through the external network.
3.18.1 Remote Login to Linux
For convenience of verification, this manual assumes that the local client operating system used is Linux or Mac OS, that is, the default SSH client is included, and SSH commands can be used to log in to the remote SSH server directly via the command line. The specific steps are:
- Assign an external IP address to the virtual machine that needs to be remotely logged in, and allow SSH port 22 access from the external security group, as shown in the following figure:

- The user opens the system’s built-in Terminal and inputs the SSH command to log in:
ssh root@the public IP address of the virtual machine, as in the following example:
# ssh root@192.168.179.98
- Enter the login password for the virtual machine to directly log in to the Linux server, as shown in the following figure, which means successful login.
3.18.2 Remote Login to Windows
For convenience of verification, this manual assumes that the local client operating system is Mac OS and uses Microsoft Remote Desktop Connection MAC version program RDC to log in. The operation steps are the same as Windows Remote Desktop, only need to enter the public IP address of Windows in the tool to connect。
The prerequisite for remote desktop connection is that the virtual machine must be bound to an external IP address, and the external security group bound to it must allow port 3389 to pass. If the default port of the remote desktop is modified in the operating system, the security group needs to allow the modified port to pass.
3.19 System disk expansion
The default system disk capacity of the virtual machine is 40GB, and the platform supports users to expand the system disk capacity to a maximum of 500GB. When the default 40GB system disk capacity cannot meet the business requirements, the required system disk capacity can be specified to create the virtual machine, such as the following figure specifying 200GB system disk capacity to create a virtual machine, the capacity of the system disk block device created is 200GB.
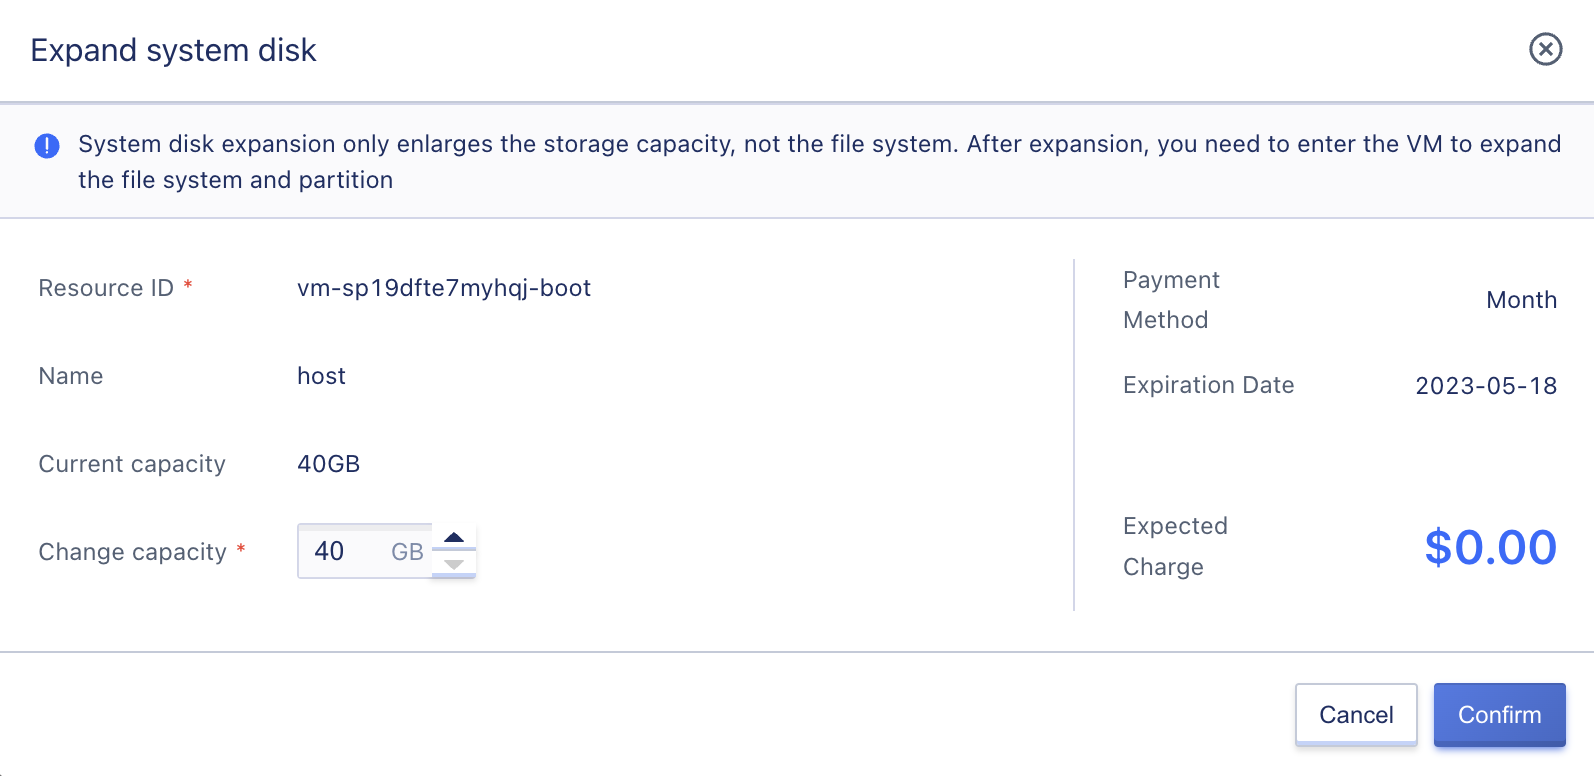
The expansion of the system disk capacity is the expansion of the capacity of the system disk block device, and the expansion of the file system in the virtual machine operating system is not performed. That is, after the system disk is expanded, it is necessary to enter the virtual machine to perform the expansion (resize) operation of the file system.
For different types of operating systems, the partition expansion operation is different. For example, Windows usually uses its own disk management tool to expand the partition. According to different OS system disk expansion scenarios, it can be roughly classified as follows:
- Expand the partition of the Linux system disk
- Expand the partition of the Windows system disk
Before performing system partition expansion and file system expansion, it is necessary to ensure that the storage capacity of the system disk has been adjusted on the console.
3.19.1 Expand Partition of Linux System Disk
On Linux systems, the growpart and resize2fs tools are usually used to complete the system disk partition expansion and file system expansion operations. This example takes the Centos 7.4 operating system as an example, and the specific operation is as follows:
1、Install the growpart filesystem resizing tool.
-
Centos
yum install -y epel-release
yum install -y cloud-utils
2、Check the system disk capacity of 200GB by running fdisk -l, and run df -Th to check the capacity of system disk partition /dev/vda1, which is 40GB, and the file system type is ext4.
[root@localhost ~]# fdisk -l

disk /dev/vda:214.7 GB, 214748364800 bytes,419430400 sectors
Units = sector of 1 * 512 = 512 bytes
sector size(logic/physics):512 bytes / 512 bytes
I/O size(the smallest/optimal):512 bytes / 512 bytes
disk label type:dos
disk identifier:0x000ba442

   equipment Boot      Start         End      Blocks   Id  System
/dev/vda1   *        2048    83883775    41940864   83  Linux
[root@localhost ~]#
[root@localhost ~]# df -Th
file system   type    capacity  used available used% mount point
devtmpfs       devtmpfs  1.9G     0  1.9G    0% /dev
tmpfs          tmpfs     1.9G     0  1.9G    0% /dev/shm
tmpfs          tmpfs     1.9G  8.4M  1.9G    1% /run
tmpfs          tmpfs     1.9G     0  1.9G    0% /sys/fs/cgroup
/dev/vda1      ext4       40G  1.4G   36G    4% /
tmpfs          tmpfs     382M     0  382M    0% /run/user/0
3、Run the command growpart <DeviceName> <PartionNumber> to expand the partition and restart the virtual machine. In this example, growpart /dev/vda 1 means to expand the capacity of partition 1 of the system disk.
[root@localhost ~]# LANG=en_US.UTF-8
[root@localhost ~]# growpart /dev/vda 1
CHANGED: partition=1 start=2048 old: size=83881728 end=83883776 new: size=419428319 end=419430367
[root@localhost ~]# reboot
4、After the virtual machine is restarted, extend the file system of the extended virtual machine system disk. Different file system types use different methods to extend.
-
The ext type file system can be expanded using the resize2fs
tool, as shown below: [root@localhost ~]# resize2fs /dev/vda1 resize2fs 1.42.9 (28-Dec-2013) Filesystem at /dev/vda1 is mounted on /; on-line resizing required old_desc_blocks = 5, new_desc_blocks = 25 The filesystem on /dev/vda1 is now 52428539 blocks long. -
If the file system is of type XFS, you can use the
xfs_growfs <mountpoint>tool to expand it.
5、Run df -Th to view the system partition /dev/vda1 with a capacity of 200GB.
[root@localhost ~]# df -Th
file system    type    capacity  used available used% mount point
devtmpfs       devtmpfs  1.9G     0  1.9G    0% /dev
tmpfs          tmpfs     1.9G     0  1.9G    0% /dev/shm
tmpfs          tmpfs     1.9G  8.3M  1.9G    1% /run
tmpfs          tmpfs     1.9G     0  1.9G    0% /sys/fs/cgroup
/dev/vda1      ext4      197G  1.5G  187G    1% /
tmpfs          tmpfs     382M     0  382M    0% /run/user/0
3.19.2 Windows System Disk Partition Expansion
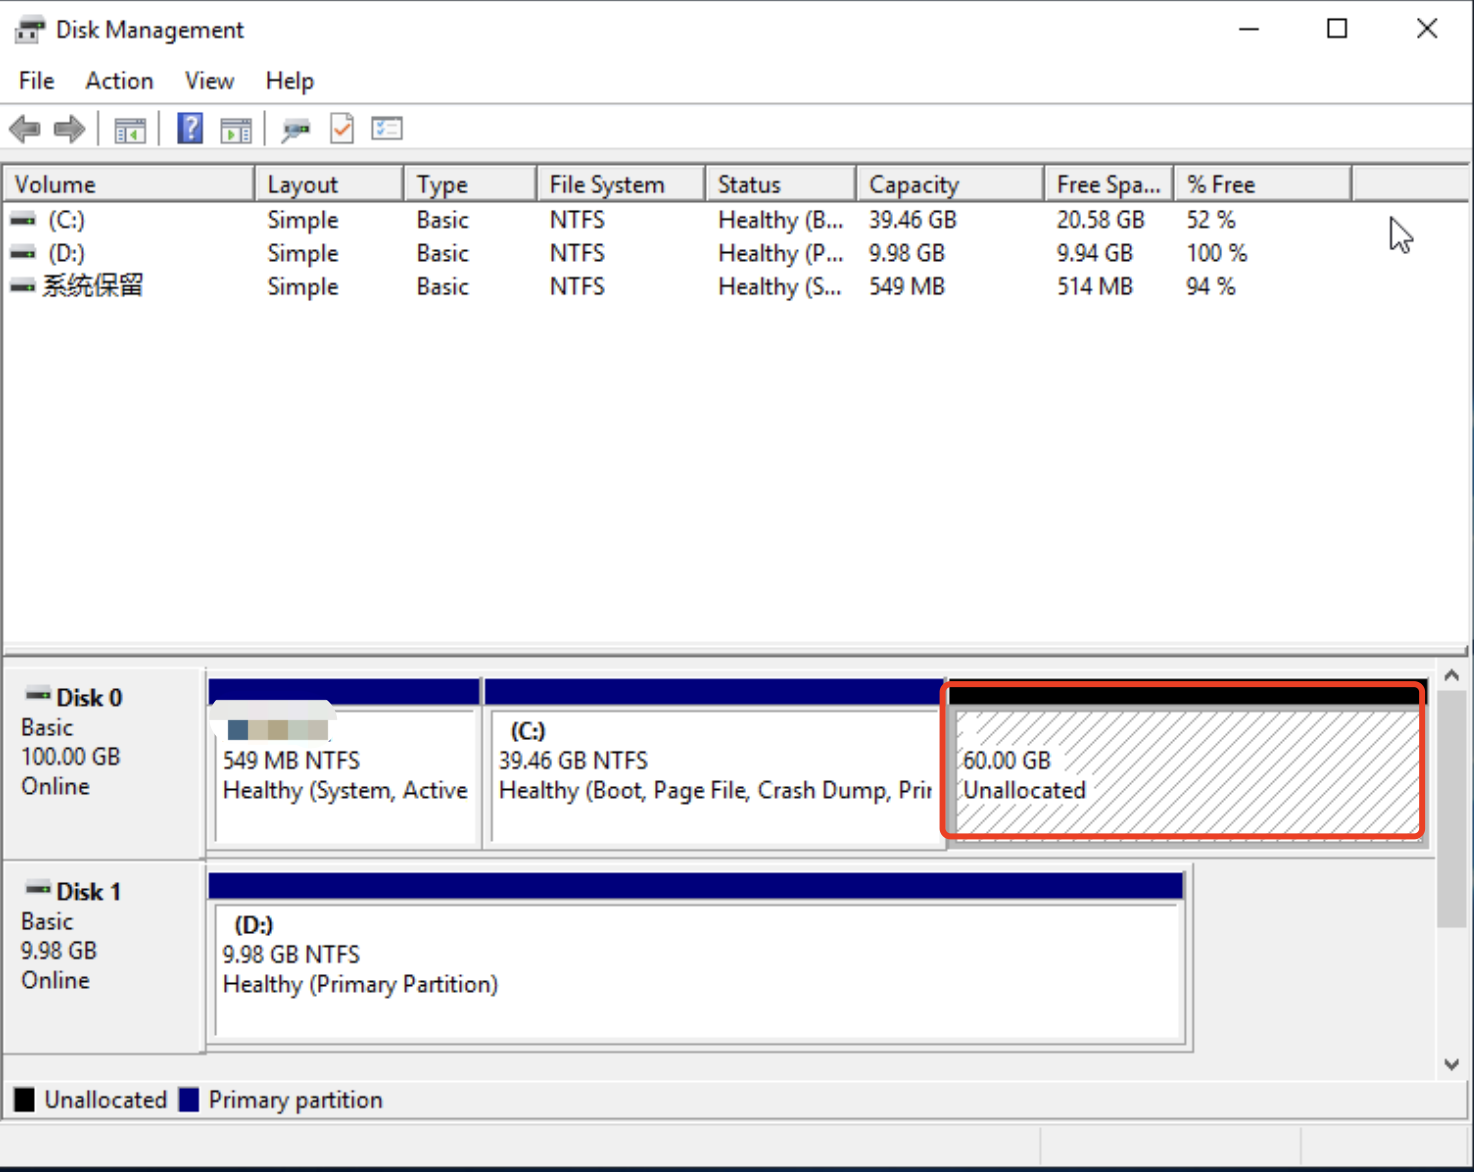
Windows systems usually use the “Disk Management” tool in “Administrative Tools - Computer Management” to extend volume operations. The specific operation is as follows:
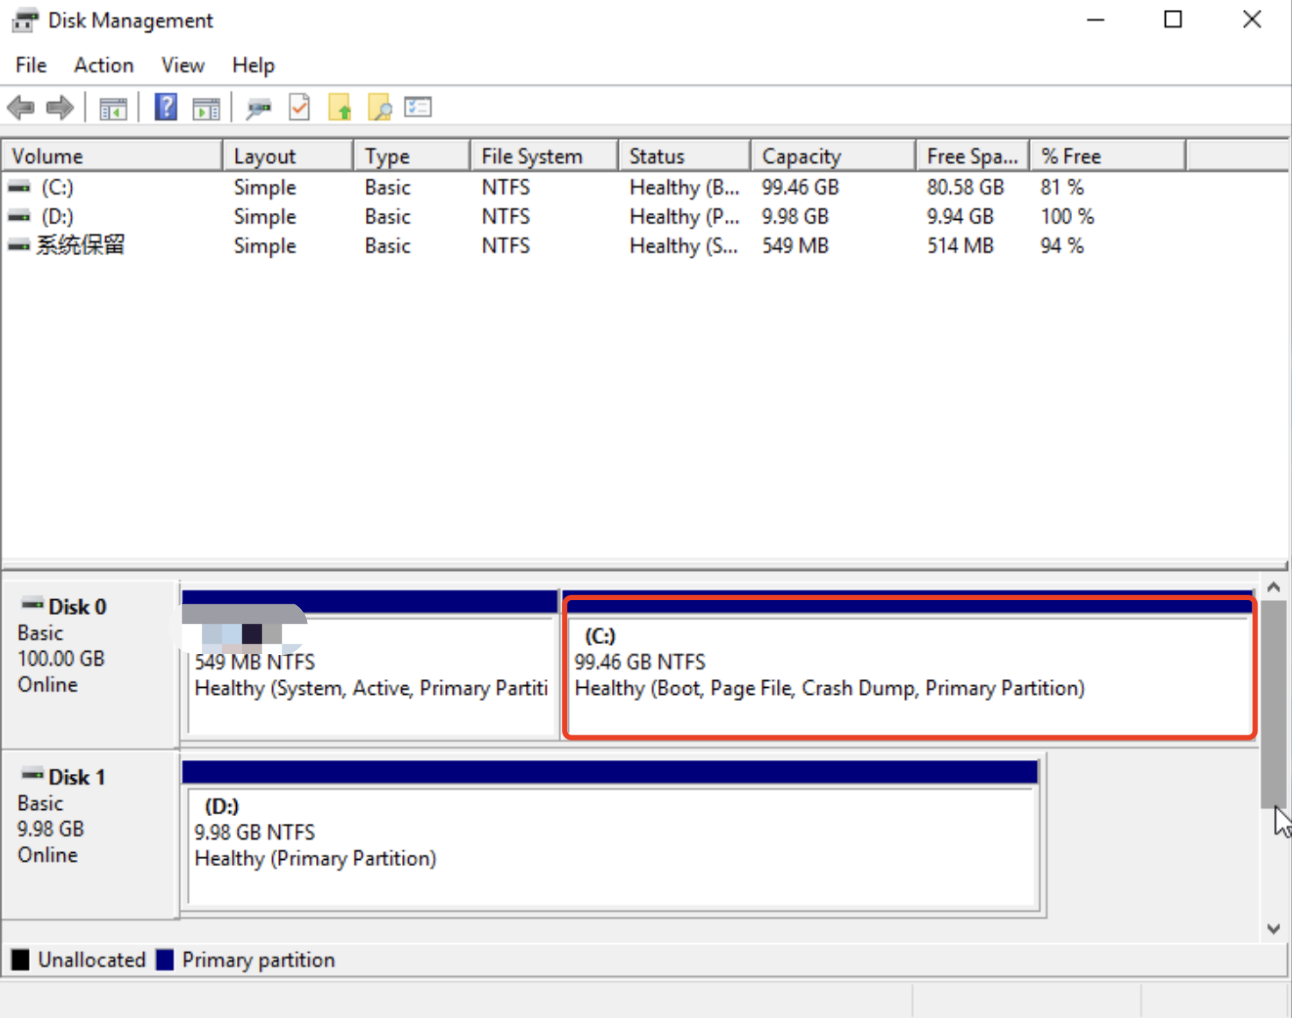
1、In the Disk Management tool, select Operations > Rescan Disks to identify newly expanded unallocated space, as shown in the following picture, where Disk 0 has 60GB of unallocated space.
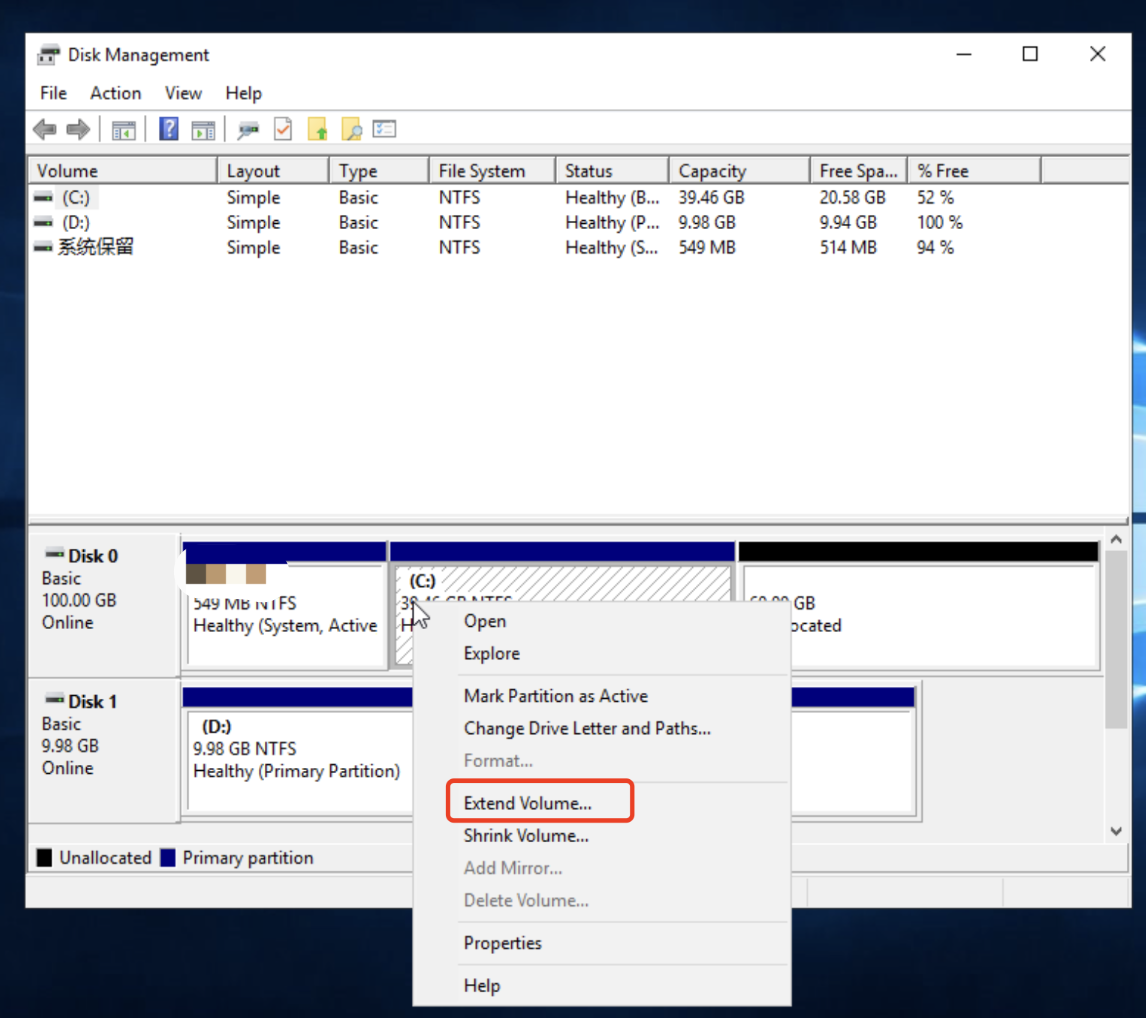
2、Right-click on the C drive, select Extend Volume, and perform Extend Volume operation on Disk 0.
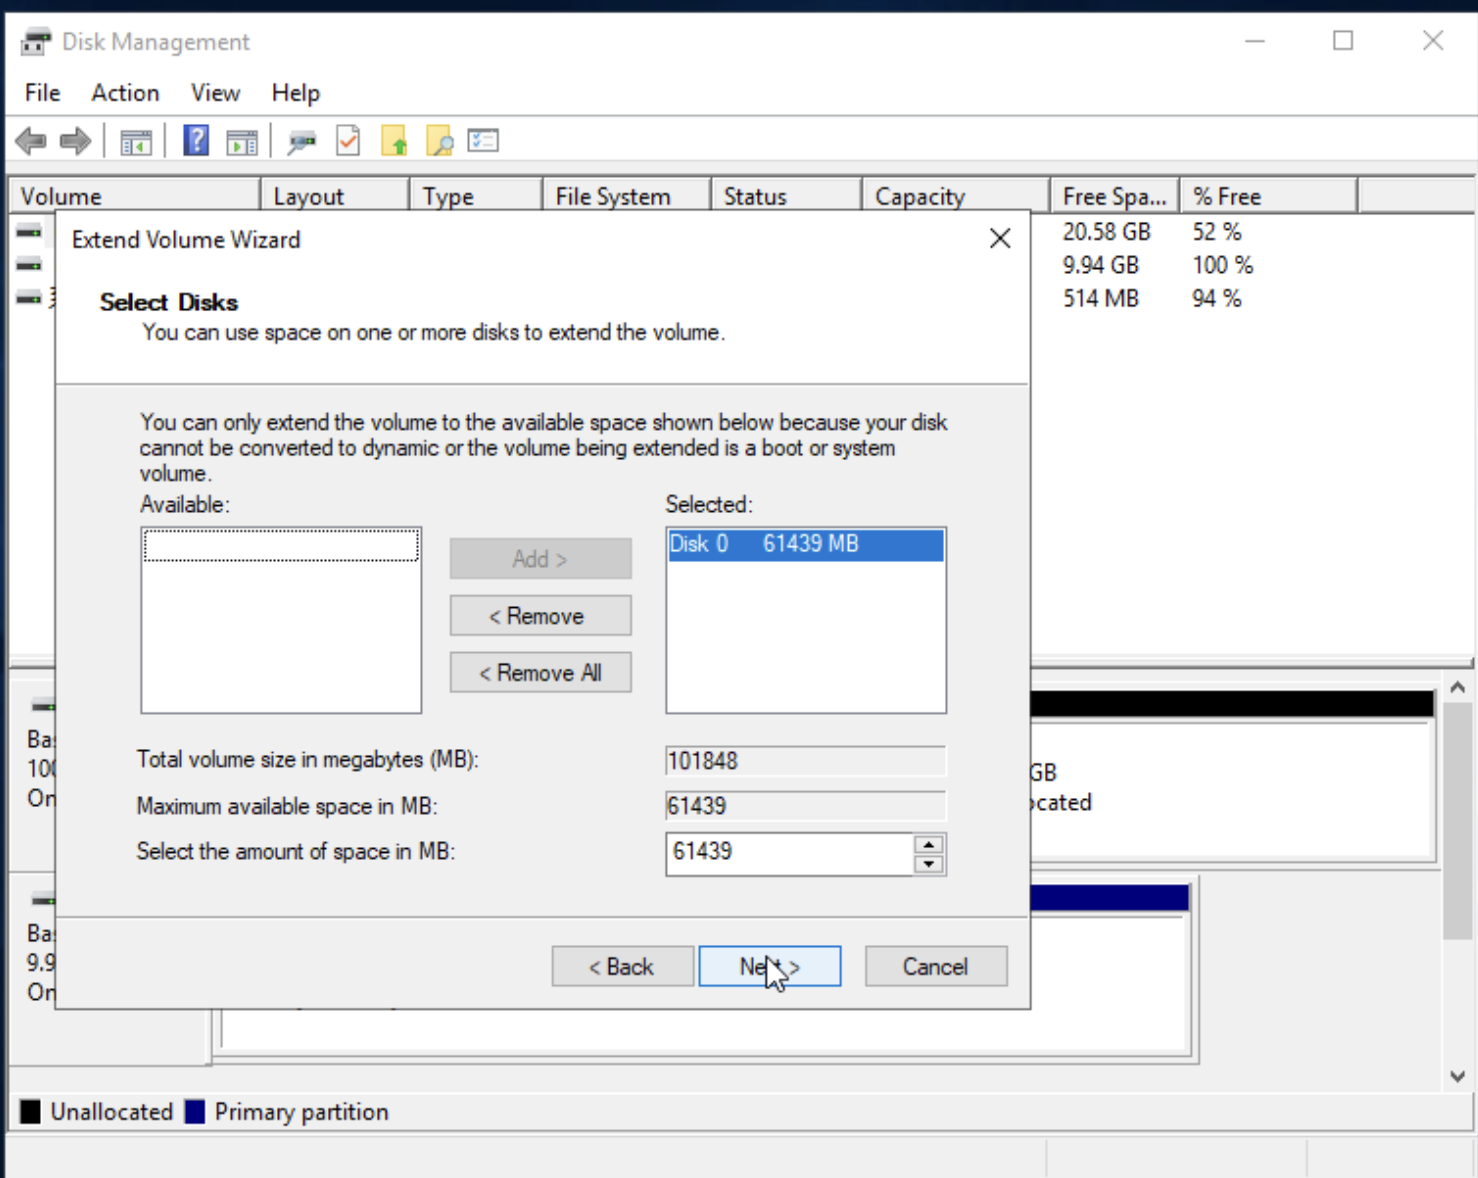
3、In the Extension Volume Wizard, use the default configuration to operate the Extension Volume.
4、After the expansion volume operation is completed, the newly added system disk capacity will be automatically merged into the C drive, indicating that the disk 0 file system has been successfully expanded.