Virtual Network Interface Card (NIC)
This document only introduces the operations related to virtual NICs, auxiliary IPs, and other related functions on the product page.
Glossary
-
Default NIC: The NIC automatically created by the system when the host enables the NIC function. The EIP and firewall originally bound to the cloud host will be assigned to the default NIC.
-
Custom NIC: A NIC manually created in the console that can be elastically bound to the cloud host.
-
Auxiliary IP: An auxiliary IP manually requested from the console to be used in conjunction with the main IP. It can be elastically bound to the cloud host, and the number of auxiliary IPs that can be requested is related to the cloud host configuration.
Under Network Enhancement 1.0:
| Index | vCPU | Number of Elastic NICs | Number of Private IPs per NIC |
|---|---|---|---|
| 1 | 1 ≤ vCPU ≤ 2 | 2 | 2 |
| 2 | 2 < vCPU ≤ 4 | 3 | 3 |
| 3 | 4 < vCPU ≤ 8 | 4 | 4 |
| 4 | 8 < vCPU ≤ 32 | 8 | 6 |
| 5 | 32 < vCPU ≤ 64 | 12 | 8 |
| 6 | 64 < vCPU ≤ 128 | 15 | 10 |
| 7 | vCPU > 128 | 15 | 12 |
Under Network Enhancement 2.0:
| Index | vCPU | Number of Elastic NICs | Number of Private IPs per NIC |
|---|---|---|---|
| 1 | 1 ≤ vCPU ≤ 2 | 1 | 4 |
| 2 | 2 < vCPU ≤ 4 | 1 | 9 |
| 3 | 4 < vCPU ≤ 8 | 1 | 16 |
| 4 | 8 < vCPU ≤ 32 | 1 | 48 |
| 5 | 32 < vCPU ≤ 64 | 1 | 96 |
| 6 | 64 < vCPU ≤ 128 | 1 | 150 |
| 7 | vCPU > 128 | 1 | 180 |
Creating a NIC
Log in to the console, select Virtual NIC under [All Products], and click [Create Virtual NIC].
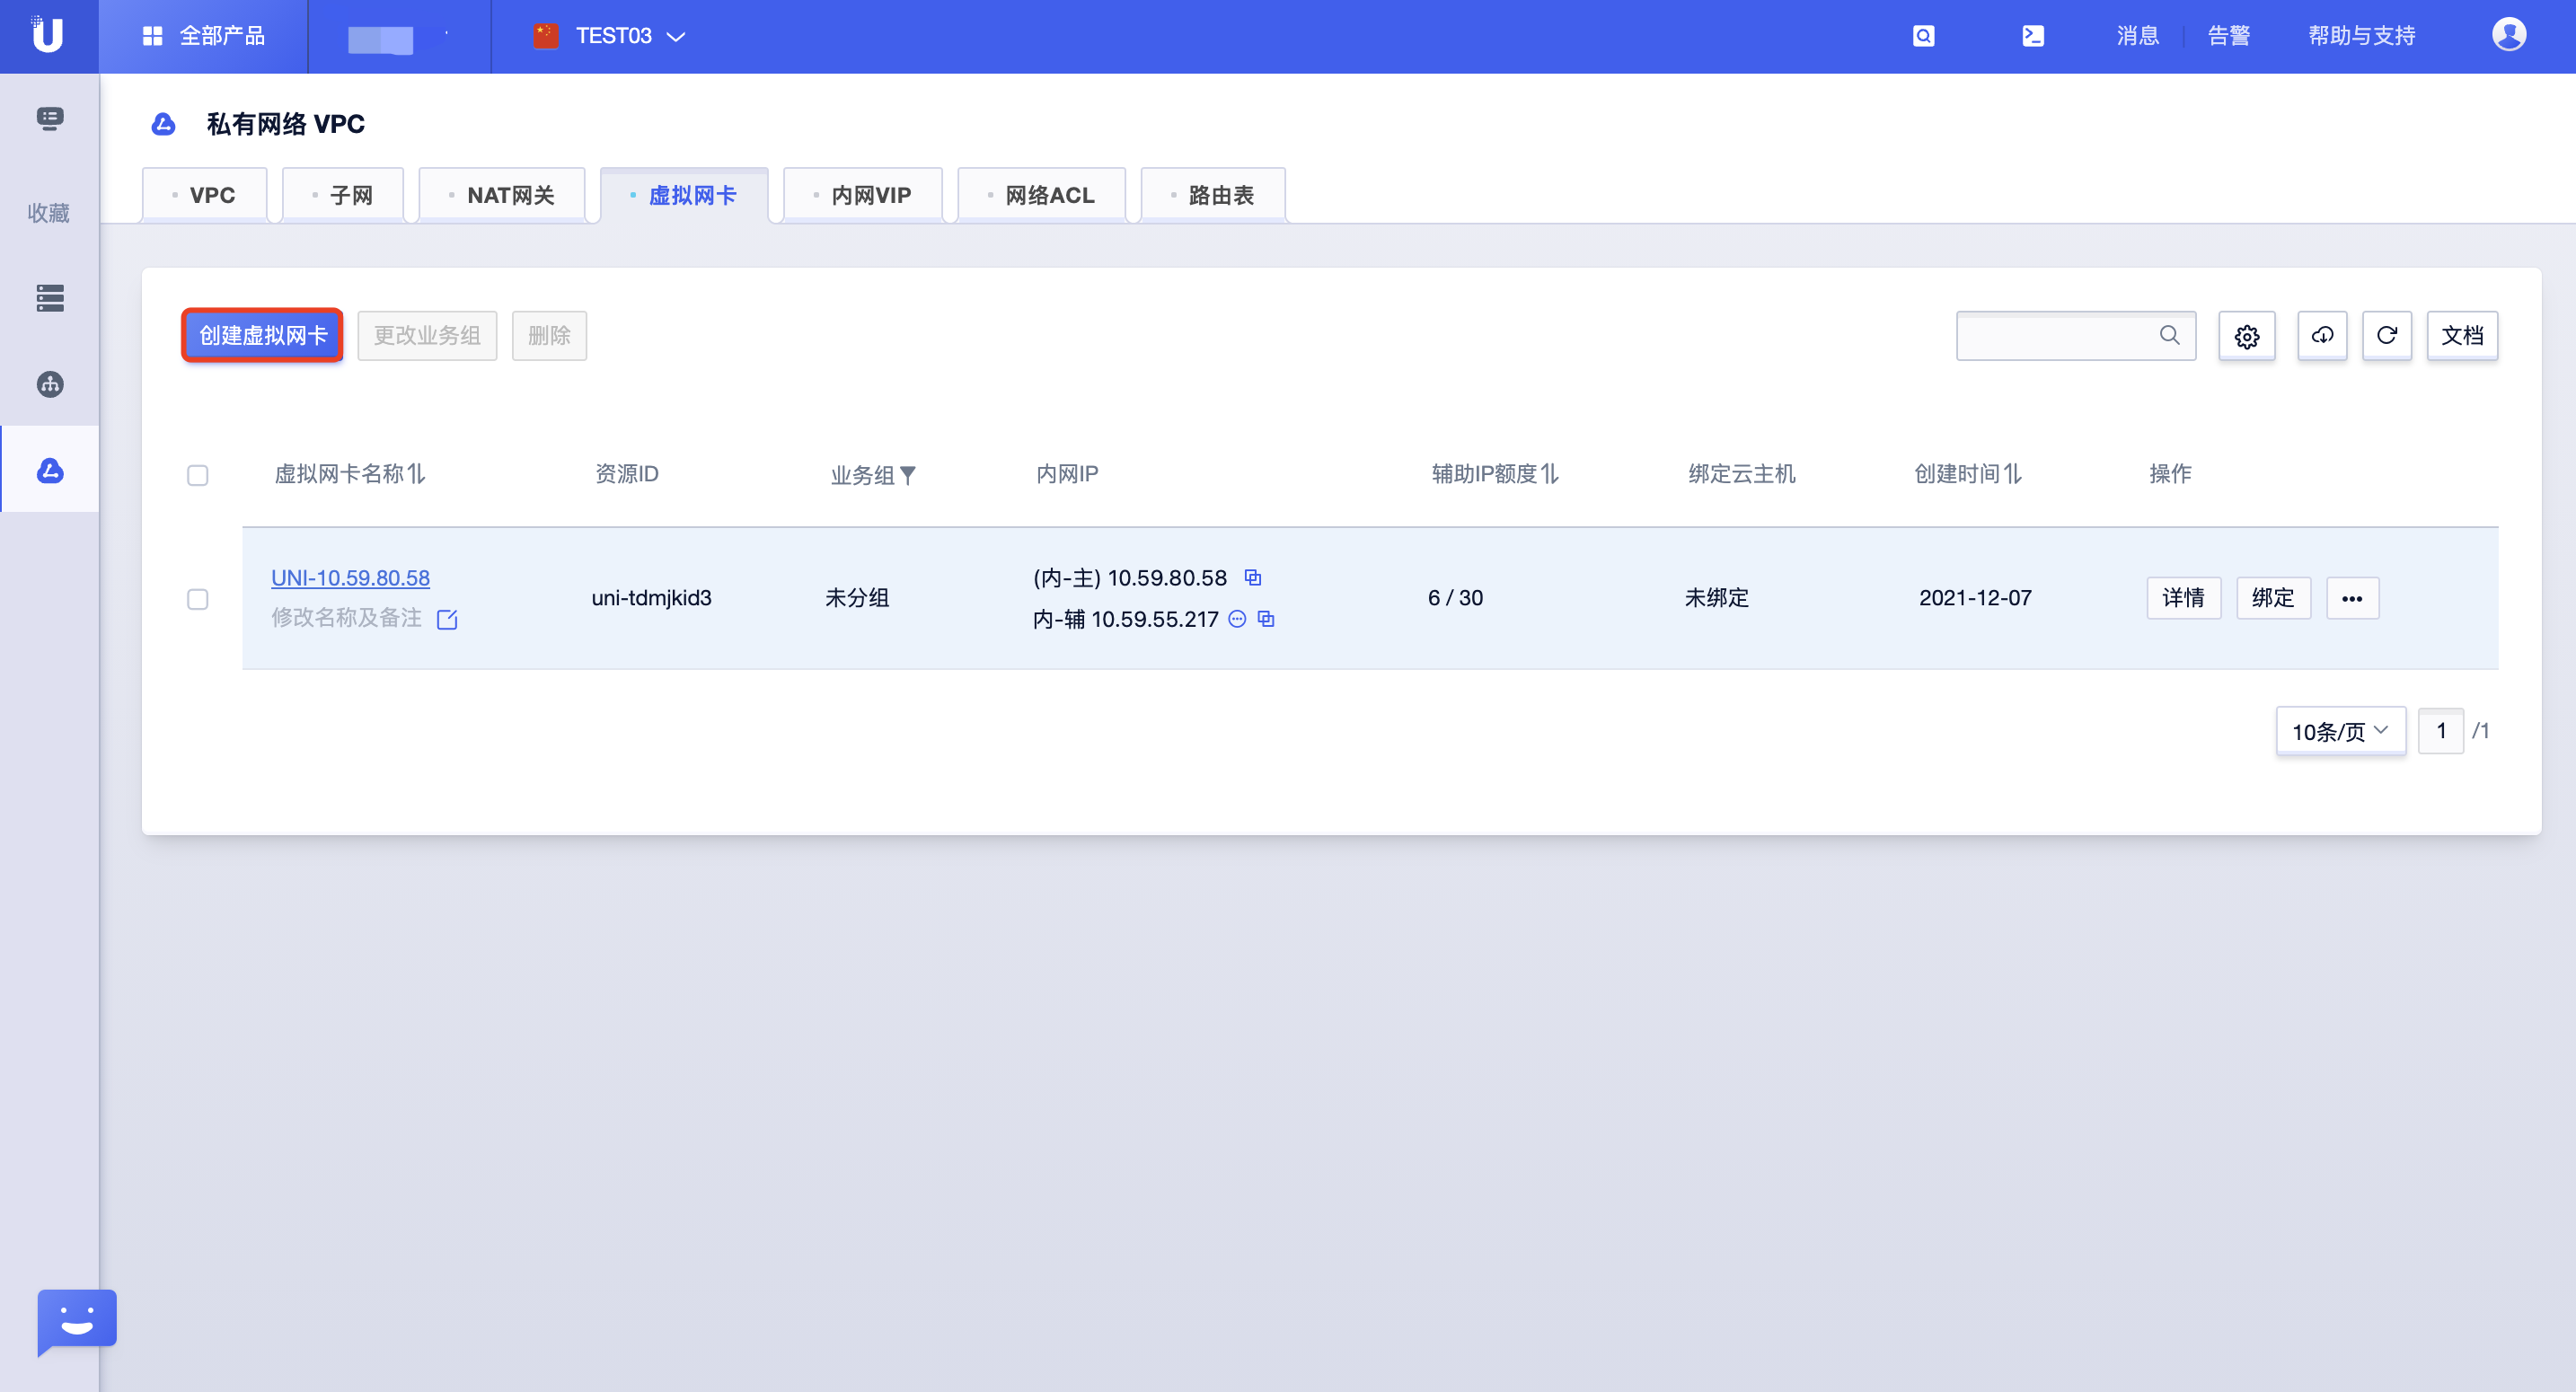

Explanation:
- A newly created NIC is automatically bound to the default web firewall.
- Custom NICs have independent configurations, such as resource name remarks, business group, elastic IP, firewall configuration, etc., and are independent of the cloud host. They can be elastically bound to the cloud host.
- The cloud host’s network configuration is automatically applied to the default NIC, which is strongly bound to the cloud host and is consistent with the cloud host’s lifecycle.
Using a NIC
The newly created NIC is not bound to an external elastic IP, so it needs to be bound after the NIC is created. Additionally, you can rename, bind to the host, and perform other operations on the NIC in the virtual NIC list or detail page.
After a custom NIC is bound to a cloud host, you need to configure the NIC information and policy routing on the cloud host (no configuration is required for the default NIC).
- List page operation!
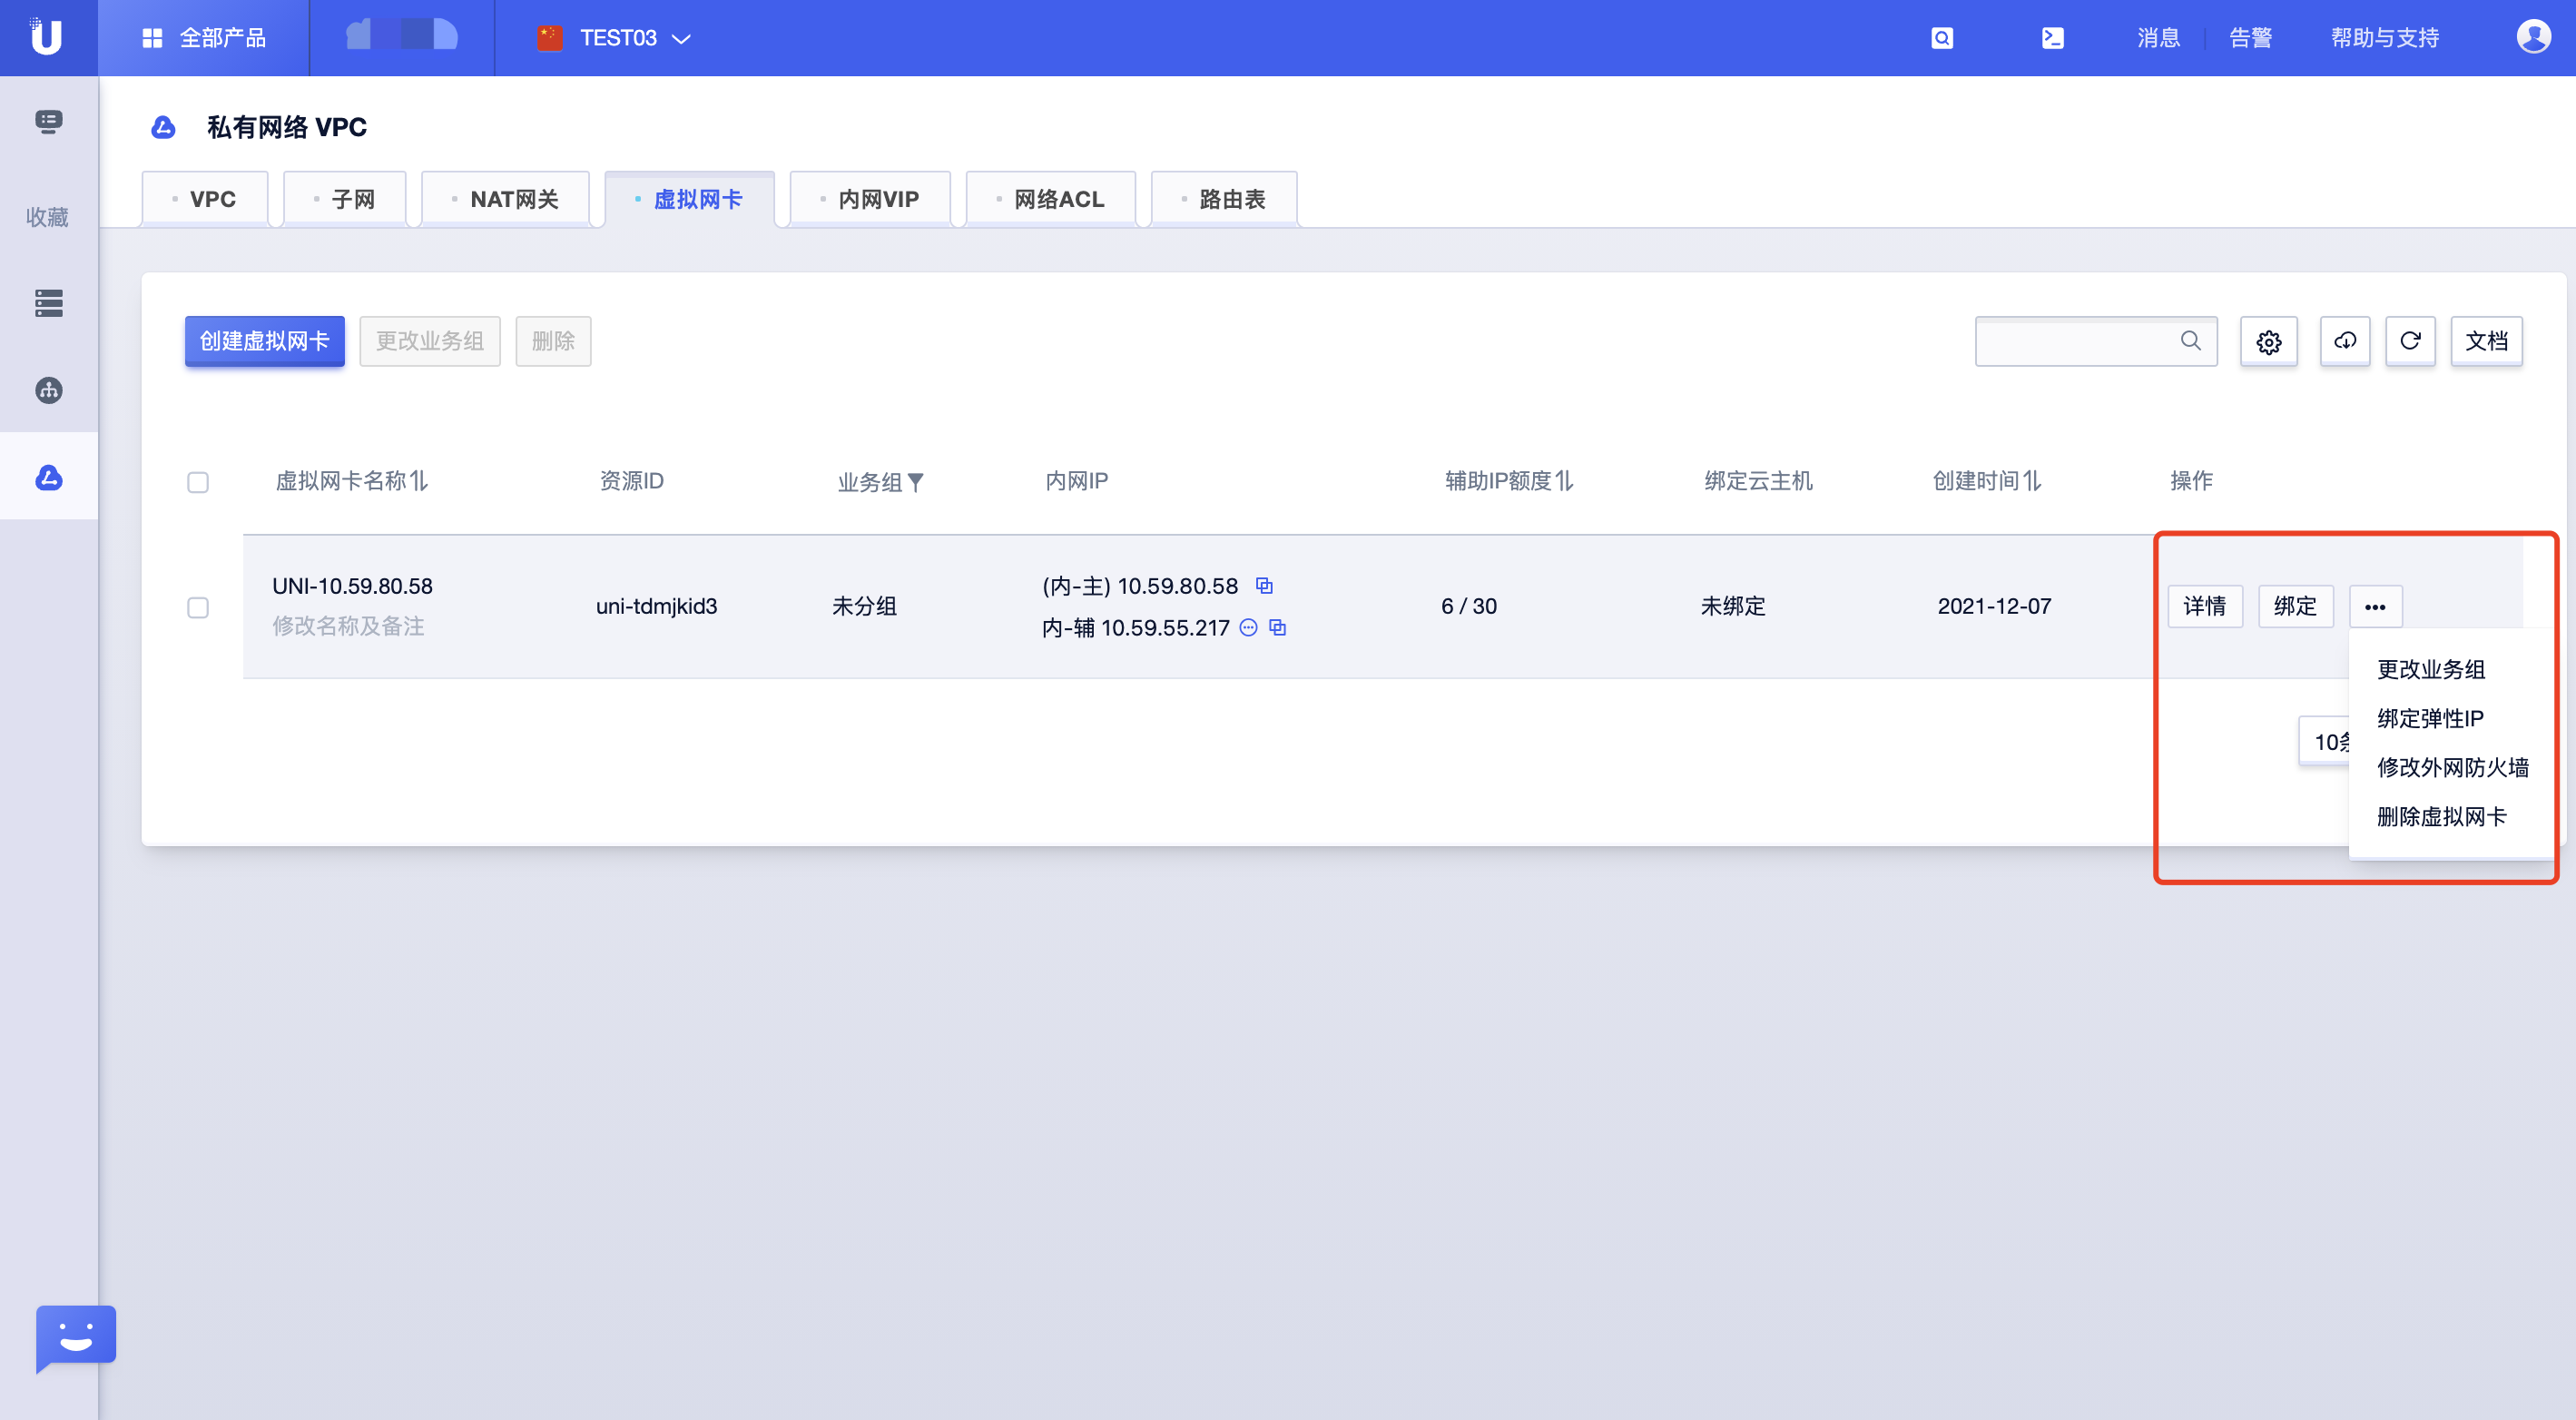
- Detail page operation!
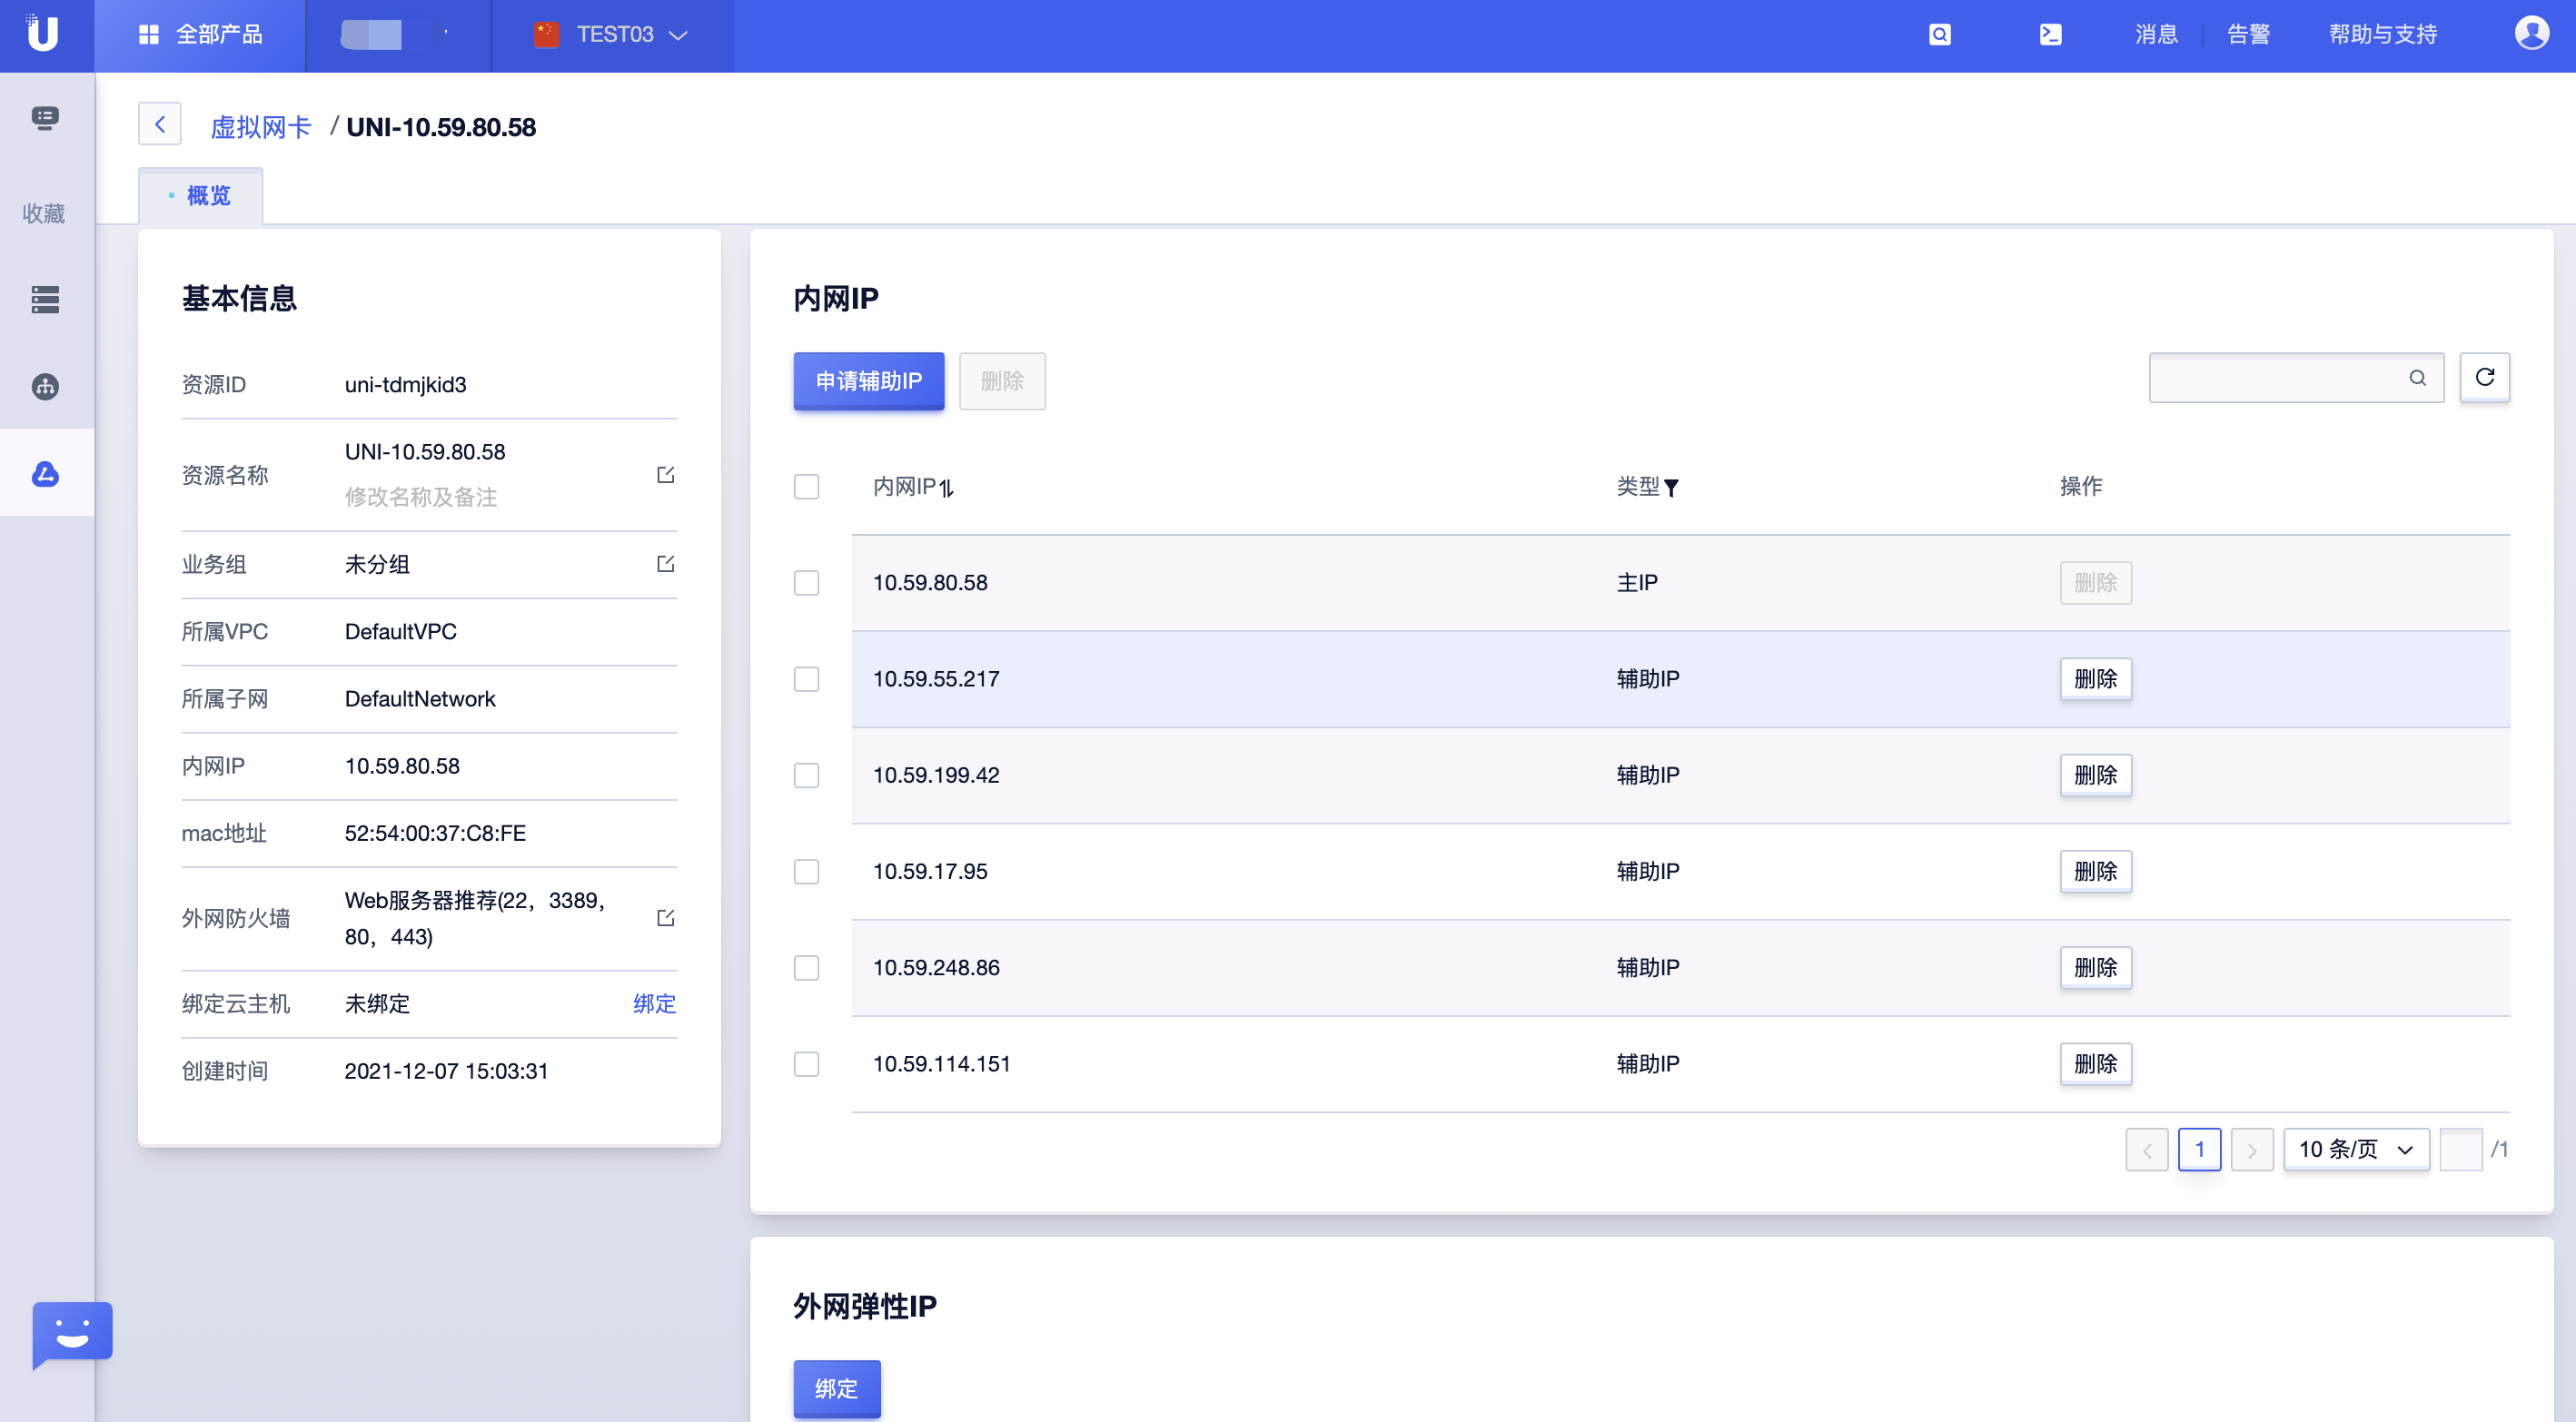
- Binding a NIC to a cloud host!

Explanation:
- You can enter the resource detail page by clicking [Resource Name] on the list page or by clicking [Details] in the operation column.
- In the upper right corner of the console, you can customize the display of NIC information columns, download the NIC resource list, refresh NIC resource list information, review documentation, etc.
NIC Configuration Guide
The default NIC of the cloud host does not require configuration, but the corresponding auxiliary IP needs to be configured.
CentOS 7 Configuration Guide
The three NIC configurations of the existing host are as follows, and two custom NICs have been bound to the cloud host.
eth0 (Default NIC)
(Main IP) 10.42.108.166
(Auxiliary IP) 10.42.107.2
eth1 (Custom NIC created)
(Main IP) 10.42.71.137
(Auxiliary IP) 10.42.71.3
eth2 (Custom NIC created)
(Main IP) 10.42.175.116
(Auxiliary IP) 10.42.175.3
Step 1: Disable RPF
Temporarily Disable
Modify the value of /proc/sys/net/ipv4/conf/all/rp_filter:
echo 0 > /proc/sys/net/ipv4/conf/all/rp_filter
Restart the network service
service network restart
Permanently Disable
Edit the /etc/sysctl.conf file, change the value of net.ipv4.conf.all.rp_filter to 0, then restart the server.
Step 2: Configure Custom NIC
Configure eth1
# ifconfig eth1 10.42.71.137 netmask 255.255.0.0
# ifconfig eth1 mtu 1454
# echo "101 net_101 " >> /etc/iproute2/rt_tables
# ip route add default via 10.42.0.1 dev eth1 src 10.42.71.137 table net_101
# ip rule add from 10.42.71.137 table net_101
Configure eth2
# ifconfig eth2 10.42.175.116 netmask 255.255.0.0
# ifconfig eth2 mtu 1454
# echo "102 net_102 " >> /etc/iproute2/rt_tables
# ip route add default via 10.42.0.1 dev eth2 src 10.42.175.116 table net_102
# ip rule add from 10.42.175.116 table net_102
Persistent Configuration
Write configuration files for eth1 and eth2 NICs
Create configuration files
# cp /etc/sysconfig/network-scripts/ifcfg-eth0 /etc/sysconfig/network-scripts/ifcfg-eth1
# cp /etc/sysconfig/network-scripts/ifcfg-eth0 /etc/sysconfig/network-scripts/ifcfg-eth2

Modify the following in the file:
- DEVICE=Name of the virtual NIC
- HWADDR=MAC address of the virtual NIC
- IPADDR=IP address of the virtual NIC
Write policy routing configuration files
# cat /etc/sysconfig/network-scripts/route-eth1

default via 10.42.0.1 dev eth1 src 10.42.71.137 table net_101

# cat /etc/sysconfig/network-scripts/rule-eth1

from 10.42.71.137 table net_101


# cat /etc/sysconfig/network-scripts/route-eth2

default via 10.42.0.1 dev eth2 src 10.42.175.116 table net_102

# cat /etc/sysconfig/network-scripts/rule-eth2

from 10.42.175.116 table net_102
Step 3: Configure Auxiliary IP
ip addr add 10.42.107.2 dev eth0
ip addr add 10.42.71.3 dev eth1
ip addr add 10.42.175.3 dev eth2
Replace the IP address with the auxiliary IP to be bound. To configure the auxiliary IP for the default NIC, simply change the NIC name to eth0, and so on.
The virtual NIC’s main IP and auxiliary IP can ping through successfully, meaning the configuration is complete.
Step 4: Configure Policy Routing Steps After Auxiliary IP Binding EIP
Create a new policy routing table
echo '101 net_101' >> /etc/iproute2/rt_tables
Configure policy matching rules
ip rule add from X.X.X.X (Auxiliary IP) table net_101
ip rule add from X.X.X.X (Auxiliary IP) table net_102
Configure policy routing
ip route add default via X.X.X.X (Gateway IP) dev eth1 table net_101
ip route add default via X.X.X.X (Gateway IP) dev eth2 table net_102
CentOS 8 Configuration Guide
According to the quota, purchase a 2C2G cloud host, which can bind 2 virtual NICs, and each virtual NIC can apply for 6 auxiliary IPs.
The current configuration of the two NICs on the existing host is as follows, with one custom NIC already bound to the cloud host.
eth0 (Default NIC)
(Main IP) 10.40.121.96
(Auxiliary IP) 10.40.4.124
(Auxiliary IP) 10.40.91.199
...
(Auxiliary IP) 10.40.47.171
eth1 (Custom NIC created)
(Main IP) 10.40.54.131
(Auxiliary IP) 10.40.33.188
(Auxiliary IP) 10.40.134.89
...
(Auxiliary IP) 10.40.44.17
Step 1: Disable RPF
Temporarily Disable
Modify the value of /proc/sys/net/ipv4/conf/all/rp_filter:
echo 0 > /proc/sys/net/ipv4/conf/all/rp_filter
Restart the network service
nmcli c reload
Step 2: Configure Custom NIC eth1
Write the configuration file for eth1, and configure the main IP here
# cp -f /etc/sysconfig/network-scripts/ifcfg-eth0 /etc/sysconfig/network-scripts/ifcfg-eth1
# vim /etc/sysconfig/network-scripts/ifcfg-eth1
Modify the following in the file

- DEVICE=Name of the virtual NIC
- HWADDR=MAC address of the virtual NIC
- IPADDR=Main IP address of the virtual NIC

Example:
DEVICE=eth1
HWADDR=52:54:00:1B:5E:57
IPADDR=10.40.54.131
Configure the routing policy for the main NIC eth1 through nmc;
Create a new routing policy table
# nmcli c modify System\ eth1 +ipv4.route-table 101
Configure the routing policy
# ip rule
0:	from all lookup local
32766:	from all lookup main
32767:	from all lookup default
// If no routing policy has been configured before, priority starts to decrement from 32765
# nmcli c modify System\ eth1 +ipv4.routing-rules "priority 32765 from 10.40.54.131 table 101"
# nmcli c show System\ eth1 | grep -E 'ipv4.route-table|ipv4.routing-rules'
ipv4.route-table:                       101
ipv4.routing-rules:                     priority 32765 from 10.40.54.131 table 101
Restart the network service and check the routing policy rules
#nmcli c reload
#nmcli c up System\ eth1
Connection successfully activated (D-Bus active path: /org/freedesktop/NetworkManager/ActiveConnection/...)
#ip rule
...
32765:   from 10.40.54.131 lookup 101
...
The added virtual NIC’s main IP, if bound to an external elastic IP and the firewall rule is open, can ping successfully, indicating the configuration is complete.
Step 3: Configure the Auxiliary IP for eth1
Before configuration, please confirm that the subnet mask of the auxiliary IP is consistent with the main IP;
Replace the IP address with the auxiliary IP to be bound. To configure the auxiliary IP for the default NIC, simply change the NIC name to the bound ethx, and so on.
# nmcli c modify System\ eth1 +ipv4.addresses X.X.X.X(Auxiliary IP)/subnet mask
# nmcli c show System\ eth1 | grep ipv4.addresses
ipv4.addresses:                         10.40.54.131/16, $X.X.X.X(Auxiliary IP)/subnet mask
Configure the routing policy for the auxiliary IP on eth1 through nmcli
# nmcli c modify System\ eth1 +ipv4.routing-rules "priority 32764 from X.X.X.X(Auxiliary IP) table 101"
# nmcli c show System\ eth1 | grep ipv4.routing-rules
ipv4.routing-rules:                     priority 32765 from 10.40.54.131 table 101, priority 32764 from X.X.X.X(Auxiliary IP) table 101
Restart the network service and check the routing policy rules
# nmcli c reload
# nmcli c up System\ eth1

#ip rule
...
32764:   from X.X.X.X(Auxiliary IP) lookup 101
32765:   from 10.40.54.131 lookup 101
...
The added virtual NIC’s main IP and auxiliary IP can both ping successfully, indicating the configuration is complete.
Windows Configuration Guide
The standard image has DHCP enabled by default, so no additional configuration is needed.
If DHCP is disabled, you can manually configure it as follows:
- Enter the “Network and Sharing Center” in the Windows system. If the system has DHCP enabled, you can see the bound NIC.
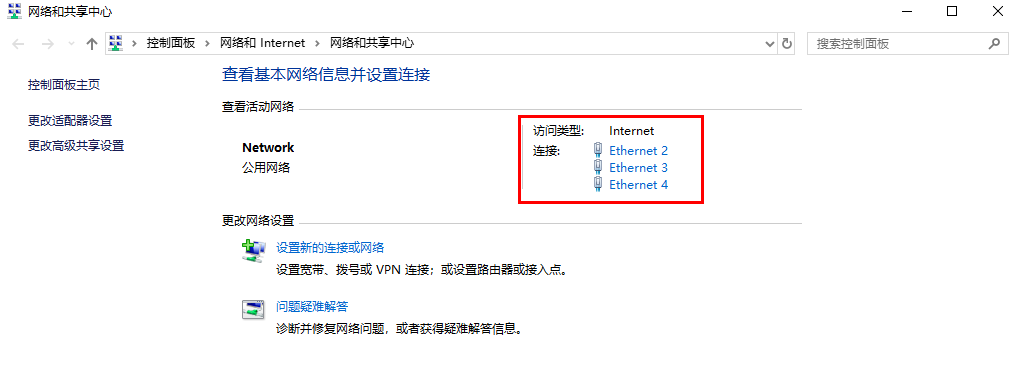
- Click on the network, then click “Properties” - double-click “Internet Protocol Version 4 (TCP/IPv4)” - select “Use the following IP address”, and fill in the IP and DNS information according to the actual configuration.
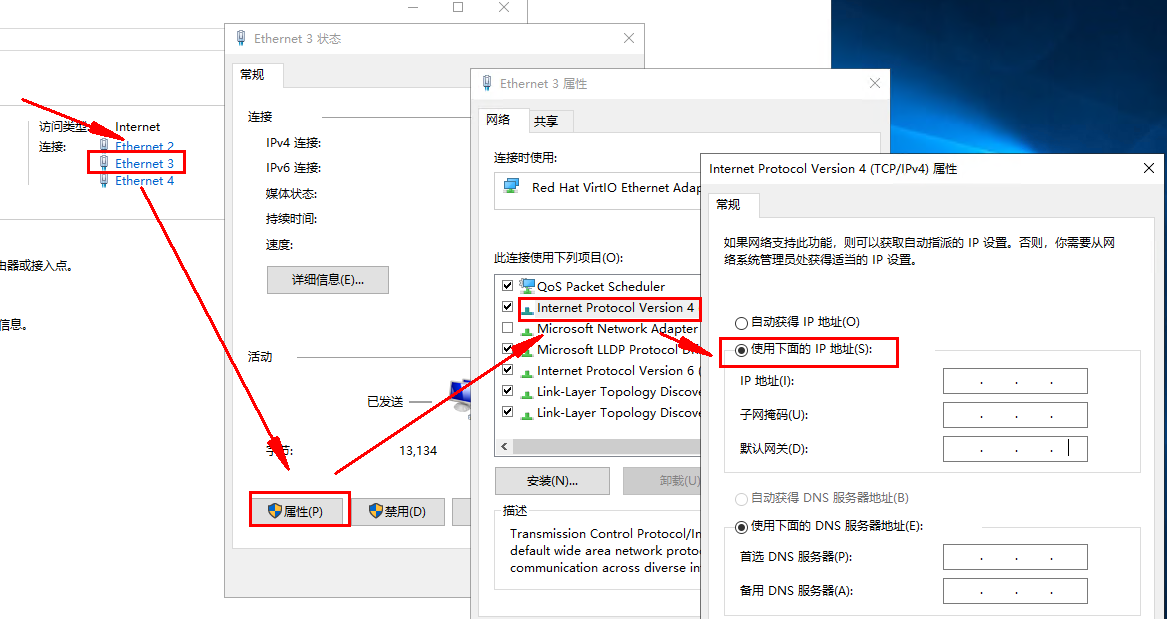
- Verification: Use a machine in the same VPC to ping the internal IP address of the bound custom NIC. If it can ping through, the configuration is complete.
Ubuntu 20.04 Configuration Guide
1. Disable RPF and restart the network service
Temporarily disable
echo 0 > /proc/sys/net/ipv4/conf/all/rp_filter

sudo apt-get install network-manager (Install the network-manager tool)

sudo service network-manager restart
Permanently disable
Edit the /etc/sysctl.conf file, change the value of net.ipv4.conf.all.rp_filter to 0, then restart the server
2. Configure the newly bound virtual NIC
Assuming the newly bound NIC is eth1, the following operations are based on this
sudo ifconfig eth1 up

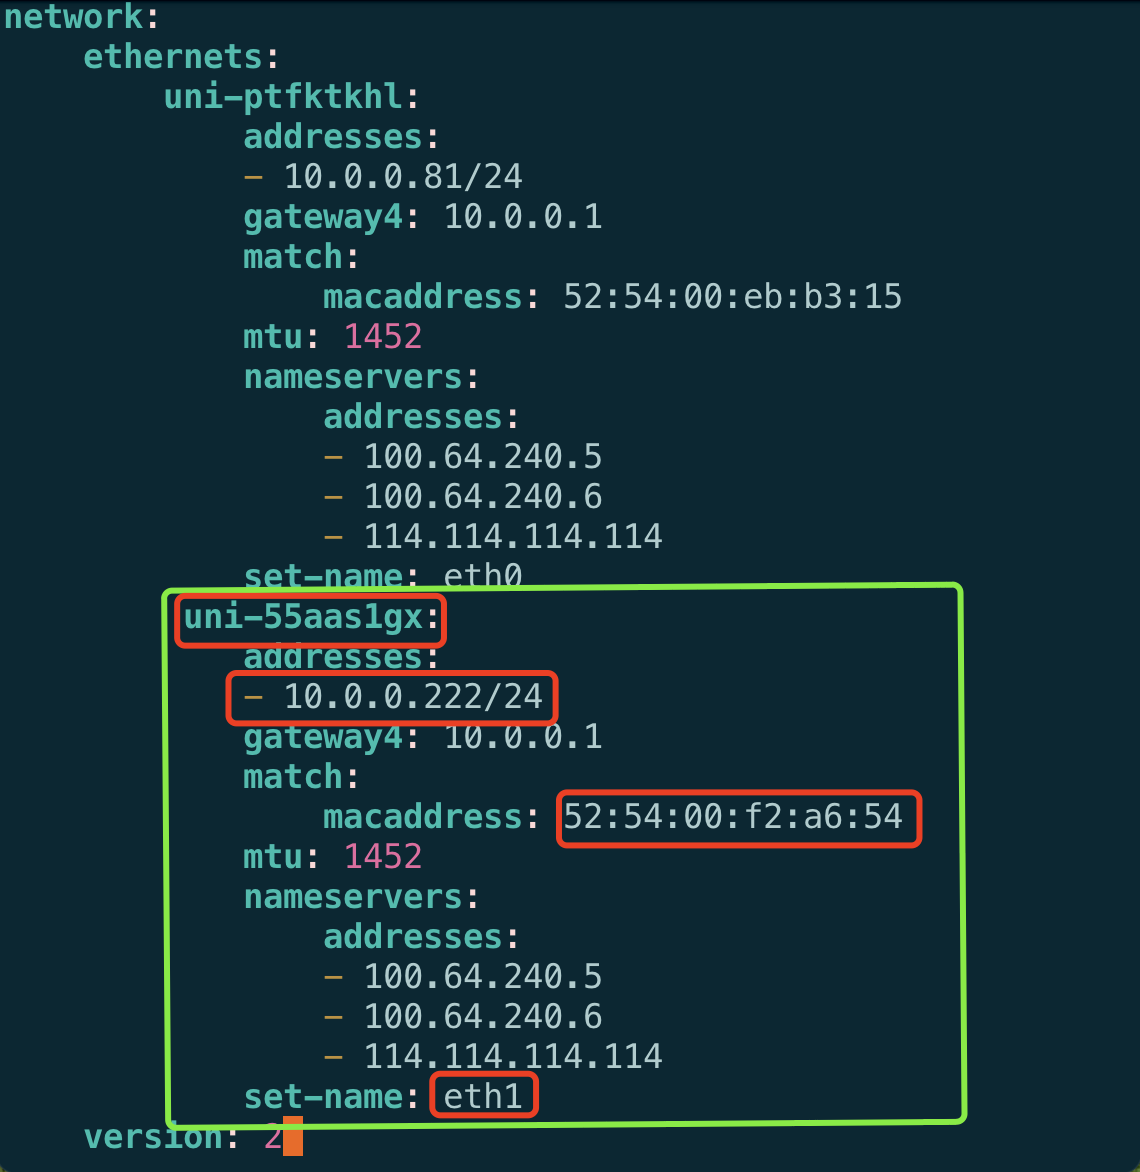
Edit /etc/netplan/50-cloud-init.yaml

vim /etc/netplan/50-cloud-init.yaml, the configuration example for the newly bound NIC is as follows, modify according to the actual situation

sudo netplan apply
3. Temporary configuration of routing policy (This configuration will be lost upon reboot)
 ip route add default via 10.0.0.1 dev eth1 table 2000

 ip rule add from 10.0.0.222 table 2000
4. Temporary configuration of auxiliary IP (Configure when using auxiliary IP)
1) Bind the auxiliary IP to the corresponding NIC (in this case, eth1), temporary configuration (this configuration will be lost upon reboot)
 ip addr add 10.0.0.101/24 dev eth1 #Set when using auxiliary IP

 ip addr add 10.0.0.102/24 dev eth1 #Set when using auxiliary IP
2) Configure the routing policy for the auxiliary IP, temporary configuration (this configuration will be lost upon reboot)
 ip rule add from 10.0.0.101 table 2000

 ip rule add from 10.0.0.102 table 2000
5. Permanent configuration of routing policy and auxiliary IP
Implement using rc.local, using ubuntu20.04 as an example, the following configuration is for using auxiliary IPs simultaneously. If not using auxiliary IPs, omit the related configurations.
1) sudo vim /lib/systemd/system/rc-local.service
2) Add the following at the end of the file
[Install]
WantedBy=multi-user.target
Alias=rc-local.service
3) Create rc.local
sudo touch /etc/rc.local
4) Edit rc.local
#!/bin/sh
ip route add default via 10.0.0.1 dev eth1 table 2000  #Configure routing policy

ip rule add from 10.0.0.222 table 2000 #Virtual NIC main IP

ip addr add 10.0.0.101/24 dev eth1 #Add auxiliary IP, configure when using auxiliary IP

ip addr add 10.0.0.102/24 dev eth1 #Add auxiliary IP, configure when using auxiliary IP

ip rule add from 10.0.0.101 table 2000 #Configure routing policy for auxiliary IP, configure when using auxiliary IP

ip rule add from 10.0.0.102 table 2000 #Configure routing policy for auxiliary IP, configure when using auxiliary IP

exit 0
5) Change permissions
sudo chmod +x /etc/rc.local
6) Create a symbolic link
ln -s /lib/systemd/system/rc.local.service /etc/systemd/system/
7) Check the Routing Policy Configuration
Reboot the host
root@xx-xx-xx-xx:/home/ubuntu# ip route show table 2000
Output:
default via 10.0.0.1 dev eth1
root@xx-xx-xx-xx:/home/ubuntu# ip rule show
Output:
0:   from all lookup local
32760: from 10.0.0.101 lookup 2000
32761: from 10.0.0.102 lookup 2000
32762: from 10.0.0.222 lookup 2000
32763: from all lookup main
32764: from all lookup default
If both the main IP and auxiliary IP of the added virtual NIC can ping through, the configuration is complete.
6. Configuration Steps for Policy Routing After Binding Auxiliary IP to EIP
Create a new policy routing table:
echo '2001 ROUTER_IP_T' >> /etc/iproute2/rt_tables
Configure policy matching rules:
ip rule add from X.X.X.X (Auxiliary IP) table ROUTER_IP_T
ip rule add from X.X.X.X (Auxiliary IP) table ROUTER_IP_T
Configure policy routing:
ip route add default via X.X.X.X (Gateway IP) dev eth1 table ROUTER_IP_T
Common Issues FAQ
1. Why are multiple configured NICs not working?
Generally, this issue is due to the NIC configuration. You can check as follows:
-
Check whether the NIC is bound to the cloud host and whether the NIC is configured on the cloud host.
-
Check whether RPF is disabled.
-
Check whether the NIC routing is correct.
If the above configurations are checked and still do not work, you can provide:
- The five-tuple from the source IP to the destination IP and information for each hop.
- The binding relationship between the NIC and the host.
- The subnet information of the resource.
- The routing configuration of the NIC.
2. The cloud host did not enable the NIC function at creation, but I want to enable a second NIC. How can I do this?
If the NIC function was not enabled when the cloud host was created, it cannot be enabled later. It is recommended to create a new host to use the NIC function.